Table of Contents
Advertisement
Quick Links
- 1 Temperature and Humidity Sensor Specifications
- 2 Temperature and Humidity Sensor Device Features
- 3 Temperature and Humidity Sensor Service Buttons
- 4 Sensor Led Indicators
- 5 Manually Initiate a Sensor to Check-In to Onevue
- 6 Step 1: Verify Sensor Configuration
- 7 Step 4: Establish Connections
- 8 Technical Support
- Download this manual
Advertisement
Table of Contents

Summary of Contents for Primex OneVue Sense A100
- Page 1 OneVue™ Sense Temperature and Humidity Sensor Installation Guide Product Models: A100 09/25/19...
- Page 2 The Bluetooth® word mark and logos are registered trademarks owned by the Bluetooth SIG, Inc. and any use of such marks by Primex, Inc. is under license. Primex is the leading provider of solutions to automate and maintain facility compliance, increase efficiencies, enhance safety and reduce risk for enterprise organizations in the healthcare, education, manufacturing and government vertical markets. Primex delivers platforms that utilize a facility’s existing network infrastructure to automate, monitor, document and report essential activities...
-
Page 3: Table Of Contents
Step 6: Verify OneVue settings ....................13 OneVue Network Requirements ....................... 15 Network communication protocols ................... 15 Safety, Regulatory, Warranty ......................17 SAFETY PRECAUTIONS ......................17 REGULATORY APPROVALS ..................... 17 PRIMEX ONE YEAR LIMITED WARRANTY ................... 19 Technical Support ......................... 20 Page 3... -
Page 4: Temperature And Humidity Sensor Specifications
Temperature and Humidity Sensor specifications Ambient 32 °F to 122 °F (0 °C - 50 °C) Temperature Range: Ambient ± 1.0 °F (±-0.5 °C) between 32 °F and 122 °F (0 °C and 50 °C) Temperature Accuracy Humidity Range 0% to 100% RH Humidity Accuracy ±... -
Page 5: Temperature And Humidity Sensor Device Features
Certifications FDA registered, 21 CFR Part 11 compliant FCC, CE, and IC compliant Warranty 1 Year Cleaning recommendations • Clean by spraying cleaning fluid on a rag then wiping unit down to avoid getting moisture in housing. Moisture will spike the %RH reading and its readings will return to normal after the moisture evaporates. •... -
Page 6: Temperature And Humidity Sensor Service Buttons
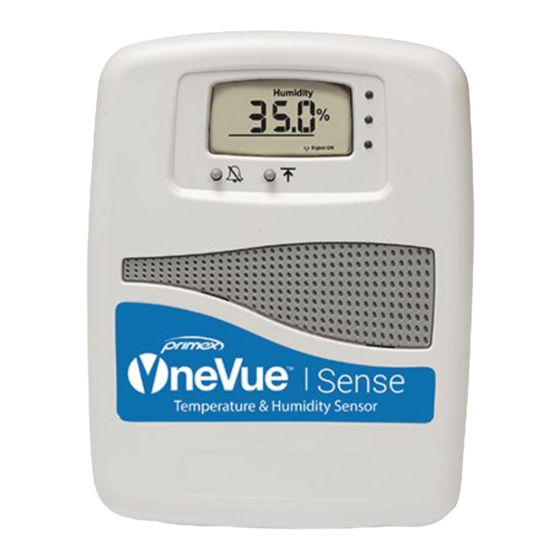
Segment Description Temperature (°F or The last sampled ambient temperature reading in either Fahrenheit or Celsius. A sample reading it taken every 60 seconds. °C) The display units (°F or °C) is configured within the sensor profile in your OneVue account. Humidity (%RH) The last sampled relative humidity reading;... -
Page 7: Sensor Led Indicators
Sensor audio alert Primex sensors are equipped with an audio alert that is activated during a reading Alarm state (Out of Range, Past Alarm Delay status). The audio alert is activated when a reading is out of range and the time period it has been out of range has exceeded the time period set in its Alarm Delay. -
Page 8: Sensor Power Input
OneVue and any pending updates are downloaded to the sensor. A Primex sensor checks-in to your OneVue account at regular intervals, per the frequency set in its Check-In Interval setting. The Logging Interval and Check-In Interval settings are configured from the sensor's gateway profile. - Page 9 • If you hear 1 beep followed by 2 beeps: The device could not connect to OneVue. Log in to OneVue and verify its last check-in. If in an Alarm state with an Unresponsive status, contact your Primex support team.
-
Page 10: Install Temperature And Humidity Sensor
Primex 3.0v Lithium/Iron Disulfide Battery Pack (contains 2 AA 1.5V Energizer® Ultimate Lithium batteries) USB configuration cable; supplied with a device order only. For use with the Primex Device Configuration software to manually configure a device or troubleshoot device network connectivity issues. It's recommended to save this cable for future use. -
Page 11: Step 1: Verify Sensor Configuration
1. Remove device cover; simultaneously press the two tabs located on the top side of the device (A). 2. Insert the 3.0v Primex Lithium/Iron Disulfide Battery Pack or two 1.5v Lithium AA batteries. Follow the symbols showing the correct way to position the positive (+) and negative (-) ends of the battery pack. -
Page 12: Step 3: Mount Sensor
Step 3: Mount sensor Mount sensor using either of the methods below. Method Steps Wall mount Key-hole mount (A) Determine the mounting location by referencing the key-hole slot located on the back of the device. Pre-drill mounting hole into the wall surface and insert wall anchor. Insert a wall anchor into mounting hole. -
Page 13: Step 4: Establish Connections
Monitored Asset settings (Go to Monitoring > Monitored Assets) Each Primex sensor device is assigned to a Monitored Asset and its readings or monitored conditions generate the Monitored Asset's current and historical readings. In addition, sensor operating condition data is linked to its assigned Monitored Asset. - Page 14 • Audio Alert (sensor gateway setting) Primex sensors are equipped with an audio alert that is activated during a reading Alarm state (Out of Range, Past Alarm Delay status). The audio alert is activated when a reading is out of range and the time period it has been out of range has exceeded the time period set in its Alarm Delay.
-
Page 15: Onevue Network Requirements
OneVue Network Requirements The information below provides the details required to allow Primex devices equipped with Ethernet, Power over Ethernet (PoE), or Wi-Fi technology to communicate over a facility's network to OneVue. Network communication protocols The OneVue platform is designed, developed, and managed in-house, allowing Primex to control the user experience and provide the highest level of reliability and security. - Page 16 • Port TCP 443: required to be open to allow Hypertext Transfer Protocol over TLS/SSL (HTTPS) communication with OneVue and Wi-Fi, Power over Ethernet (PoE)/Ethernet enabled devices. • Port UDP 123: used by Wi-Fi, Power over Ethernet (PoE)/Ethernet devices to access an external NTP Server. Port is required to be open for use with external Network Time Protocol (NTP) Servers.
-
Page 17: Safety, Regulatory, Warranty
Primex models: Sensors (T101, T102, A120, A100, E121, E122, E123), Bell Controller (E130) FCC Compliance Pursuant to FCC 15.21 of the FCC rules, changes not expressly approved by Primex might cause harmful interference and void the FCC authorization to operate this product. - Page 18 To assure continued appliance, any changes or modifications not expressly approved by the party responsible for compliance could voice the user's authority to operate this equipment. (Example -use only shielded interface cables when connecting to computer or peripheral devices). FCC Warning Any Changes or modifications not expressly approved by the party responsible for compliance could void the user's authority to operate the equipment.
-
Page 19: Primex One Year Limited Warranty
Primex, Inc. warrants this product to be free from defects in materials and workmanship for a standard of one (1) year from the date of purchase. Primex, Inc. will at its sole option, repair or replace any components that fail in normal use. -
Page 20: Technical Support
Ensuring our customers experience excellent service is of utmost importance to Primex. Our network of Certified Sales and Service Partners offer technical support services for Primex products. If you have purchased Primex products or have a service agreement with a Primex Partner, they are your primary contact for all Technical Support inquires.
Need help?
Do you have a question about the OneVue Sense A100 and is the answer not in the manual?
Questions and answers