
Summary of Contents for Soptop JS Series
- Page 1 Manual Balance Series FA Electronic Balance(Electronic Analytical Balance) FB Electronic Balance(Auto Internal Calibration Electronic Analytical Balance) JA Electronic Balance(Electronic Precision Balance) FA/FB/JA Series...
- Page 2 Quick Use Guide Hold on to click the button , until appear required hints Power On Percentage Tare 开 关 Max: Max: Max: 1 00% 置 零 Max : 100% Max: 100% 去 皮 10 0% Max : 100% Max: Max: 功...
-
Page 3: Table Of Contents
CONTENTS BALANCE SERIES INTRODUCTION ...........................4 1.1 I ..............................5 NTRODUCTION ............................6 ALANCE TRUCTURE 1.3 O ..........................7 PERAING UNCTION NDEX USAGE ...................................8 2.1 P ................................8 ACKAGE 2.2 I ............................9 NSTALL LEVEL DJUSTMENT 2.3 S ............................9 AFETY UIDELINES OWER 2.4 C... - Page 4 4.7 D ............................23 OMMUNICATION CONFIGURING BALANCE ............................23 5.1 O ..........................23 PERATING THE ONFIGURING (* ) ...................24 5.2 B ALANCE UNCTION ETTING MEASN FACTORY SET 5.3 B ........................25 ALANCE ETTING UNCATION XPLAIN 5.4 B ........................25 ALANCE ETTING FOR UICK EIGHING 5.5 B ......................25 ALANCE...
-
Page 5: Balance Series Introduction
2. FB series internal calibration balance Readability: 0.1/1mg 3. JA series electronic precision balance Readability: 1mg 4. JS series density balance Readability: 0.1mg/1mg The basic function of four series balance is almost same; expect special function (such as density measurement). Detail as follow:... -
Page 6: Balance Structure
1.2 Balance Structure 1)Operating Key 2)Display Screen 3)Unlocked pen for glass doors 4)Windbreak 5)Handing ring for hook (In the bottom of balance) 6)Leveling foot 7)Windproof cover 8)Lock for glass 9)Weighting pan 10)Level indicator 11)RS232 port 12)USB port(optional) 13)Power adapter socket 1) Operating Key 2) Display Screen 3) Unlocked pen for glass doors... -
Page 7: Operaing Key Function Index
1.3 Operating Key Function Index The balance have two operating methods:weighing mode and function mode. According to the choice of operating mode and the length of pressing key. It has different meaning. Operating key in weighing mode Press key for short time Press key for long time Weighing Mode ON (Shutdown State)... -
Page 8: Usage
2 USAGE 2.1 Package List FA、FB、JA Balance Standard Configuration: ♦ Balance 1 pc ♦ AC Power 1 pc ♦ Pan 1 pc ♦ Windbreak 1 pc ♦ Calibration weight 1 pc(Except internal calibration balance) ♦ Manual 1 pc ♦ Certificate of quality 1 pc ♦... -
Page 9: Install, Level Adjustment
Different model balance has different calibration weight, please see parameter list at part six. Please keep packing materials properly for transport 2.2 Install, level Adjustment Best placed place For high resolution analytical and precise balance, the right placed place is the key for accurately weighing. So please ensure that: ·Stable and no vibration position, as far as possible be level ·Avoid direct sunlight... -
Page 10: Calibration
achieve the working temperature, in order to obtain the accurate resultes. 2.4 Calibration In order to obtain the accurate resultes, it is need to calibration according to the local acceleration of gravity. Necessary situations to calibrate the balance: ·Before the first measurement ·After weighing for a period ·Weighing location changed Should start the balance for 60 minutes before calibration to achieve the working temperature, in order to obtain... -
Page 11: Weighing
3 WEIGHING 3.1 Power On/Off Power On 开 关 ON/OFF →Press Max: A self-test will be performed, and then return to zero, now it can be used. 100% Max: 100% Max: Power Off 100% ON/OFF →Press for a while,then display screen power off. Max: 开... -
Page 12: Zero
If remove the container from balance, the data will be negative. The data will keep until power off or press Tare/ Notice: This function can not be used under zero or above the maximum weighing. 3.4 Zero Press , balance return to zero. Max: ZERO/... -
Page 13: Function Menu Operation
Into the function menu: Press Menu Navigation: Press to switch menu items. MODE/ Exit menu: Press for long time to return weighing mode, or press for short time to ZERO/ ZERO/ return to last menu. 4.2 Function Menu Operation Enter the function mode. Max: 功... -
Page 14: Basic Weighing Operation
Return Max: 零 置 ZERO/ Press for short time to return last menu. 100% 4.3 Basic Weighing Operation 1、 Basic Weighing ZERO/ ,to make the balance return to zero, the balance Press Max: shows” ”, put the sample on the weighing pan. When it is stable, 100% read the data. -
Page 15: Function Weighing Operation
ounces and carat. Press to shift the units. Their relationship as follows Pound 1P=453.59237g Gold Ounces 1oz.g=31.1034768g Ounces 1oz=28.349523125 g Carat 1ct=0.2g 4.4 Function Weighing Operation MODE/ Press to switch piece count, percentage and system. 1、 Piece Count The reference coefficient could be chose from 5pcs, 10pcs, 20pcs, 50pcs and 100pcs. The bigger the coefficient is, the higher precision the result is. -
Page 16: Weighing In Percent
Switching between piece and weight reading · Add sample on the container, shows piece count · Press TARE/ , shows weight. · Press again,return to showing piece. TARE/ 100% 2、Weighing in Percent Steps: ·Put container on the balance. (Quit this step if no container is 100% needed.) 100%... -
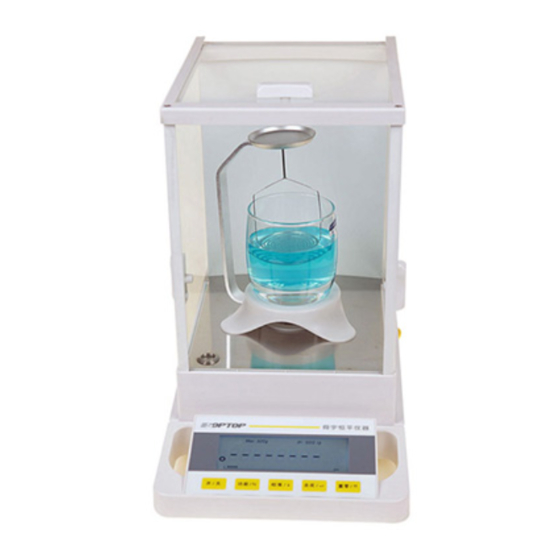
Page 17: Density Weighing ( Only For Js Series )
4.5 Density Weighing*(The function is just for JS series) 1、Density device installation Adjust two level adjusting foots. 秤盘 吊篮 The fixed ring is mounted to the table top. Install the C-Style on the core of weighting pan, and it could turn agilely. -
Page 18: 2、Density Mode Select
on the edge of fixed circle. Level rotate and the shelve table do not meet the C-style bracket. Put arched glass on the shelve table. Then put the testing shelf on the C-style bracket. 2. Density Mode Select Long press into the mode menu (g/cm ). -
Page 19: 3、Standard Material Select
3. Standard Material Select When the material is soluble in water or the density of material is close to the density of water, user could choose appropriate standard media to measure. The system has set eight kinds of solid density and eight kinds of liquid density for chosen, also the system store the last choose, avoid repetitive operation. - Page 20 5. Short press , return to the step one. 6. In the process of measurement, press , to return to the step one directly. 2)Liquid Density Measure 1. Balance display , and remove the object on the weighing pan and basket, then short press 2.
- Page 21 6)Example----Solid Density Measure (Example for JA3003J) 1. Start the Balance and warm-up. Then install the density device. 2. Long press , enter the mode of switching –mode, short press . Short press enter the mode density of solid. 3. Short press to start measure.
-
Page 22: System
1. Start the Balance and warm-up. Then install the density device. 2. Long press , enter the mode of switching –mode, short press enter . Short press enter the mode of density Short press to into the . Press enter the density of liquid. -
Page 23: Date Communication
press key shortly to choose. Press to switch after enter system. 4.7 Date Communication CAL/ Press , could output the current reading of weight from RS232C port. There is another way to output reading date, shown at part seven. CONFIGURING BALANCE 5.1 Operating the Configuring Keys MODE/... -
Page 24: Balance Function Setting List(* Measn Factory Set
5.2 Balance Function Setting List(* measn factory set) Page Line Word Function Optional Very stable Adapting the balance to ambient stable conditions Unstable Very unstable 0.25 digit 0.5 digit 1 digit 2 digit Ambient conditions Stability range 4 digit 8 digit 16 digit 32 digit 64 digit... -
Page 25: Balance Setting Funcation Explain
38400 57600 115200 Data Bit Stop Bit 无 Parity Even Retention for 1 Retention for 0 Version Linear correction Recovery factory set 5.3 Balance Setting Funcation Explain 【Adapting the balance to ambient conditions】 : Room to place the balance uses ordinary air-condition, generally select C113. -
Page 26: Recover Factory Setting
TARE/ “ ”flickering means that there is nothing on the weighing pan. Press shortly. When send out voice of “du” and stop flickering, it is means finishing corretion. Then the balance auto turn to the next correcting point “ ” , it need to add 50g weight. Then press shortly to ensure. - Page 27 ·There is no vibration, air and magnetic to effect measurement. ·The preheating is at least 45 minutes, 1 hours is more better. Parameter List series FA1204 FA2204 0.0001g 0.0001g Actual division value(d) 0.001g 0.001g Verification scale interval(g) 120g 220g Weighing Capacity(Max) 0.0001g 0.0001g Repeatability(s)...
- Page 28 FB124 FB224 FB223 FB323 FB423 Actual division value(g) 0.0001 0.0001 0.001 0.001 0.001 Weighing Capacity(g) Repeatability(g) 0.0001 0.0001 0.001 0.001 0.001 Maximum Permissible Error(MPE) GB/T26497-2011 Calibraion Weight(g) Type Standard Dimension(W/D/H) (mm) 365×223×338 Packing Measurement(W/D/H) (mm) 500×310×450 φ90 Pan Size(mm) 150×165×200 Effective height above pan(mm)...
-
Page 29: Rs232 Port
6.2 RS232 Port Each balance can be connected to equipment through RS232. ( For example: RS232 series printer or Computer with 9 needles). Connect to printer, parameter setting: TARE/ C2 2×、C2 3×、C2 4×、C2 5× then press shortly. - Page 30 6.3 Figure Dimension Balance...
-
Page 31: Appendix
7 APPENDIX 7.1 RS232 Port Date Communication Connect to microcomputer setting as follow: Microcomputer: (9 needle hole)——Balance(9 needle hole) 2(SI)——3(SO) 5(GND)——5(GND) Port baud: 9600bps。 Data format: 10 bit Start bit:(0) Data bit: 8(ASCII code,low in the former) Stop bit(1) ... -
Page 32: Failure Information And Solutions
3~11 weighing area,same to the balance. The byte no showing is vacant code. 13~14 unit area,may be not same to the balance. Output Balance display g(lowcase) vacant code o(lowcase) z(lowcase) oz.g o(lowcase) g(lowcase) c(lowcase) t(lowcase) p(lowcase) vacant code p(lowcase) s(lowcase) vacant code 7.2 Failure Information and Solutions Recovery Processing:Please contact your sales department or us if your balance works wrongly. -
Page 33: Maintenance And Cleaning
please re-calibrate your balance. Weight is too light: b. ·The weighing pan is not in place. ·Check below the weighing pan, see if it is touching any objects. Display over 9999999. Display capacity exceeded . c. • If occurred at piece count, unload the balance ( disappear ), re-select the samples. -
Page 34: Density Parameter Table
Cleaning Please use a soft and non-fluffy cloth to clean the figure and pa. If necessary, can use neuter cleaner. Explain It is recommended that clean the pan and workbench after weighing chemicals. 7.4 Density Parameter Table Table 1(Sample size table) Density effective number of three digital Density effective number of three digital (Repeatability≤±0.0001g/cm3)... - Page 35 0.70 0.980 0.980 0.0980 0.0980 0.80 1.280 1.280 0.1280 0.1280 0.90 1.620 1.620 0.1620 0.1620 1.00 2.000 2.000 0.2000 0.2000 2.00 8.000 8.000 0.8000 0.8000 3.00 18.000 18.000 1.8000 1.8000 4.00 32.000 32.000 3.2000 3.2000 5.00 50.000 50.000 5.0000 5.0000 6.00 72.000 72.000...
- Page 36 Table 2 (Commonly used material density table) Material Density Material Density Construction Steel 7.85 Interleaving Paper Cast Steel Fiber Paperboard 1.1~1.4 Grey Cast Steel 6.8~7.2 Waterproof Paper 1.0~1.1 High-Quality Cast Iron 7.0~7.6 Felt 0.24~0.38 Malleable Cast Iron 7.2~7.4 Rubber 1.3~1.8 Hard Alloy (Tungsten Alloy) 13.9~14.9 Cork...
- Page 37 Tungsten Carbide 9.5~12.2 Mica 2.8~3.2 (Titanium Alloy) Aluminum 2.77 Amino Plastic 1.45~1.55 Pressure Processing 2.67~2.8 Asbestos Cloth Plastic Aluminum Alloy Foundry Aluminum Alloy 2.6~2.85 Asbestos Screen Plastic Babbitt Metal 7.5~10.5 Fibre Resin 1.35~1.45 Red Copper 8.89 Paper Fillin Plastic 1.4~1.7 Pressure Processing with 8.4~8.85 Fabric Bakelite...
Need help?
Do you have a question about the JS Series and is the answer not in the manual?
Questions and answers