
Summary of Contents for American Printing House for the Blind Jupiter Portable Magnifier
- Page 1 Jupiter Portable Magnifier ™ User Manual AMERICAN PRINTING HOUSE FOR THE BLIND American Printing House for the Blind...
- Page 2 Copyright © 2019 American Printing House for the Blind. All rights reserved. No part of this publication may be reproduced or distributed in any form or by any means, or stored in a database or retrieval system, without prior written permission.
-
Page 3: Table Of Contents
Contents A. Precautions ................. pages 4 - 5 B. Package ..................page 6 C. Instructions Before Use .............page 7 D. Opening the Jupiter ..............page 8 E. Closing the Jupiter ..............page 9 F. Camera Position ..............page 10 G. Configuration ..............pages 11 - 18 H. -
Page 4: Precautions
A. Precautions Please read this manual carefully to ensure safe and proper use of the product. ! Important ! • Negligent use or misuse of the product may cause a fire, personal injury, or serious damage. To prevent electric shock or fire: ͳ... - Page 5 A. Precautions • After six (6) months usage, the lifespan of the battery may be shortened. • Keep the product out of direct sunlight and extreme temperatures, as the display may not work properly. ͳ The recommended operating temperature is between 0 ~ 35 oC (32 ~ 95 oF)
-
Page 6: Package
B. Package Thank you for choosing Jupiter Portable Magnifier™! Please ensure the following items are in the Jupiter package. 1. Jupiter Portable Magnifier™ 2. Power adapter USER MANUAL 3. Carrying pouch 4. User Manual 5. Microfiber cloth for clearing the display... -
Page 7: Instructions Before Use
C. Instructions Before Use • The battery must be fully charged prior to the initial use. Please connect the supplied power adapter to the DC input jack to charge the battery. • Remove the LCD protection film before using the unit. •... -
Page 8: Opening The Jupiter
D. Opening the Jupiter 1. Place the folded Jupiter on a stable surface such as a table. 2. Press on the base plate with one hand, while grasping the top of the body frame with the other. 3. Lift the arm until it locks in place. 4. -
Page 9: Closing The Jupiter
E. Closing the Jupiter 1. Put both hands on the left and right sides of the LCD monitor. 2. To close the Jupiter, push down the LCD monitor using both hands. 3. Push the LCD monitor toward the main body frame. 4. -
Page 10: Camera Position
F. Camera Position You can switch between modes by rotating/adjusting the camera pointer (camera positioning wheel). 1. Reading mode (downward) 2. Distance-view mode (front-facing) 3. Self-view mode (mirror mode) -
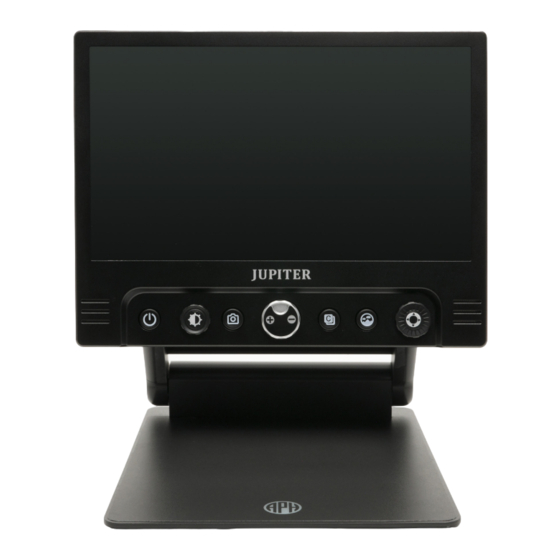
Page 11: Configuration
G. Configuration Hardware Description 1. LCD screen 5. Zoom wheel 2. Image optimizer wheel 6. Color mode button (adjusting brightness) 7. Natural color button 3. Power on/off button 8. Super function key (A Jog Key) 4. Snapshot button... - Page 12 G. Configuration, Cont’d. Hardware Description 9. Camera 10. Camera location adjuster wheel 11. Close up lens 12. LED lights 13. DC jack...
- Page 13 G. Configuration, Cont’d. External Connections 1. HDMI OUT 2. Test PORT (USB C type connector)
- Page 14 G. Configuration, Cont’d. 1. Power on/off button • Power on/off: Press the button for 2 seconds. 2. Image optimizer wheel • Provides two different functions, depending on the setting: ͳ Natural color mode: Turn the knob to adjust brightness level of the display.
- Page 15 G. Configuration, Cont’d. 3. Snap shot button Briefly press the button and the image on the screen will freeze. • You can then zoom in/out on the still image and adjust color and screen brightness. • Press the button again to return to live mode. •...
- Page 16 G. Configuration, Cont’d. 5. Color mode button The image on the screen can be viewed in eight (8) color modes • Natural color mode ABC 123 • White text on black background ABC 123 • Black text on white background ABC 123 •...
- Page 17 G. Configuration, Cont’d. 8. LCD screen 9. Camera • Be careful not to allow foreign material to adhere to camera lens. • If any foreign material is on the lens, wipe it off with the provided microfiber cloth. 10. Camera location adjuster wheel Adjust the direction of the camera by using the wheel.
- Page 18 G. Configuration, Cont’d. 11. Conversion lens Open the conversion lens for the distance view mode. 12. LED lights 13. DC jack You can insert the power adapter here to charge the battery.
-
Page 19: Hot Keys & Features
H. Hot Keys & Features 1. Line & Mask Press and hold the Super Function Key (7) to activate Line & Mask. When Line & Mask is active, the direction key and wheel of the Super Function Key (7) works as follows. •... - Page 20 H. Hot Keys & Features, Cont’d. • Wheel : Move the position of the Line & Masks. 1) Counterclockwise 2) Clockwise 2. Battery status • The status of the remaining battery power is not normally displayed. • The battery charging icon when the power adapter is connected will be displayed.
- Page 21 H. Hot Keys & Features, Cont’d. 3. Power saving mode If you leave the unit turned on and unused for 10 minutes, it automatically goes into the Power saving mode. If the unit is left for 3 minutes after entering the Power saving mode, power is automatically switched off.
- Page 22 H. Hot Keys & Features, Cont’d. 5. Self-view mode & Distance-view mode You can change the mode by moving the camera with the Camera location adjuster wheel (13). • Self-view mode (Mirror mode) Use when the direction of the camera lens is facing the user. ͳ...
- Page 23 H. Hot Keys & Features, Cont’d. 6. Natural color & Find Function • Press the Natural color button (6) to view pictures or documents in natural color. • Press and hold the Natural color button (6) to zoom out and display the Find box on the screen to help you locate the object under the camera.
-
Page 24: Technical Specifications
I. Technical Specifications LCD Screen Size 13 inches (338mm), 16:9 wide screen LCD Resolution 1920 x 1080 (Full HD) LCD Rotation angle 180 degree Camera Specifications 1920 x 1080, 60 fps Auto Focus Dimensions Approx. 13 inches (320mm) x 15 inches (373mm) x 17 inches (420mm) (in operation) Approx. - Page 25 I. Technical Specifications Cont’d. This unit is an EMC-registered device. This device bears the CE and FCC, KC approval mark...
Need help?
Do you have a question about the Jupiter Portable Magnifier and is the answer not in the manual?
Questions and answers