Table of Contents
Advertisement
Quick Links
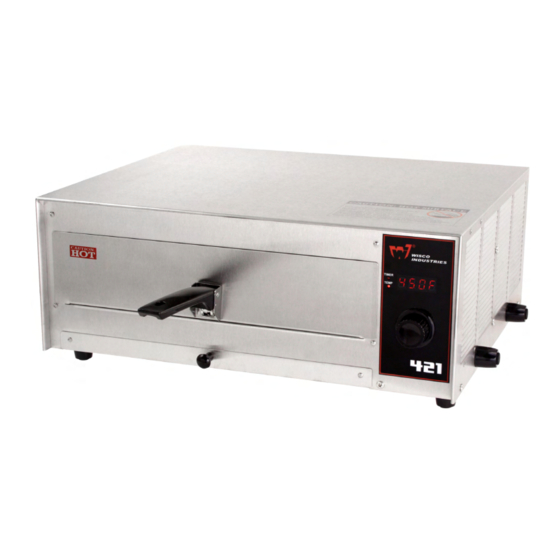
This is not your typical pizza oven. With one simple push, your digital LED display is automatically set
for 10 minutes at 450
to easily set it at what you need with just a turn of the dial. Did we mention it does more than just
pizza? Get creative! You'll be amazed at what you can make in this oven.
FEATURES:
•
Opening: 3" x 13"
•
Removable clean out tray
•
LED Display
•
Adjustable thermostat 150°F–500°F in 25°F
increments
•
30-minute digital display timer
•
Quick one-touch setting of 450°F for 10 minutes
•
Long life calrod heating elements
•
Attractive stainless steel outer housing
•
Flip up handle design for easier storage
• "Formed" tray to prevent food products from
sliding o ffback tray
ADDITIONAL ACCESSORIES AVAILABLE:
• Cookie Pan (#0016555)
• Cooling Rack (#00616CR)
• Parchment Paper: 500 Sheets (#018167-1)
1000 Sheets (#0018167-2)
P .O. Box 10 • Oregon, WI 53575 • Ph: 608.835.3106 • Fx: 608.835.7399 • wiscoind.com • wiscomade.com
°F. Need more or less time? Not a problem! Our new rotary dial design allows you
DELUXE PIZZA
MULTI-PURPOSE OVEN
MODEL 421
ELECTRICAL DATA:
VOLTS:
120
AMPS:
• Best when operated on an individual branch circuit
• 6' power cord length
DIMENSIONS:
• Outside: 18"W × 15"D × 7-3/4"H
• Grill/Rack: 13"W × 13"D
SHIPPING INFORMATION:
•
SHIPPING DIMENSIONS
•
SHIPPING WEIGHT
: 21 lbs.
12.5
WATTS:
1500
:
18"
W ×
21"D × 9"H
FP140166 REV: B
Advertisement
Table of Contents

Related Manuals for Wisco Industries 421


Summary of Contents for Wisco Industries 421
- Page 1 DELUXE PIZZA MULTI-PURPOSE OVEN MODEL 421 This is not your typical pizza oven. With one simple push, your digital LED display is automatically set for 10 minutes at 450 °F. Need more or less time? Not a problem! Our new rotary dial design allows you to easily set it at what you need with just a turn of the dial.
- Page 2 IMPORTANT: Read the following safety and operation instructions to avoid injury and to avoid damage to equipment or property. Plug unit into a properly grounded electrical outlet of the correct voltage, size, and plug configuration for this unit. We recommend usage on an individual branch circuit of at least 15 amps for best results. Failure to do so may result in decreased performance of the oven.
- Page 3 OPERATION: Turning the Oven ON - Push the control knob to turn the oven on. The prompting buzzer make a sound. Quick One-touch setting with Temperature Memory - The oven will automatically start at the last used temperature setting for 10 minutes if the control knob is not turned or pushed within 5 seconds.
- Page 4 Pizza Oven Handle Assembly Instructions If your grill differs in size or shape, the assembly process will remain the same. Slide the Grill Front over the Grill Loop allowing it to lay flat Place the Handle Bracket over the Grill Loop Rotate the Grill Front and Handle upright Insert the Screw through the Grill Loop, the Handle Bracket, and the Grill Front...
- Page 7 PARTS LIST: MODEL 421 ITEM # PART # DESCRIPTION 0022901 CONTROL BOARD I013746 CONTROL BOARD DECAL 0022903 CONTROL KNOB HOUSING 0022905 CONTROL KNOB RA441N CLEAN OUT TRAY 0023019 BAG OF PARTS (Incl. handle, nut, screw & clean out tray knob & screw)
Need help?
Do you have a question about the 421 and is the answer not in the manual?
Questions and answers