Table of Contents
Advertisement
Available languages
Available languages
MANUEL D'UTILISATION
INSTRUCTIONS MANUAL
CELLIER À VIN/ CENTRE DE BREUVAGES ENCASTRABLE
BUILT-IN WINE CELLAR & BEVERAGE CENTER
ABC160S
Modèle/Model:
Pour une utilisation optimale de cet appareil ainsi que pour votre sécurité, veuillez lire attentivement les
instructions contenues dans ce manuel avant de faire fonctionner cet appareil.
To ensure proper use of this appliance and your safety, please read the following instructions
completely before operating this appliance.
1
Advertisement
Chapters
Table of Contents

Related Manuals for AVG PRYMO ABC160S


Summary of Contents for AVG PRYMO ABC160S
- Page 1 MANUEL D’UTILISATION INSTRUCTIONS MANUAL CELLIER À VIN/ CENTRE DE BREUVAGES ENCASTRABLE BUILT-IN WINE CELLAR & BEVERAGE CENTER ABC160S Modèle/Model: Pour une utilisation optimale de cet appareil ainsi que pour votre sécurité, veuillez lire attentivement les instructions contenues dans ce manuel avant de faire fonctionner cet appareil. To ensure proper use of this appliance and your safety, please read the following instructions completely before operating this appliance.
-
Page 2: Table Of Contents
TABLE DES MATIÈRES 1. MESURES DE SÉCURITÉ IMPORTANTES ………………..…....3-4 2. INSTRUCTIONS D’INSTALLATION ………………………………….…. 5-8 Inverser la porte ………………………………………………….….… 7 Installer la poignée ……………………………………………………. 8 3. MODE D’EMPLOI ……………………………………………………….… 9-11 Commandes et réglages de température …….……………..…… 9 Fonctions ………………………………………………………….……. 10 Entreposage …………………………………………………….………... -
Page 3: Mesures De Sécurité Importantes
1. MESURES DE SÉCURITÉ IMPORTANTES VEUILLEZ LIRE TOUTES LES INSTRUCTIONS AVANT D’UTILISER L’APPAREIL. AVERTISSEMENT : CONSIGNES DE SÉCURITÉ IMPORTANTES Pour diminuer le risque d’incendie, d’électrocution ou d’accident pendant l’utilisation de votre appareil, veuillez suivre les mesures de sécurité suivantes PRÉCAUTIONS AVEC LE REFRIGERANT R600a DANGER - RISQUE D’INCENDIE OU D’EXPLOSION. -
Page 4: Mesures De Sécurité Importantes
1. MESURES DE SÉCURITÉ IMPORTANTES (suite) AVERTISSEMENTS ET CONSIGNES DE SÉCURITÉ • Ne pas dépasser la puissance nominale électrique. • L’appareil doit être installé conformément aux codes électriques locaux et nationaux. • Le câble d’alimentation de cet appareil est muni d’un fil et d’un connecteur de mise à la terre. Le connecteur doit être branché... -
Page 5: Instructions D'installation
2. INSTRUCTIONS D’INSTALLATION ATTENTION Si l’appareil est transporté en position horizontale, l’huile du compresseur risque de couler sur le circuit de refroidissement. C’est pourquoi il est nécessaire de laisser l’appareil en position verticale pendant 12 heures avant de le mettre en marche. Cette période permet à l’huile de retourner dans le compresseur. Enlevez l’emballage extérieur,puis le film protecteur en plastique collé... - Page 6 2. INSTRUCTIONS D’INSTALLATION (suite) CONNEXION ÉLECTRIQUE Une alimentation électrique de 115 volts / 60 Hz avec mise à la terre munie d’un fusible ou d’un disjoncteur de 15 ou 20 ampères est requise. Nous recommandons de dédier un circuit exclusivement à l’alimentation de votre appareil.
-
Page 7: Inverser La Porte
2. INSTRUCTIONS D’INSTALLATION (suite) INVERSER LA PORTE ATTENTION : Nous recommandons que cette opération soit réalisée par deux (2) personnes. Enlevez les trois vis de la charnière Ouvrez la porte à 90 degré, enlevez les vis Open the door to a 90 degree angle, take supérieure droite (#4) et dégagez la (2) de l'axe inférieur de la porte (#2) et Take out the 3 hinge screws from the top... -
Page 8: Installer La Poignée
2. INSTRUCTIONS D’INSTALLATION (suite) INSTALLER LA POIGNÉE Pour installer la poignée, veuillez suivre les instructions ci-dessous : 1. Tirez le joint d’étanchéité de la porte (#1), puis le dégager partiellement, tel qu’indiqué à l’illustration # 1. Le joint peut être enlevé facilement, à la main; aucun outil n'est nécessaire. 2. -
Page 9: Mode D'emploi
3. MODE D’EMPLOI COMMANDES ET RÉGLAGES DE TEMPÉRATURE TABLEAU DES COMMANDES Bouton « »: Pour mettre en marche ‘ON’ et arrêter ‘OFF’ l’appareil appuyez sur ce bouton pendant environ trois (3) secondes. Bouton « » (Bouton d’économie d’énergie): Appuyez sur ce bouton pendant trois (3) secondes pour activer ou désactiver la fonction d’économie d’énergie. -
Page 10: Fonctions
3. MODE D’EMPLOI (suite) FONCTIONS MÉMORISATION DE LA TEMPÉRATURE En cas de panne de courant, l’appareil conserve en mémoire le réglage de température. Lorsque le courant revient, l’appareil se remettra en marche et le même réglage de température sera appliqué. ALARME DE TEMPÉRATURE Si la température à... -
Page 11: Entreposage
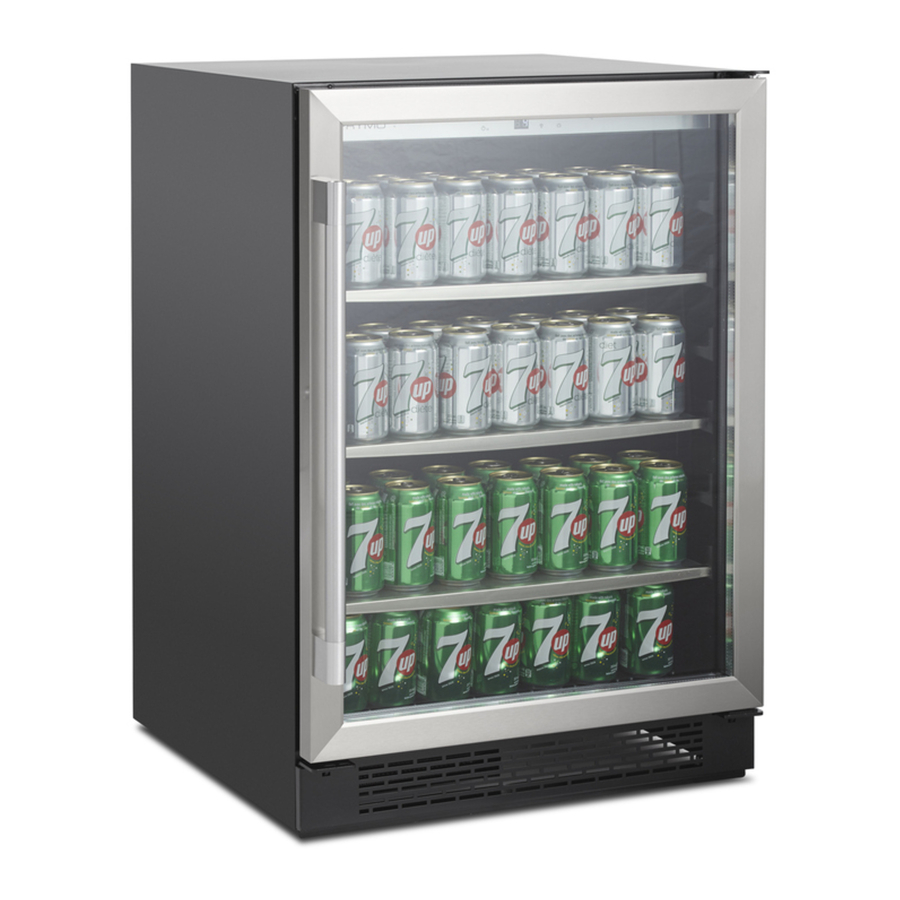
3. MODE D’EMPLOI (suite) ENTREPOSAGE Pour les canettes: Trois (3) tablettes de verre permettent de ranger 152 canettes. Pour le vin: Les bouteilles de vin varient en taille et en dimension. Ainsi, la capacité de cette unité est basée sur un format de bouteille standard de 750 ml, type «Bordeaux» (voir format/dimensions ci-dessous). La capacité... - Page 12 4. ENTRETIEN NETTOYAGE DE L’APPAREIL Coupez le courant, débranchez l’appareil et videz le contenu incluant les tablettes. Lavez les surfaces intérieures avec de l’eau chaude et une solution au bicarbonate de soude (2 cuillères à soupe pour ¼ d’eau). ...
- Page 13 5. GARANTIE LIMITÉE AVG USAGE RESIDENTIEL INFORMATION SUR LA GARANTIE DES PIÈCES ET DE LA MAIN-D’OEUVRE Les celliers AVANTGARDE sont fabriqués avec l’optique d’offrir une valeur exceptionnelle, et en visant votre entière satisfaction pour chacun de nos produits. Ainsi, tous les celliers AVANTGARDE sont couverts par une garantie limitée de deux (2) ans, valable sur les pièces et la main-d’œuvre.
-
Page 14: Garantie Limitée
5. GARANTIE LIMITÉE AVG (suite) RÉCLAMATION COUVERTE PAR LA GARANTIE Toutes les réclamations couvertes par la garantie pour un défaut de main-d’œuvre ou de matériel doivent être soumises directement à la division AGI SERVICE, 2255, boul. Dagenais ouest, Laval, Québec, tel : 450.963.1303 ou 1.888.651.2534. Toutes les réclamations doivent inclure le numéro de modèle de l’unité, le numéro de série de l’unité, une preuve d’achat, la date d’installation, et tous les... -
Page 15: Guide De Dépannage
6. GUIDE DE DÉPANNAGE Vous pouvez résoudre un grand nombre de problèmes courants facilement. Essayez les suggestions ci- dessous avant d’avoir recours à un technicien. PROBLÈME CAUSE POSSIBLE L’appareil n’est pas branché. L’appareil ne fonctionne pas. L’appareil est éteint. Le disjoncteur ou le fusible du circuit est sauté. Vérifiez le réglage de température. - Page 16 TABLE OF CONTENTS 1. IMPORTANT SAFETY INSTRUCTIONS ..…………………………..... 15-16 2. INSTALLATION INSTRUCTIONS ………………..………………………..… 17-19 Reversing the door ………………………………………....18 Installing the handle …………………………………………………… 19 OPERATING YOUR APPLIANCE ……………………………………………. 19-21 Controls ………………………………………………………………….. 19 Temperature Settings ………………………….…………………..20 Functions ……….……………………………………………………..20 Storage ……………………………………………………………………. 21 CARE AND MAINTENANCE ……………………..………………….……...
-
Page 17: Important Safety Instructions
1. IMPORTANT SAFETY INSTRUCTIONS PLEASE READ ALL INSTRUCTIONS BEFORE USING THE APPLIANCE To reduce the risk of fire, electrical shock, or injury when using WARNING your appliance, follow these basic precautions. WARNING CONCERNING R600 REFRIGERANT DANGER - RISK OF FIRE OR EXPLOSION. FLAMMABLE REFRIGERANT USED. DO NOT PUNCTURE REFRIGERANT TUBING. - Page 18 1. IMPORTANT SAFETY INSTRUCTIONS (continued) WARNING Before the appliance is used, it must be properly positioned and installed as described in this manual. So read the manual carefully. To reduce the risk of fire, electric shock or injury when using the appliance, follow basic precautions.
-
Page 19: Installation Instructions
2. INSTALLATION INSTRUCTIONS Remove the external packaging, remove the protective plastic film from the surface of the appliance and clean the external parts of the appliance with a cleaner designed for this purpose. Do not use steel wool or any coarse agents, which could irreparably damage the surface of the appliance. IMPORTANT This unit can be installed as either built-in or free-standing unit. -
Page 20: Reversing The Door
2. INSTALLATION INSTRUCTIONS (continued) Proper operation of the appliance is guaranteed only if the following conditions are met: The room temperature where the appliance is located conforms to class stated on rating label. Maximum ambient relative humidity: RH75%. ... -
Page 21: Installing The Handle
2. INSTALLATION INSTRUCTIONS (continued) INSTALLING THE HANDLE To install the handle, please follow these instructions: Pull away the door gasket from the area where the handle is to be installed, on the left side, as shown in Fig. 1. The gasket may be easily removed by hand, no tools are required. Align the handle with the screws to be installed. -
Page 22: Temperature Settings
3. OPERATING YOUR APPLIANCE ( CONTINUED WINE STORAGE If you are storing wine for long periods of time, it should be stored at a temperature of between 10° C and 14° C (50° F and 57° F). The following drinking temperatures are recommended for the various types of wine: Red wines: +14°... -
Page 23: Storage
3. OPERATING YOUR APPLIANCE (continued) SHELVES To prevent damaging the doors or gasket seals, open the doors fully when removing the shelves. When removing the shelves out of the rail compartment, you must lift (from the rear) and pull it towards you. -
Page 24: Care And Maintenance
4. CARE AND MAINTENANCE CLEANING YOUR WINE CELLAR Turn off the power, unplug the appliance and remove all items including shelves and rack. Wash the inside surfaces with warm water and baking soda solution. The solution should be about two (2) tablespoons of baking soda with a quart of water. -
Page 25: Limited Warranty
5. AVG’S LIMITED WARRANTY RESIDENTIAL USE PARTS AND LABOR WARRANTY INFORMATION AVANTGARDE Wine cellars and Beverages Centers are manufactured to provide outstanding value and your complete satisfaction is our goal. Therefore, all AVANTGARDE units carry a two (2) year limited warranty on both parts and labor. - Page 26 5. AVG’S LIMITED WARRANTY (continued) NOT COVERED BY THIS WARRANTY AVANTGARDE’s sole obligation under this warranty is limited to either repair or supply replacement parts, and is subject to the additional limitations below. This warranty neither assumes nor authorizes any person to assume obligations other than those expressly covered by this warranty.
-
Page 27: Troubleshooting Guide
6. TROUBLESHOOTING GUIDE You can solve many common appliance problems easily, saving you the cost of a possible service call. Try the suggestions below to see if you can solve the problem before calling the servicer. Problem Possible cause Not plugged in. Appliance does not operate.
Need help?
Do you have a question about the PRYMO ABC160S and is the answer not in the manual?
Questions and answers