Table of Contents
Advertisement
Quick Links
12 VOLT RECHARGEABLE
GREASE GUN
Model 92196
OPERATING INSTRUCTIONS
®
3491 Mission Oaks Blvd., Camarillo, CA 93011
Visit our Web site at: http://www.harborfreight.com
TO PREVENT SERIOUS INJURY,
READ AND UNDERSTAND ALL WARNINGS
AND INSTRUCTIONS BEFORE USE.
©
Copyright 2004 by Harbor Freight Tools
®
. All rights reserved. No portion of this
manual or any artwork contained herein may be reproduced in any shape or form
without the express written consent of Harbor Freight Tools.
For technical questions, or replacement parts, please call 1-800-444-3353.
Advertisement
Table of Contents

Related Manuals for Chicago Electric 92196


Summary of Contents for Chicago Electric 92196
- Page 1 12 VOLT RECHARGEABLE GREASE GUN Model 92196 OPERATING INSTRUCTIONS ® 3491 Mission Oaks Blvd., Camarillo, CA 93011 Visit our Web site at: http://www.harborfreight.com TO PREVENT SERIOUS INJURY, READ AND UNDERSTAND ALL WARNINGS AND INSTRUCTIONS BEFORE USE. © Copyright 2004 by Harbor Freight Tools ®...
-
Page 2: Product Specifications
Failure to follow all instructions listed below may result in electric shock, fire, and/or serious injury. SAVE THESE INSTRUCTIONS WORK AREA Keep your work area clean and well lit. Cluttered benches and dark areas invite accidents. SKU 92196 For technical questions, please call 1-800-444-3353 PAGE 2... -
Page 3: Electrical Safety
Use safety equipment. Always wear ANSI approved safety glasses underneath a full face safety shield. Dust mask, non-skid safety shoes, hard hat, or hearing protection must be used for appropriate conditions. SKU 92196 For technical questions, please call 1-800-444-3353 PAGE 3... -
Page 4: Specific Safety Rules
SPECIFIC SAFETY RULES Maintain a safe working environment. Keep the work area well lit. Make sure there is adequate surrounding workspace. Always keep the work area free of SKU 92196 For technical questions, please call 1-800-444-3353 PAGE 4... - Page 5 Battery Pack. Always switch to a fresh Battery Pack (3) when tool performance begins to diminish. Severe heat is most destructive to a Battery Pack. The more heat SKU 92196 For technical questions, please call 1-800-444-3353 PAGE 5...
-
Page 6: To Charge The Battery Pack
Insert the Battery Pack (3) into the Charging Socket of the Charger. Then, plug the Charger (17) into the nearest 120 volt, grounded, electrical outlet. (See Figure A.) The Green Light on the Charger (17) will automatically turn on. (See Figure A.) SKU 92196 For technical questions, please call 1-800-444-3353 PAGE 6... - Page 7 Unscrew and remove the Grease Tube (2) from the Pump Housing (6). (See Figure B.) Remove the plastic cap from a grease cartridge (not included), and insert the cartridge into the Grease Tube (2). (See Figure B.) SKU 92196 For technical questions, please call 1-800-444-3353 PAGE 7...
- Page 8 (2) to allow the Follower Rod (22) to move forward into the Grease Tube. (See Figure B.) Clean off any excess grease off the outer body of the Grease Gun. SKU 92196 For technical questions, please call 1-800-444-3353 PAGE 8...
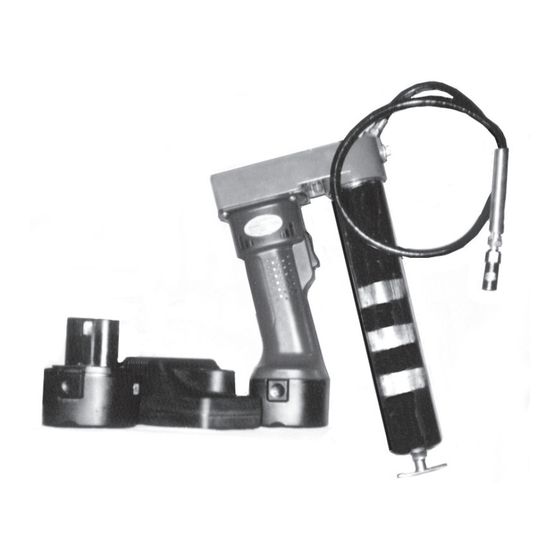
- Page 9 Gun. Then release pressure on the Lock Buttons, and check to make sure the Battery Pack is locked in place. (See Figure C.) SWITCH (18) RIGHT/LEFT COVERS (1, 5) LOCK BUTTON BATTERY PACK FIGURE C SKU 92196 For technical questions, please call 1-800-444-3353 PAGE 9...
- Page 10 Vent Valve (13) to expel air pockets. (See Figure D.) TO OPERATE THE GREASE GUN Attach a fully charged Battery Pack (3) to the Grease Gun. (See Figure C.) SKU 92196 For technical questions, please call 1-800-444-3353 PAGE 10...
-
Page 11: Inspection, Maintenance, And Cleaning
Grease Gun in any liquids. When storing: Always remove the Battery Pack (3) from the Grease Gun. Keep the Grease Gun and its accessories in a clean, dry location and out of childrens’ reach. SKU 92196 For technical questions, please call 1-800-444-3353 PAGE 11... -
Page 12: Please Read The Following Carefully
Follower Stopcock Follower Seal Filler Valve Screw Vent Valve Carrying Case NOTE: Some parts are listed and shown for illustration purposes only, and are not available individually as replacement parts. SKU 92196 For technical questions, please call 1-800-444-3353 PAGE 12... -
Page 13: Assembly Diagram
ASSEMBLY DIAGRAM NOTE: Some parts are listed and shown for illustration purposes only, and are not available individually as replacement parts. SKU 92196 For technical questions, please call 1-800-444-3353 PAGE 13...
Need help?
Do you have a question about the 92196 and is the answer not in the manual?
Questions and answers