Advertisement
Quick Links
Advertisement

Summary of Contents for Wulian WL-ZTCWNPW-H2-01
- Page 1 Smart Thermostat (USA Standard) WL-ZTCWNPW-H2-01 Quick Installation Guide...
-
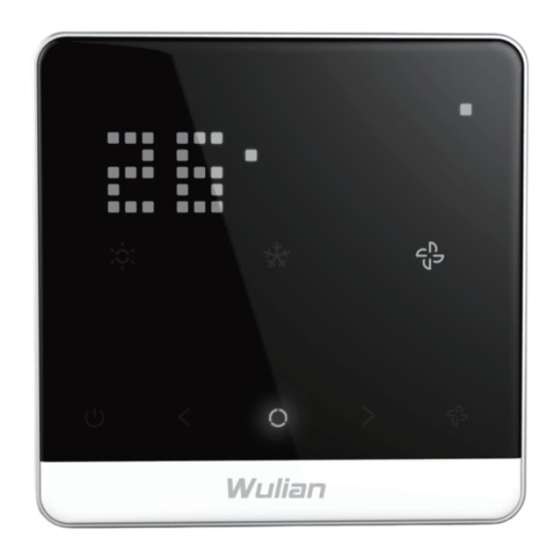
Page 2: Product Illustration
Product Illustration ① ① ② ② COOL/AUTO ③ ③ HEAT/AUTO Room Temperature. Press [<] & [>] to set temperature. ④ ④ ⑤ ON/OFF Switch for Fan ⑥ Turn down the Thermostat ⑦ Mode Key:Change Thermostat between HEAT/COOL/AUTO modes ⑤ ⑧ Turn up the Thermostat ⑨... - Page 3 1. Press any key to wake up the device. Display 2. The device shows current mode and room temperature after waking up. 3. When you tap UP [>] /DOWN [<] Key for the first time, the device shows the preset temperature. •...
-
Page 4: Packing List
Packing List Thermostat Display Thermostat Base Decorative Plate (Optional) AUX1 AUX1 AUX2 AUX2 E.heat E.heat Drywall Screw (x2) AAA Batteries Wire Labels 3... - Page 5 Installation Guide The Old Thermostat Step 1: Check system Before getting started, make sure that your HVAC system works normally. Do not short across electric terminals at the control on the furnace or air conditioner to test the system. This may damage the thermostat.
- Page 6 When the power is off, take the Step 3. Step 3: Remove the cover and take a picture of the wire. Before you take out any wires, take a picture of the wires on your old thermostat so you have an easy reference if you need it. 5...
- Page 7 Step 4: Label all wires. Use the supplied sticky tags to label each wire. Label wires according to old thermostat terminal designations and make sure that the wires are labeled correctly. Terminal designation AUX1 AUX1 AUX2 AUX2 Blank sticky tag E.heat E.heat If no tag matches a terminal designation, write the appropriate letter on a blank sticky tag.
- Page 8 Step 5: Remove the wallplate. Remove the old wallplate from the wall after all wires are labelled and disconnected. Remember that do not let wires fall back into the hole in the wall. 7...
-
Page 9: Prepare Wires
Prepare Wires Follow the tips for security: 1. Make sure that the diameter of wire is 18-24AWG; 2. Make sure that the length of exposed wire is 1/8 of the whole wire. CAUTION: Make sure your system voltage is 24V AC. If the old thermostat is labeled 120V or 240V, or has thick wires with wire nuts, your system is high voltage. - Page 10 Install the Smart Thermostat Step 1: Remove the anti-loosening screws at the bottom of the Smart Thermostat and take down its base. After Separation: 9...
- Page 11 Step 2: Mount decorative plate (Optional). Mount the optional decorative plate to cover holes or marks made by the old thermostat. Attach the base and decorative plate together to the wall.
- Page 12 Step 3: Wire the Smart Thermostat. It is best to have this operation done by a HVAC specialist and there is a risk if it is done by a non-technical person. Connect wires to the Smart Thermostat and mark the connected wires with a pencil in the image below. This information will be needed when you configure the Smart Thermostat.
- Page 13 Make sure all wires are connected with the corresponding systems 1. For Heating Device Wires: C, R, W (or W1, W2) HVAC SYSTEM W1 W2 From HVAC POWER O W1 W2 THERMOSTAT TERMINALS Note: When there is only W wire, please connect W1 to W1 wire terminal on the Smart Thermostat.
- Page 14 2. For Heating Device with Fan Wires: C, R, G, W (or W1, W2) HVAC SYSTEM W1 W2 From HVAC POWER O W1 W2 THERMOSTAT TERMINALS...
- Page 15 3. For Heating & Cooling Device Wires: C, R, G, W (or W1, W2), Y (or Y1, Y2) HVAC SYSTEM W1 W2 From HVAC POWER O W1 W2 THERMOSTAT TERMINALS...
- Page 16 4. Device with RH and RC Wires. Wires: C, RH, RC, G, W (or W1, W2), Y (or Y1, Y2) HVAC SYSTEM W1 W2 Rh Rc From HVAC POWER O W1 W2 THERMOSTAT TERMINALS RC and RH disconnected Note: When there is W or Y wire, please connect W to W1 wire terminal, and Y to Y1 wire terminal on the Smart Thermostat.
- Page 17 5. Heat Pump without AUX Heat Wires: C, B or O, Y (or Y1, Y2), R, G HVAC SYSTEM From HVAC POWER O W1 W2 THERMOSTAT TERMINALS...
-
Page 18: Hvac System
6. Heat Pump with AUX Heat Wires: C, B or O, AUXn, Yn, R, G Multi-stage Heat Pump with Multi-stage Aux Heat HVAC SYSTEM From HVAC POWER AUX1 AUX2 THERMOSTAT TERMINALS... - Page 19 Step4: Install batteries. Tighten screws.
- Page 20 Step5: Attach the display. Tighten the screws at the bottom of the display.
- Page 21 Step 6: Switch power back on.
- Page 22 Download the latest Smart Home App by scanning the following QR Code or the QR code on the package box of the product. Option B: iOS user can download the App by searching "Wulian Smart Home" on "App Store". Android user can download the App by searching "Wulian Smart Home" on "Google Play".
- Page 23 Step 2: Network setting 1.Before setting please make sure the gateway (need to be purchased) works normally and the ZigBee network indicator flashes, also the product is in a power-on state and within valid communication scope of the wireless gateway. 2.Before operating, please make sure the product is not connected to any other gateway;...
-
Page 24: Configure Settings
Note 1: If the device cannot join the ZigBee network after the operations above, please follow the following steps (please make sure the gateway is allowed for networking): ① exit the network (refer to Exit Setting for details); ② wait for 2s and quick click [Set Key] once or four times to join the network. - Page 25 App operation is shown below: Step 1: Find the Smart Thermostat in Smart Home App. Enter “thermostat” interface, and press “TO SET” . thermostat Please set the themostat before operation TO SET...
- Page 26 Step 2: Set system type. Step 3: Press “OK” to confirm the system type. [System Type] is for selecting Conventional or Heat Pump system; equipment setting [Fuel] is for selecting heating fuel; [HVAC Type] is for selecting heating/cooling stage. First Stage Option Second Stage Option equipment setting installed:...
- Page 27 equipment setting Step 4: It can be used normally if the prompt box “setting succeed” comes up. First Stage Option Second Stage Option Third Stage Option Return to Step 2 and repeat setting operations if the Calibrate Option prompt box “setting failed” comes up due to poor network performance.
- Page 28 No. 15, Fengji Road, Yuhuatai District, Nanjing, Jiangsu Province, China Email: overseas@wuliangroup.com Service Line: +86 400-889-2891 Official Website: www.wuliangroup.com...
Need help?
Do you have a question about the WL-ZTCWNPW-H2-01 and is the answer not in the manual?
Questions and answers