Advertisement
Available languages
Available languages
Quick Links
MOUNTING HARDWARE INCLUDED:
A - Mounting Screw (2)
D - Fixture Screw
B - Wire Connectors (3)
E - Gasket
C - Mounting Crossbar
F - Rubber Hole Plug
A (2)
B (3)
D
E
THIS PRODUCT MUST BE INSTALLED IN ACCORDANCE WITH THE APPLICABLE INSTALLATION CODE BY A PERSON FAMILIAR WITH THE CONSTRUCTION AND OPERATION OF THE
PRODUCT AND THE HAZARDS INVOLVED.
STEP 1:
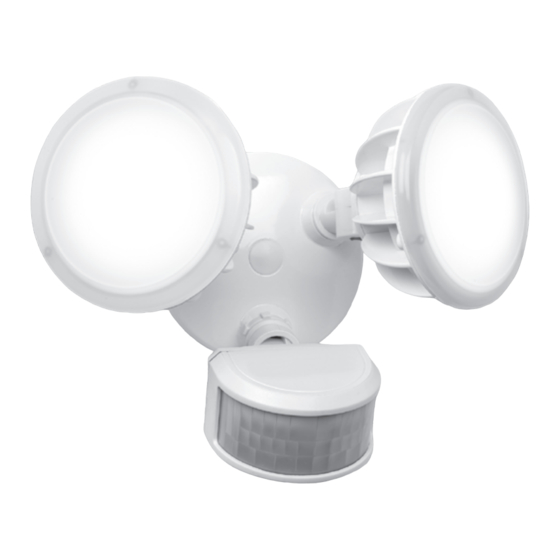
INSTALLING YOUR NEW SECURITY FLOODLIGHT.
TURN OFF THE POWER AT FUSE/BREAKER BOX.
Remove old lighting xture. If installing at a new location, contact quali ed electrician.
For optimal performance, xture should be mounted on a wall at least 8 feet above ground.
C
Pull the supply (house) wires over the
Mounting Crossbar (C). Install the Mounting
Crossbar onto the junction box using
the two Mounting Screws (A).
STEP 2:
MOTION SENSOR CONTROLS
See STEP 3 for more details on setting these controls.
Observe the two controls on the bottom of the sensor.
The RANGE (sensor sensitivity) control is located on the bottom left.
The ON-TIME (duration) switch is located on the bottom center.
STEP 3:
SETTING THE MOTION SENSOR CONTROLS
SETTING UP OR MAKING ADJUSTMENTS TO THE MOTION SENSOR
1. Turn the power OFF to the oodlight.
2. Aim the motion sensor to the approximate center of the desired detection range. Caution: Do not aim the sensor above the horizon as direct sunlight may cause damage to the sensor circuitry.
3. Slide the ON TIME switch to the TEST position.
4. Turn the RANGE control (sensitivity dial) to the full clockwise rotation.
5. Turn the power back ON to the oodlight.
6. Set the RANGE of the motion sensor.
a. Have a person move around at the furthest distance of the desired detection area.
b. If the RANGE dial is at the maximum clockwise rotation and the light still has not turned on, it may be necessary to re-aim the motion sensor or the desired detection zone may be too far away.
The sensor range is designed for up to 70 feet.
c. When the lights do turn on, have the person stand still until the light goes off. Once the lights are off, have the person move again to con rm the settings.
d. To reduce false triggerings, decrease the RANGE (sensitivity).
7. Slide the ON TIME switch to increase or decrease the time the light stays ON after motion is detected. The setting choices are 1, 5, or 10 minutes. NOTE: When making this adjustment during daylight in test mode, the light will
remain ON for the set time duration you have selected and then turn OFF. Once the light is OFF, it will not turn ON again until motion is detected.
MANUAL OVERRIDE FEATURE
If the security oodlight is connected to a wall switch, the Manual Override Feature is available. The Manual Override Feature allows the unit to be turned ON or OFF manually during the night, bypassing the motion sensor.
Manual Operation
To manually turn the oodlight ON, turn the wall switch OFF and then ON again immediately within 2 seconds. The oodlights will turn ON and remain ON until the wall switch is turned OFF. If the wall switch was
previously turned OFF for a period of time, turn the wall switch ON for at least 5 seconds and then use the OFF- ON procedure above to turn the oodlight ON manually. To manually turn the oodlight OFF, simply turn the
wall switch OFF. The unit will not activate as long as the wall switch is in the OFF position.
Resetting to Automatic Operation
To return the security oodlight to automatic operation, turn the wall switch OFF for at least 5 seconds and then turn the swith back ON. The security oodlight will come ON for the time duration set and then turn OFF. The
oodlight will now activate according to the settings on the motion sensor. Leave the wall switch in the ON position to operate the oodlight in automatic mode.
TROUBLESHOOTING
SYMPTOM
REMEDY
Does not function at all.
Make sure wall switch (if installed), is ON. Check that the circuit breaker, fuse and main circuit breaker or main power switch are on. Be sure sensor head is pointed downward towards the target area.
Floodlight cycles ON and OFF.
Redirect security oodlight away from heat sources such as a street, active sidewalk, barbecue grill, etc. Direct oodlight in a slightly different direction than sensor.
Turn RANGE (Sensor sensitivity) control more counterclockwise.
Turn wall switch OFF for at least 5 seconds and then turn switch to ON again. This will reset the xture to normal (automatic) operations.
Floodlight is continuously ON.
If there is no wall switch, set circuit breaker OFF for at least 5 seconds and then turn circuit breaker ON again.
QUESTIONS: For further assistance or more information, please call 1-800-562-5625, 8 am – 5 pm (Paci c Time), Monday – Friday.
LIMITED LIFETIME WARRANTY – This product is warranted to be free from defects in material and workmanship for life of product. If a defect occurs, call 1-800-562-5625 for instructions on how to have defective product repaired or replaced free
of charge. LIMITATIONS - This warranty only covers Brink's assembled lighting products and accessories and is not extended to other components, Lamp Bulb(s), or equipment used on the product. Warranty extends to original purchaser of product.
Receipt or other approved proof of purchase required for warranty service. NOT LIABLE FOR INCIDENTAL, INDIRECT, OR CONSEQUENTIAL DAMAGES. Some states do not allow the exclusion or limitation of incidental or consequential damages, so
the above limitation or exclusion may not apply to you. This warranty gives you speci c legal rights, and you may also have other rights which vary from state to state. NOT COVERED - Product failure not relating to faulty material or workmanship,
corrosion of brass components, reimbursement for installation or unauthorized service.
50 Icon, Foothill Ranch, CA 92610-3000 USA
email: info@hamptonproducts.com
www.hamptonproducts.com • 1-800-562-5625
Made in China
3-STEP EASY INSTALLATION INSTRUCTIONS
IMPORTANT SAFETY INFORMATION
• IF YOU ARE NOT FAMILIAR WITH ELECTRICAL WIRING, IT IS RECOMMENDED THAT YOU SECURE THE SERVICES OF A QUALIFIED
ELECTRICIAN WHO CAN ASSURE THAT THIS INSTALLATION MEETS LOCAL, STATE, AND NATIONAL CODES.
• BE SURE POWER IS TURNED OFF AT THE MAIN POWER PANEL OR FUSE BOX BEFORE INSTALLING OR REPLACING THE FIXTURE.
• Before installing this xture, be sure to check with local ordinances regarding approved outdoor lighting. This xture style may not be allowed in
some areas.
• This xture is for outdoor use only.
• The electrical system and the method of connecting the xture to the system must be in accordance with local, state, and national electrical codes.
C
• This xture is to be connected to a 120 Volts, 60 Hz power source. Connecting to a different power source may create a hazard and will void the
warranty.
• This xture should be mounted to a grounded junction box marked for use in wet locations.
• Do not use near or around ammable/combustible material or liquids.
• Do not attempt to open the motion sensor housing. There are no serviceable parts inside.
F
• Performance may be affected by temperature.
A
Secure base plate to junction box using
the Fixture Screw (D). Press in rubber hole
plug (F). Apply a weatherproof silicone
caulk or sealant around the xture base.
Sets the sensitivity of the motion sensor. Turn the dial clockwise to increase the
sensitivity (range). Turn the dial counter-clockwise to decrease the sensitivity (range).
The RANGE control should – in most cases, be set at the maximum setting.
However, the sensitivity (range) may need to be set lower to avoid false triggering
(small animals, cars, or nearby lighting) may require range setting to be dialed down.
D
RANGE (Sensor Sensitivity)
Position lamp holders downward at a minimum 45º and away from
xture housing a minimum of 2 inches. Aim the motion sensor at
the center of the desired detection area.
ON-TIME (Duration)
Sets how long the light will stay on after motion is
detected (1, 5, or 10 minutes). Slide the ON TIME
switch to the desired time duration. The TEST mode
allows the motion sensor to activate during daylight.
Brink's trademark & copyright
work are used with permission.
©2019 Hampton Products International Corp.
999-61482_7001_REVB 08/19
SERIES 7001
Advertisement

Related Manuals for BRINKS 7001 Series

Summary of Contents for BRINKS 7001 Series
- Page 1 SERIES 7001 3-STEP EASY INSTALLATION INSTRUCTIONS MOUNTING HARDWARE INCLUDED: IMPORTANT SAFETY INFORMATION A - Mounting Screw (2) D - Fixture Screw • IF YOU ARE NOT FAMILIAR WITH ELECTRICAL WIRING, IT IS RECOMMENDED THAT YOU SECURE THE SERVICES OF A QUALIFIED ELECTRICIAN WHO CAN ASSURE THAT THIS INSTALLATION MEETS LOCAL, STATE, AND NATIONAL CODES.
- Page 2 SERIES 7001 INSTRUCCIONES DE INSTALACIÓN EN TRES FÁCILES PASOS IMPORTANTE INFORMACIÓN DE SEGURIDAD SE INCLUYEN LOS HERRAJES DE MONTAJE: • SI USTED NO ESTÁ FAMILIARIZADO CON CABLEADO ELÉCTRICO, SE RECOMIENDA QUE USTED CONTRATE LOS SERVICIOS DE UN A - Tornillo de montaje (2) D - Tornillo de dispositivo ELECTRICISTA EXPERIMENTADO QUE PUEDA ASEGURAR QUE ESTA INSTALACIÓN CUMPLE CON LOS CÓDIGOS LOCALES, ESTATALES Y NACIONALES.