
Summary of Contents for Geekpure GP-UV6W
- Page 1 Ultraviolet Water Sterilizer Installation and Maintenance Manual (Models:GP-UV6W, GP-UV12W, GP-UV55W) INSTALLERS: PLEASE READ ALL INSTRUCTIONS BEFORE INSTALLING AND USING THIS SYSTEM. PERFORMANCE IS GUARANTEED WHEN THE SYSTEM IS INSTALLED AND OPERATED APPROPRIATELY.
-
Page 2: Table Of Contents
Table of Contents How Your System Works Parts Included Specifications Safety Instructions Installation Instructions Disinfection Procedure Operating & Maintenance Trouble Shooting... -
Page 3: How Your System Works
UV systems are easy to operate and require little maintenance. Geekpure Ultraviolet Water Sterilizer System Geekpure Ultraviolet Water Sterilizer System is uniquely designed to protect households from waterborne contaminants. It includes a low- pressure UV lamp installed in a disinfection chamber. As untreated water enters the chamber, pathogenic elements in the water are destroyed by the UV light. -
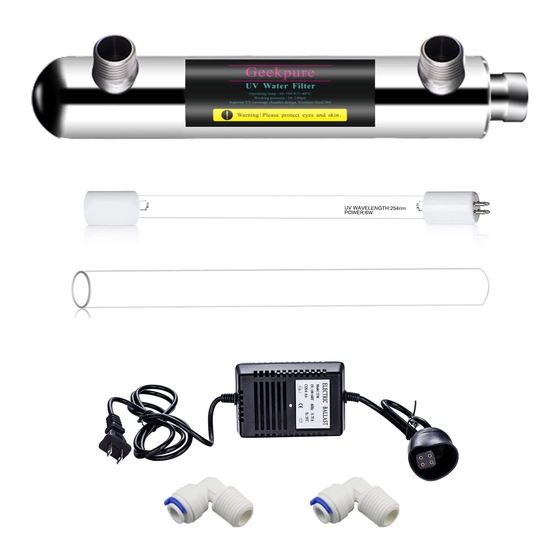
Page 4: Parts Included
UV Lamp Ballast NOTE 1. 2PCS mounting clips included with GP-UV6W and GP-UV12W, 3 pcs mounting clips included with GP-UV55W. 2. GP-UV55W with extra 2sets quartz tube and UV lamp. so,total is 3 pcs UV lamp and 3pcs Quartz Sleeve in the box of GP-UV55W. -
Page 5: Specifications
Specifications Model GP-UV6W, GP-UV12W GP-UV55W Picture Flow Rate GPM Lamp Power (Watt) Max.Current (Amp) Inlet & Outlet Size 1/4" 1/4" 1" Operating Pressure psi 10-100 psi (69-689 kPa) (kpa) Operating Temperature 36 t° 104° F (2 to 40 °C) Range Electrical 100-140V/200V –... -
Page 6: Safety Instructions
Since the system will be operated in the immediate proximity of water, please make sure that the ballast and the lamp connector are kept dry at all times. This will prevent electric shock and other potential incidents related to the exposure of electrical equipment to water. www.geekpure.cc... - Page 7 After this period of time, the U.V. lamp has undergone a photochemical change. Failure to replace the U.V. lamps every 9,000 hours may cause bacteriological breakthrough. To ensure effective functioning of the system replace the UV lamp annually. www.geekpure.cc...
-
Page 8: Installation Instructions
(F) from packaging. Do not touch the glass! Use the ceramic end of the Lamp. If you touched the glass, make sure you clean it off with glass cleaner. Do not use oils, as it will cause spots and premature bulb failure. www.geekpure.cc... - Page 9 UV lamp, it is recommended that quartz sleeve is installed in the horizontal position for better sealing purposes. If the lamp installed vertically, the incoming water should come from the bottom of the housing moving up。 www.geekpure.cc...
-
Page 10: Disinfection Procedure
filter. pass valve is to be closed if equipped. 3.Fill half of one filter bowl with the household (5.25%) chlorine (bleach) and re-install all the bowls (without cartridges) back into the filter housing head. DO NOT use hydrogen peroxide. www.geekpure.cc... - Page 11 While this is consistent with the minimum 50 mg/L chlorine solution recommended for the disinfection of the water distribution systems known to be contaminated, DO NOT consume water until the system has been fully flushed out. www.geekpure.cc...
-
Page 12: Operating & Maintenance
Simply pull it away. Avoid touching the glass part of the lamp. Step 5.Remove the lamp from the chamber. Be careful not to angle the lamp, as in case it touches the quartz sleeve, the sleeve can be damaged. www.geekpure.cc... - Page 13 Step 2.Remove the UV lamp (follow the UV lamp replacement instructions). Step 3.Using the drain port, drain Step 4.Unscrew the close-ended cap water from the UV disinfection and carefully remove the silicone system chamber. stopper. *Applies only to GP-UV55W www.geekpure.cc...
- Page 14 After replacing the quartz sleeve (or the UV lamp), perform the disinfection procedure, detailed in the disinfection procedure section of this manual.In case the sleeve can no longer be cleaned completely, is scratched or cracked, replace it with a new one. www.geekpure.cc...
-
Page 15: Troubleshooting
It may also be due from the system chamber to the excessive humidity in the room. Consider addressing these conditions to ensure that the UV system operates properly. C. Inadequate water in/out C. Check the connections, tighten or connection seal, as needed. www.geekpure.cc... - Page 16 Unstable power supply down periodically no other devices connected to the same power outlet. The UV system should not be controlled by a light switch. If you need any support,please do not hesitate contact us. customersevice@geekpure.cc www.geekpure.cc...
Need help?
Do you have a question about the GP-UV6W and is the answer not in the manual?
Questions and answers
how do you put o rings on quatz bulb holder