Advertisement
Quick Links
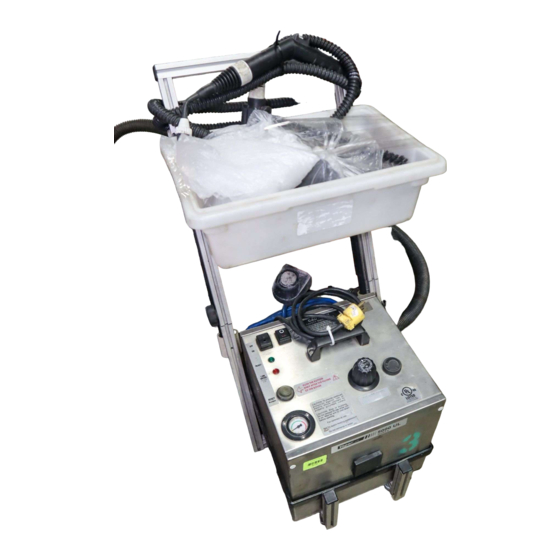
VaporLux 5000 UL
Make sure
E
Pressure Gauge is on zero. Press down on cap
#1
counterclockwise to remove cap.
Fill unit with warm or hot clean water. NEVER ADD ANYTHING BUT CLEAN WATER
#2
TO THE TANK
Close
A
Safety Cap. Turn clockwise. Finger Tighten only! DO NOT OVERTIGHTEN
#3
CAP!
Plug electric cord into a properly grounded 110-V outlet.
#4
Press
B
On/Off 110-V Power Switch to "on" position
#5
Press
C
12-V Steam Button to "on" position
Press
D
Reset breaker button located on top of machine
When
H
green light is on, machine is ready for operation. While cleaning, pressure will
#6
drop and green light will go off, this is normal operation.
When
I
red light comes on, water must be added to the unit. Turn power button off.
#7
With
C
Steam Button on, press
#8
from tank. When
E
pressure gauge shows zero pressure, remove pressure cap. DO
NOT OPEN CAP UNDER PRESSURE!
Unplug the unit
#9
To refill, follow steps 1 - 5.
#10
C
Steam On/Off
12-V Switch
B
On/Off Power
Heating 110-V Element
D
Reset Breaker Button
E
Pressure Gauge
J
Tank Drain Plug
Located Center
Bottom
L
Steam Handle Switch until all pressure is released
Steam Handle
Vapor On/ Off 12-V
H
Green Ready Light
I
Red Light Low Water
Indicator
K
Infinitely Variable Vapor
Volume Control
A
Water Fill With
F
Safety Cap
Mono-Bloc Connection For
Flexible Steam Hose
A
and turn
L
Advertisement

Summary of Contents for VaporLux 5000 UL
- Page 1 VaporLux 5000 UL Make sure Pressure Gauge is on zero. Press down on cap and turn counterclockwise to remove cap. Fill unit with warm or hot clean water. NEVER ADD ANYTHING BUT CLEAN WATER TO THE TANK Close Safety Cap. Turn clockwise. Finger Tighten only! DO NOT OVERTIGHTEN CAP! Plug electric cord into a properly grounded 110-V outlet.
-
Page 2: Operating Tips
A surge protector can be placed between the outlet supply and the extension cord to protect against spikes and surges. 6.When you plug in the VaporLux extension cord, make sure the lighted end of the cord is lit. If it is not, check your power source. - Page 3 8. Do not press down hard on the brush, your VaporLux does not clean by abrasion. The different brushes break the surface tension of the dirt or debris that you are cleaning so that the vapor can penetrate the surface.
- Page 4 Always clean corners and hard to reach areas first, then work toward the center. If your VaporLux does not clean a grout surface, there is a sealer on the surface. Apply a high quality sealer stripper to the area, let it set for several minutes, then resume normal cleaning as described above.
-
Page 5: Troubleshooting
Trouble Shooting A. Unit Does Not Heat Up 1. Make sure unit is plugged in. 2. Make sure power switch is on - switch will emit dim red light when on. refer to model for location. 3. Check the power source - make sure outlet has power. 4.