
Related Manuals for Lakeland DRY:SOON 24576

Summary of Contents for Lakeland DRY:SOON 24576
- Page 1 INSTRUCTION BOOKLET DRY:SOON WALL MOUNTED HEATED AIRER Model: 24576 J18515 DrysoonMountedAirer Ins 7Aug14.indd 1 07/08/2014 15:12...
-
Page 2: Table Of Contents
It’s cheaper than costly tumble-drying and better than muffling the heat from your radiators by laying clothes over them. An award winning family-owned business, here at Lakeland we still have the same values of excellent quality, value for money and exceptional customer care as we did when we first set up the company in the 1960s. -
Page 3: Product Features
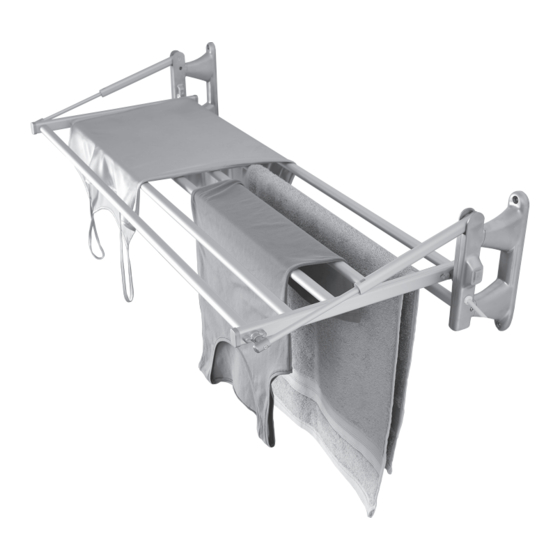
PRODUCT FEATURES Side bars Heated bars 1. Main unit Small hole for Hook fixing screw 2. On/off switch 3. Cord and plug 4. Wall mounts x 2 5. Stencil 6. Fixing screws x 2 7. Wall screws x 4 8. Wall plugs x 4 J18515 DrysoonMountedAirer Ins 7Aug14.indd 3 07/08/2014 15:12... -
Page 4: Safety Cautions
• Do not use this appliance if the lead is damaged. If the lead is damaged it must be replaced with a special lead. Contact the Lakeland customer care team on 015394 88100. • Unplug from the mains when not in use. To disconnect, turn the socket to “off “and remove the plug from the mains socket. - Page 5 • Always ensure that your hands are dry before removing the plug from the mains socket. Never pull the plug out of the mains socket by its lead or carry the airer by its lead. Do not allow the lead to be compressed or curled, or touch sharp edges. •...
-
Page 6: How To Mount The Airer To Your Wall
HOW TO MOUNT THE AIRER TO YOUR WALL Carefully unpack the airer and accompanying parts, and remove all the packaging materials. Lay all the parts out in front of you. When choosing where to mount your airer, select a space which gives plenty of room for the airer to be fully folded up flat against the wall, and fully folded down horizontally for airing your clothes. - Page 7 3) The wall mounts need to be screwed into the wall plugs with the small hole at the bottom and the hooks facing upwards. 216mm Screw the wall mounts onto the wall using the four wall screws. WARNING: It is important that the wall mounts are screwed into the correct position you have marked onto your wall.
- Page 8 5) Take the two small fixing screws and screw them through the main unit and into the wall mount to secure the airer into place. WARNING: The airer is not yet fixed securely into place so you may need another person to hold the main unit safely while you screw the fixing screws.
-
Page 9: Instructions For Use
INSTRUCTIONS FOR USE WARNING: Ensure the airer is securely mounted to the wall before use. • Gently pull down the heated bars until they sit horizontally, at a 90° angle to the wall. • When opening and closing the airer, never use force. The mechanism should move freely and easily. -
Page 10: Troubleshooting
RECYCLING YOUR ELECTRICALS Along with many other high street retailers, Lakeland has joined a scheme whereby customers can take their unwanted electricals to recycling points set up around the country. Visit www.recycle-more.co.uk to find your nearest recycling point. -
Page 11: Electrical Connections
ELECTRICAL CONNECTIONS THIS APPLIANCE MUST BE EARTHED. This appliance is fitted with a fused three-pin plug to BS1363 which is suitable for use in all homes fitted with sockets to current specifications. If the fitted plug is not suitable for your socket outlets, it should be cut off and carefully disposed of. - Page 12 J18515 DrysoonMountedAirer Ins 7Aug14.indd 12 07/08/2014 15:12...
- Page 13 GEBRAUCHSANWEISUNG DRY:SOON BEHEIZTER WANDTROCKNER Modell: 24576 J18515 DrysoonMountedAirer Ins 7Aug14.indd 13 07/08/2014 15:12...
- Page 14 Unser mehrfach ausgezeichneter Familienbetrieb legt heute genauso viel Wert auf ein Höchstmaß an Qualität, ein gutes Preis-Leistungsverhältnis und einen hervorragenden Kundenservice wie damals in den 60er Jahren, als Lakeland gegründet wurde. Unsere Artikel werden mit größter Sorgfalt ausgewählt und im Einklang mit unseren strengen Standards gründlich geprüft.
-
Page 15: Ausstattungsmerkmale
AUSSTATTUNGSMERKMALE Seitensprossen Beheizte Sprossen 1. Haupteinheit Kleines Loch für Haken Bundschraube 2. An/Aus-Schalter 3. Netzkabel und Netzstecker 4. Wandbefestigungen (2 Stck) 5. Schablone 6. Bundschrauben (2 Stck) 7. Steinschrauben (4 Stck) 8. Dübel (4 Stck) J18515 DrysoonMountedAirer Ins 7Aug14.indd 15 07/08/2014 15:12... -
Page 16: Sicherheitshinweise
Sicherheit verantwortlich ist. • Kinder müssen stets beaufsichtigt werden, damit sie nicht mit dem Produkt spielen können. • Verwenden Sie nur die von Lakeland empfohlenen Zubehörteile und Aufsätze. • Tauchen Sie Netzkabel, Netzstecker oder Gerät nicht in Wasser oder andere Flüssigkeiten ein. - Page 17 transportieren den Wandtrockner am Netzkabel. Achten Sie darauf, dass das Netzkabel nicht gedrückt oder geknickt wird oder mit scharfen Kanten in Berührung geräht. • Schließen Sie das Gerät nicht an eine externe Zeitschaltuhr oder an ein System mit Fernbedienung an. •...
-
Page 18: So Bringen Sie Ihren Wandtrockner An Der Wand An
SO BRINGEN SIE IHREN WANDTROCKNER AN DER WAND AN Packen Sie den Trockner und alles Zubehör sorgfältig aus und entfernen Sie alle Verpackungsmaterialien. Breiten Sie alle Teile vor sich aus. Wählen Sie für die Montage Ihres Trockners eine Stelle aus, an der der Trockner vollkommen flach zurück an die Wand geklappt und horizontal heruntergeklappt werden kann, sodass Sie Ihre Wäsche zum Trocknen aufhängen können. - Page 19 3) Die Wandbefestigungen müssen so in die Dübel geschraubt werden, dass das kleine Loch an der Unterseite und die Haken nach oben zeigen. 216mm Montieren Sie die Wandbefestigungen mit den vier Schrauben an der Wand. WARNHINWEIS: Die Wandbefestigungen müssen in die an der Wand markierte korrekte Position geschraubt werden.
- Page 20 5) Schrauben Sie die beiden kleinen Bundschrauben durch die Haupteinheit in die Wandbefestigung. So ist der Trockner sicher an der Wand montiert. WARNHINWEIS: Da der Trockner noch nicht sicher montiert ist, sollte eine weitere Person die Haupteinheit festhalten, während Sie die Bundschrauben hineinschrauben. J18515 DrysoonMountedAirer Ins 7Aug14.indd 20 07/08/2014 15:12...
-
Page 21: Gebrauchsanweisung
GEBRAUCHSANWEISUNG WARNHINWEIS: Stellen Sie sicher, dass der Trockner vor Gebrauch sicher an der Wand befestigt ist. • Ziehen Sie die beheizten Sprossen vorsichtig horizontal im 90°-Winkel zur Wand heraus. • Öffnen und schließen Sie den Trockner nie gewaltsam. Der Mechanismus ist leichtgängig. •... -
Page 22: Fehlersuche
FEHLERBEHEBUNG Im Folgenden haben wir gängige Probleme zusammengestellt, die beim Betrieb des Trockners auftreten können. Versuchen Sie, der möglichen Ursache des jeweiligen Problems auf die Spur zu kommen und Abhilfe zu schaffen, damit Ihre Wäsche gut trocknen kann. Problem Mögliche Ursache(n) Abhilfe Der beheizte Wandtrockner Er ist möglicherweise nicht Überprüfen Sie, ob der... - Page 23 J18515 DrysoonMountedAirer Ins 7Aug14.indd 23 07/08/2014 15:12...
- Page 24 Lakeland Alexandra Buildings, Windermere, Cumbria, UK LA23 1BQ Tel: +44(0)15394 88100 lakeland.co.uk Tel:0800 444 1500 lakeland.de J18515 DrysoonMountedAirer Ins 7Aug14.indd 24 07/08/2014 15:12...
Need help?
Do you have a question about the DRY:SOON 24576 and is the answer not in the manual?
Questions and answers