Table of Contents
Advertisement
Quick Links
Advertisement
Table of Contents

Related Manuals for Practical Devices XM3

Summary of Contents for Practical Devices XM3
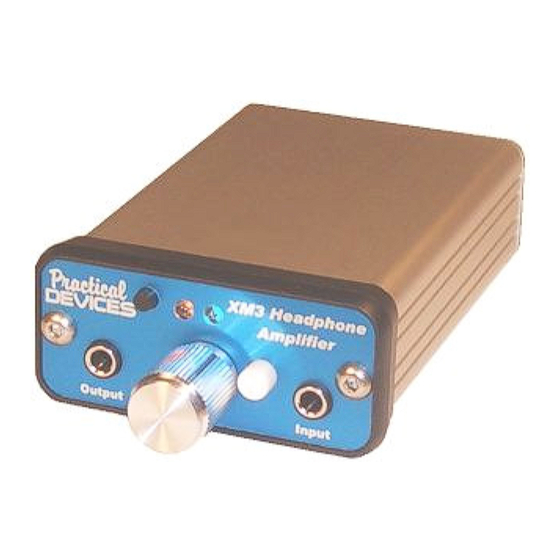
- Page 1 Headphone Amplifier User’s Manual...
- Page 2 The XM3 is designed to be durable, flexible, easy to use, practical, and above all, sound great. Each unit is carefully manufactured, and then rigorously tested for performance, durability, and sound quality.
-
Page 3: Table Of Contents
Table of Contents XM3 Block Diagram ....4 Connecting Your XM3 ....5 Power Button Functions ....6 Crossfeed Controls......7 Disassembling the Unit....8 Replacing the Battery ....9 Gain Boost Jumpers ....10 External Power Adapters...11 Testing the Battery ....12 Charging the Battery....13 Frequently-Asked Questions ..14 Troubleshooting......15... -
Page 4: Xm3 Block Diagram
XM3 Block Diagram Amber LED Flashes battery voltage when Power Button is pressed. Power Button Press button: Flashes a one-flash warning when the battery 1 time = Turn on power for 1 hour is low (below 6.5 volts). Flashes a two-flash... -
Page 5: Connecting Your Xm3
Connecting Your XM3 1. Connect a suitable source to the input jack, as pictured. Sources may be MP3 or CD players, or line- level devices. 2. Connect your headphones to the output jack. Your headphones can have an impedance of 24 to 600 ohms. -
Page 6: Power Button Functions
3 presses: Turn unit on for three hours. 6 presses: Turn unit on for six hours. 7 presses: Turn unit on. The XM3 will not turn itself off. Press and hold: Turn unit off. The unit will respond to button presses by flashing the blue LED once for each hour it will stay on. -
Page 7: Crossfeed Controls
CrossFeed Controls Crossfeed Enable Switch Crossfeed Adjuster The XM3’s Crossfeed circuit simulates the sound stage of loudspeakers, through your headphones. Press the Switch IN to activate Crossfeed. • Leave the button OUT for full stereo operation, • bypassing the Crossfeed circuit entirely. -
Page 8: Disassembling The Unit
Disassembling the Unit If you need to change the Gain Boost Jumpers or Battery Charger Jumper, you will need to disassemble the unit. Here's how: Turn the unit off, and remove the external power adapter if connected. Remove the rear panel using a Phillips screwdriver. -
Page 9: Replacing The Battery
Replacing the Battery It is usually easier to replace the battery by removing the rear panel, instead of the front. To replace the battery: Disconnect any external power adapter, if connected. Remove the two screws holding the rear panel. Unclip and discard the old battery Hold down the power button for 10 seconds (Important!). -
Page 10: Gain Boost Jumpers
Gain Boost Jumpers With the volume knob at full, your XM3 will Gain Boost Jumpers deliver +13dB of gain. Additionally, you can install the Gain Boost jumpers, which will give you an extra +10dB of gain, for a total of +23dB. -
Page 11: External Power Adapters
Jumper removed, of course), and an external power adapter greater than 10 volts, power will come from the adapter (saving battery life). When you are at home and plugged in, the XM3 will operate from external power. When you mobilize, unplug the adapter and you benefit from the long life of the Alkaline. -
Page 12: Testing The Battery
Testing the Battery The XM3 also acts as a battery tester. When the XM3 is initially turned on, the amber LED will display the battery voltage by flashing. For example, if the voltage is 8.5 volts, the LED will flash 8 times, then 5 times. -
Page 13: Charging The Battery
Your XM3 shipped from the factory with an Industrial Alkaline 9v battery. Alternatively, a rechargeable battery can be used instead of the alkaline, and you can use the XM3's integrated battery trickle charger to recharge it. The following types of rechargeable batteries can be used: Nickel Metal-Hydride (NiMH), 8.4v or 9v... -
Page 14: Frequently-Asked Questions
Frequently-Asked Questions Can I use a line-level input to the XM3, such as from a CD player or VCR? Yes, the XM3 will accept a line-level input. Can I use the XM3 to drive speakers? Usually, no. The XM3 was designed as a headphone... -
Page 15: Troubleshooting
Troubleshooting Here are some common problems, and their solutions: Amp does not turn on or respond to pushing the power button: Disconnect the battery, hold down the power button for 10 seconds, then reconnect the battery. Headphone volume is too quiet, even with the volume knob at full: Increase volume of source (MP3 player). - Page 16 Notes...
-
Page 17: Warranty And Guarantee
Practical Devices stands behind its products with a full no-risk warranty and money-back satisfaction guarantee. Practical Devices offers a 30-day money-back guarantee on all of our products. If, for any reason whatsoever, you are unsatisfied with your purchase, you may return it for your money back, including your original shipping cost. -
Page 18: Technical Specifications
Specifications Description: Portable Audio Headphone Amplifier Weight: 140 grams (4.9 oz) Power Source: - 9-volt alkaline, NiMH, NiCd battery, or, - 8.4-volt NiMH or NiCD battery, and/or, - External Power Supply External Power Supply: 2.5mm mono audio connector power jack. If using built-in battery charger: 12VDC ±... - Page 19 Dynamic Range 97dB (20-20,000Hz, typical): User-adjustable from mono to stereo using potentiometer; Crossfeed User can bypass using pushbutton. Auto Power-OFF User selects between 1, 3, or 6 hour poweroff interval, or unit can be set to stay on indefinitely Status Indicators Two LEDS (one blue, one amber) Integrated Voltmeter accuracy...
- Page 20 XM3_v23 ©2006 www.practicaldevices.com...
Need help?
Do you have a question about the XM3 and is the answer not in the manual?
Questions and answers