Advertisement
Table of Contents
- 1 Table of Contents
- 2 Installation & Connection
- 3 Introduction, Conventions & Using the Unit
- 4 Home Screen Overview
- 5 Basic Operation Overview
- 6 Operating Modes, Alarms & User Settings
- 7 Settings of Date/Time, Language
- 8 Advanced Settings
- 9 Commissioning Wizard
- 10 Schedules
- 11 Timer Function 1
- Download this manual
Advertisement
Table of Contents

Summary of Contents for flakt woods CURO Touch
- Page 1 LCD ControL paneL Air comforT CUro toUCH ® Air TreATmenT for eCostar conTrol equipmenT » Technical insTrucTion for version 2.02 april 2015...
-
Page 3: Table Of Contents
Curo ® Touch - Technical Instruction Version 2.02 Contents instaLLation instrUCtions Installation & Connection ........................... 4 User instrUCtions Introduction, Conventions & Using the unit ....................5 Home Screen overview ............................6 Basic Operation, overview..........................7 Operating modes, Alarms & User settings ....................8 Commissioning instrUCtions Settings of date/time, language ........................9 Advanced settings ..............................10... -
Page 4: Installation & Connection
Curo ® Touch - Technical Instruction Version 2.02 instaLLation & ConneCtion of LCD ControL paneL CUro ® toUCH 1. Open the control panel using a screwdriver 4. Push the connection cable through a suitable hole and if needed make an outlet for the cable on side of the cover. Mount the enclosure directly on the wall. -
Page 5: Introduction, Conventions & Using The Unit
Curo ® Touch - Technical Instruction Version 2.02 introDUCtion, Conventions & Using tHe Unit introDUCtion Use the number buttons to enter a value. This section provides an introduction to the touchscreen LCD Confirm with or cancel with control panel, also known as the ‘Human Machine Interface’, or simply, HMI. -
Page 6: Home Screen Overview
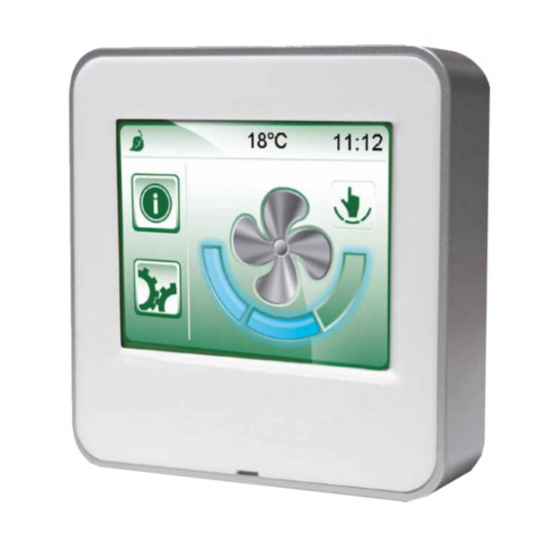
Curo ® Touch - Technical Instruction Version 2.02 Home sCreen overview statUs Line Heat recovery active Post-heater active Pre-heater active CUrrent set point CLoCk temperatUre Cooling active Defrosting in progress operating statUs aLarm Manual mode No alarm regulation Alarm B Automatic mode Constant pressure Alarm A... -
Page 7: Basic Operation Overview
Curo ® Touch - Technical Instruction Version 2.02 basiC operation overview sHortCUt to set tHe sHortCUt to set tHe time temperatUre set point anD Date aLarm seLeCt operating moDe See page 8. See page 8. User settings See page 8. triCkLe or normaL or boost or... -
Page 8: Operating Modes, Alarms & User Settings
Curo ® Touch - Technical Instruction Version 2.02 operating moDes, aLarms & User settings operating moDes User settings The operating status icon present on the Home Screen dis- plays the current operating mode. To change the operating mode, press the large fan icon located on the Home Screen. The unit has three operating modes selectable through the Operating Modes screen: Stop Mode: In this mode, the unit will stop both the... -
Page 9: Settings Of Date/Time, Language
Curo ® Touch - Technical Instruction Version 2.02 ConfigUring LangUage, Date & time settings CHoose LangUage To enter the settings menu: 1. Choose the appropriate language flag and press 1. Push on the gear cog button. the Confirm button. Note, further language flags are available after pressing the right arrow icon. -
Page 10: Advanced Settings
Curo ® Touch - Technical Instruction Version 2.02 aDvanCeD settings settings for instaLLer anD serviCe personneL This section provides an overview to the more advanced opera- tions that are available from the Home Screen via the passcode protected Advanced Settings option. Numerous system parameters can be adjusted through the Settings Screen;... -
Page 11: Commissioning Wizard
Curo ® Touch - Technical Instruction Version 2.02 Commissioning wizarD The Commissioning Wizard allows the basic unit settings to be configured in a simple and intuitive manner. The Commissioning Wizard is accessed by selection the ”Run Commissioning Wizard” option from the advanced settings screen. The speeds for each operation mode can be changed in two ways: option 2 When completed, press the Confirm button to proceed to the... -
Page 12: Schedules
Curo ® Touch - Technical Instruction Version 2.02 sCHeDULes sCHeDULes Using schedules, it is possible to fully automate the unit to pro- vide specific levels of ventilation at specific times of the day, week or year and to activate the post-heater at a given tempera- ture set point. - Page 13 Curo ® Touch - Technical Instruction Version 2.02 sCHeDULes (Cont) exampLe 2 - weekLy sCHeDULe exampLe 3 - weekLy sCHeDULe Below is an example of a weekly schedule configured to run the Below is an example of a weekly schedule configured to run the fans at normal speed from 08:00 to 18:00 Monday to Thursday, fans at normal speed from 08:00 to 18:00 Monday to Friday.
-
Page 14: Timer Function 1
Curo ® Touch - Technical Instruction Version 2.02 sCHeDULes (Cont) & timer fUnCtion singLe Date sCHeDULe A single date period schedule can be cancelled by setting both the From and To schedule dates to any date earlier than the cur- A single date schedule is defined as a one-off schedule that rent date. - Page 16 We bring www.flAkTwoods.com curo ® Touch v 2.02 | 9401GB | 20150407 better air ™ to life With over a century of innovation and expertise to share with our customers, Fläkt Woods is a global leader in Air Technology products and solutions.
Need help?
Do you have a question about the CURO Touch and is the answer not in the manual?
Questions and answers