
Summary of Contents for Technetronix BMW09CIC
- Page 1 Your best partner for better driving Technetronix BMW09CIC Update Date 2014.09.18 Model QPI-BM09-1402-011 Firmware Date...
- Page 2 Warning / Caution When installing the main unit, do not remove or alter existing vehicle fasteners, including nuts, bolts, screw, clips, and fittings. Never detach, move or alter existing vehicle wiring, including electrical grounds and straps. Alteration of existing vehicle Warning components may make vehicle unsafe to operate.
-
Page 3: Table Of Contents
Table of Contents 1. Specifications 1.1 Main Specifications 1.2 Features 1.3 System Diagram 1.4 Components 1.5 Exterior 2. Installation 2.1 Installation Diagram 2.2 Installation 3. Settings 3.1 DIP Switch 3.2 Remote Control 3.3 Car Model and Navi Model 3.4 Factory Mode 3.5 DVD, DTV I-DRIVE input 3.6 Original Button Usage 3.7 Rear Camera... -
Page 4: Specifications
1. Specifications 1.1 Main Specifications 1. Compatibility Most of brand-new cars coming with CIC Navigation Computer System including BMW 5 series 2. Product composition Multimedia Interface * 1ea 3. MULTIMEDIA INTERFACE input spec. 3 * A/V input (external video input) 1 * CVBS input (rear camera source input) 1 * RGB input (navigation system &... -
Page 5: Features
1. Specifications 1.2 Features Able to control NAVI, DVD, DTV function via Multimedia Touch GUI Able to adjust external image (DVD, NAVI) display on screen Improved Screen Display (user-oriented interface) Mode change through original button Provide power cables to connect with rear camera Dynamic PAS(Parking assistance system) -
Page 6: System Diagram
1. Specifications 1.3 System Diagram Switch for source toggle Remote control OEM Button (Can Signal) NAVIGATION Input (Analog RGB) HDMI Input (RGB-IN2) DISPLAY Car Installation A/V 1 OEM LCD VIDEO MUX A/V 2 VIDEO CIRCUIT A/V 3 CVBS (Rear camera) Car Screen Input (CAR MAIN BOARD) POWER... -
Page 7: Components
1. Specifications 1.4 Components TOUCH IN cable * 1ea (HTOUCH0009) LCD cable * 1ea (HLCDCA0005) Remote control * 1ea (REMOTE0001) BMW09CIC A/V cable * 1EA (HAVCAB0002) Mode cable * 1EA R-CAM POWER cable * 1EA (HARETC0001) (HARETC0002) RGB cable * 1ea... - Page 8 1. Specifications 1.4 Components 6.5” Touch Panel (TOUPAN0003) 8.8” Touch Panel (TOULCD0011)
-
Page 9: Exterior
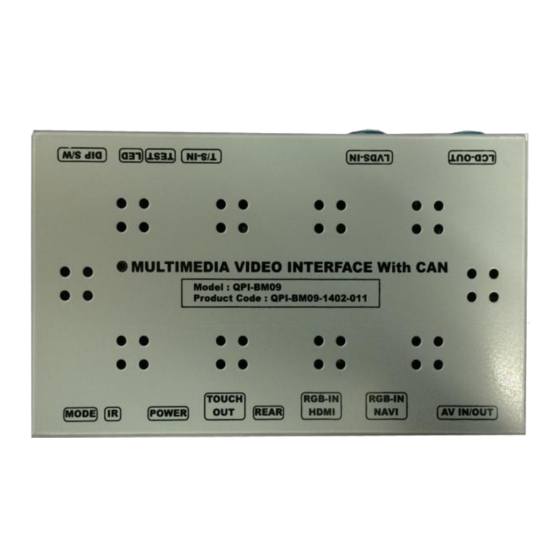
⑭ ⑬ ⑫ ⑪ ⑩ ⑨ Height 2.3.2mm ① MODE ② IR ③ POWER ④ TOUCH OUT ⑤ REAR BMW09CIC ⑥ RGB-IN HDMI ⑦ RGB-IN NAVI ⑧ AV IN/OUT ⑨ LCD-OUT ⑩ LCD-IN ① ② ③ ④ ⑤ ⑥ ⑦... -
Page 10: Installation Diagram
2.1 Installation Diagram Connecting this to the spot which the original POWER & CAN cable was connected. Original Monitor Connecting the original POWER & CAN cable to this part. Offered Original LCD Cable LCD Cable Control Box BMW09CIC Noise filter... - Page 11 2. Installation 2.2 Installation / Connection of Power cable Connect The original power& CAN Connection to the interface cable has to be NOISE FILTER BOX connected to this This has to be connected part. to the spot located at the back of the monitor which the original power &...
- Page 13 2. Installation 2.2 Installation / Monitor and Interface connection ① See left picture, Remove original LCD cable from monitor and connect with provided LCD cable. ② Connect the original LCD cable with LCD-IN on the interface. ※ Precaution : Do not connect power cable with accessory power, connect with backside of command or cigar jack.
-
Page 14: Settings
3. Settings 3.1 DIP Switch ※ Example DIP S/W usage - Use input mode : A/V2, A/V3 - Use original navigation - External rear camera ▷DIP S/W : 1,2 ON (Hide INPUT MODE) ▷DIP S/W : 3 OFF (A/V2 display) ▷DIP S/W : 4 OFF (A/V3 display) ※... -
Page 15: Remote Control
3. Settings 3.2 Remote Control Function POWER & PIP Unavailable MENU Activating OSD menu Making a selection, changing image display ▲ Moving upward ▼ Moving downward Moving leftward ◀ (If you press this button 2 seconds long, you can access the factory mode.) Moving rightward ▶... -
Page 16: Car Model And Navi Model
3. Settings 3.3 Car Model and Navi Model FACTORY mode – Press ◀ button 2 seconds long on the remote control. Setup for car model Setup for navigation Menu of FACTORY Menu of FACTORY IMAGE NAVI MODEL IMAGE NAVI MODEL PARK CAR MODEL PARK... -
Page 17: Factory Mode
3. Settings 3.4 FACTORY Mode FACTORY mode – Press ◀ button 2 seconds long on the remote control. Menu of FACTORY Menu of FACTORY IMAGE NAVI MODEL IMAGE NAVI MODEL PARK CAR MODEL PARK CAR MODEL UTIL1 AVOUT SELECT UTIL1 AVOUT SELECT UTIL2 HDMI SKIP... - Page 18 3. Settings 3.4 FACTORY Mode FACTORY mode – Press ◀ button 2 seconds long on the remote control. Menu of FACTORY Menu of FACTORY IMAGE I-DRV REMOTE IMAGE I-DRV REMOTE PARK I-DRV CONTROL PARK I-DRV CONTROL UTIL1 IR MEMORY UTIL1 IR MEMORY UTIL2 HANDLE KEY...
- Page 19 3. Settings 3.4 FACTORY Mode FACTORY mode – Press ◀ button 2 seconds long on the remote control. Menu of FACTORY Menu of FACTORY IMAGE I-DRV REMOTE IMAGE I-DRV REMOTE PARK I-DRV CONTROL PARK I-DRV CONTROL UTIL1 IR MEMORY UTIL1 IR MEMORY UTIL2 HANDLE KEY...
- Page 20 3. Settings 3.5 DVD, DTV IR MEMORY input Menu of FACTORY IMAGE I-DRV REMOTE PARK I-DRV CONTROL UTIL1 IR MEMORY UTIL2 HANDLE KEY INFO MEMORY KEY CALIBRATE MENU to Return SEL to Select/Save ① First of all, press ◀ button on ②...
-
Page 21: Dvd, Dtv I-Drive Input
3. Settings 3.5 DVD, DTV I-DRIVE input ③ After register, select “SRC” button in OSD menu. Then you example) continued.. can see confirmation window c. The values that you as shown above. At the registered will appear as moment, green text in the marked (If data is saved, DVD TYPE and area on pressing the button. -
Page 22: Original Button Usage
3. Settings 3.6 Original Button Usage I-Drive Button(All models) Mode Operation Function Long Press Mode change MENU modes Short Press back to original image Long Press Scan Channel △ Short Press Channel up ▽ Short Press Channel down ▽ Long press Operate PIP Function Reverse ▽... -
Page 23: Rear Camera
3. Settings 3.7 Rear Camera Setting up the screen option of Rear Image 5 Series(F10) : Long Press I-Drive to set up <Full Image of Rear Camera> <Rear Camera +PDC >... - Page 24 3. Settings 3.7 Rear Camera FACTORY mode – Press ◀ button 2 seconds long on the remote control. ※After installing rear camera : DIP S/W #7 must be put down (ON). Refer to page 9. Menu of FACTORY IMAGE PAS TYPE PARK PAS SETUP UTIL1...
- Page 25 3. Settings 3.8 Parking guide Lines Go to Factory Menu, choose PAS SETUP, by using OK button change H-POS → V-POS H-POS In H-POSITION, use ◁, ▷ on remote control, to adjust parking guideline left and right. V-POS In V-POSITION use △, ▽on remote control, to adjust parking guideline up and down.
-
Page 26: Osd
3. Settings 3.9 OSD (On Screen Display) / Analog RGB Mode IMAGE *LANGUAGE : Set OSD language * BRIGHTNESS (only support English and Chinese) * CONTRAST * TRANS : Adjust OSD transparency * SHARPNESS *H-POSITION : Move OSD horizontally * V-POSITION : Move OSD vertically UTIL * FACTORY RESET : Factory reset only for OSD function... - Page 27 3. Settings 3.9 OSD (On Screen Display) / Video Mode IMAGE * LANGUAGE : Set OSD language * BRIGHTNESS (only support English and Chinese) * CONTRAST * TRANS : Adjust OSD transparency * SATURATION * H_POSITION : Move OSD horizontally * HUE * V_POSITION : Move OSD vertically * SHARPNESS...
-
Page 28: Trouble Shooting
4. Trouble Shooting Q. I cannot change mode A. Check connection of Ground cable and IR Cable. Check LED lamp is on, if not check connection of POWER cable. Q. All I got on the screen is black. A. .Check second LED lamp of the interface is on, if not, check A/V sources connected are working well. - Page 29 Technetronix RM #404 4TH FLOOR, B-DONG, WOORIMLIONSVALLY, 371-28, GASAN-DONG, support@technetronix.com GEUMCHEON-GU, SEOUL, KOREA. TEL : 82-2-868-3627~9 | FAX : 82-2-2026-5987...
Need help?
Do you have a question about the BMW09CIC and is the answer not in the manual?
Questions and answers