Table of Contents
Advertisement
Available languages
Available languages
Quick Links
MSN 5005 9674
Manual de instrucciones
2.1 Soundbar mit Bluetooth
und kabellosem Subwoofer
2.1 soundbar with Bluetooth
and wireless subwoofer
Barre de son 2.1 avec fonction
Bluetooth
et caisson de basse sans fil
®
2.1 soundbar met Bluetooth
en draadloze subwoofer
Altavoces Soundbar 2.1 con función
Bluetooth
y subwoofer inalámbrico
®
Soundbar 2.1 con funzione
Bluetooth
e subwoofer senza fili
®
MEDION
LIFE
®
®
E64126 (MD 80122)
Bedienungsanleitung
User Manual
Mode d'emploi
Handleiding
Istruzioni per l'uso
-Funktion
®
function
®
-functie
®
Advertisement
Chapters
Table of Contents

Subscribe to Our Youtube Channel
Related Manuals for Medion LIFE E64126


Summary of Contents for Medion LIFE E64126
- Page 1 ® 2.1 soundbar met Bluetooth -functie ® en draadloze subwoofer Altavoces Soundbar 2.1 con función Bluetooth y subwoofer inalámbrico ® Soundbar 2.1 con funzione Bluetooth e subwoofer senza fili ® MEDION LIFE ® ® E64126 (MD 80122) MSN 5005 9674...
-
Page 2: Table Of Contents
Inhalt Zu dieser Bedienungsanleitung ..............3 1.1. Zeichenerklärung ....................3 Lieferumfang ....................4 Bestimmungsgemäßer Gebrauch .............. 4 Sicherheitshinweise ..................5 4.1. Gerät sicher montieren ..................6 4.2. Stromversorgung ....................7 4.3. Umgang mit Batterien ..................8 4.4. Reparatur ........................9 Geräteübersicht .................. -
Page 4: Zu Dieser Bedienungsanleitung
1. Zu dieser Bedienungsanleitung Lesen Sie unbedingt diese Bedienungsanleitung aufmerksam durch und befolgen Sie alle aufge führten Hinweise. So gewährleisten Sie einen zu- verlässigen Betrieb und eine lange Lebenserwartung Ihres Gerätes. Hal- ten Sie diese Bedienungsanleitung stets griffbereit in der Nähe Ihres Ge- rätes. -
Page 5: Lieferumfang
Aufzählungspunkt / Information über Ereignisse während der Bedie- • nung Auszuführende Handlungsanweisung Konformitätserklärung (siehe Kapitel „Konformitätsinformation“): Mit diesem Symbol markierte Produkte erfüllen die Anforderungen der EG-Richtlinien. 2. Lieferumfang Vergewissern Sie sich nach dem Auspacken, dass folgende Teile mitgeliefert worden sind: •... -
Page 6: Sicherheitshinweise
Beachten Sie alle Informationen in dieser Bedienungsanlei- tung, insbesondere die Sicherheitshinweise. Jede andere Be- dienung gilt als nicht bestimmungsgemäß und kann zu Per- sonen- oder Sachschäden führen. Benutzen Sie das Gerät nicht in explosionsgefährdeten Berei- chen. Hierzu zählen z. B. Tankanlagen, Kraftstofflagerbereiche oder Bereiche, in denen Lösungsmittel verarbeitet werden. -
Page 7: Gerät Sicher Montieren
Lassen Sie Kinder nicht unbeaufsichtigt an elektrischen Gerä- ten spielen. Kinder können mögliche Gefahren nicht immer richtig erkennen. 4.1. Gerät sicher montieren WARNUNG! Verletzungsgefahr durch Stromschlag! Es besteht die Gefahr eines elektrischen Schlags durch stromführende Leitungen. Wählen Sie zur Montage des Geräts einen geeigne- ten Ort und achten Sie darauf, beim Bohren keine verdeckten Elektro- oder Installationsleitungen zu beschädigen. -
Page 8: Stromversorgung
Bedecken Sie den Netzstecker des Geräts nicht mit Gegen- ständen (Zeitschriften, Decken, etc.) um zu große Erwärmung zu vermeiden. Stellen Sie keine Gegenstände auf die Kabel, da diese sonst beschädigt werden könnten. Stellen und betreiben Sie alle Komponenten auf einer stabi- len, ebenen und vibrationsfreien Unterlage, um Stürze des Geräts zu vermeiden. -
Page 9: Umgang Mit Batterien
Öffnen Sie auf keinen Fall das Gehäuse des Gerätes. Eventuel- les Berühren spannungsführender Teile sowie Verändern des elektrischen und mechanischen Aufbaus gefährden Sie und führen möglicherweise zu Funktionsstörungen des Gerätes. HINWEIS! Bei Gewitter, oder wenn Sie das Gerät längere Zeit nicht benutzen möchten, nehmen Sie es vom Netz. -
Page 10: Reparatur
Benutzen Sie die Fernbedienung nicht mehr, wenn das Bat- teriefach nicht sicher schließt und halten Sie sie von Kindern fern. Prüfen Sie vor dem Einlegen der Batterien, ob die Kontakte im Gerät und an den Batterien sauber sind, und reinigen Sie die- se gegebenenfalls. -
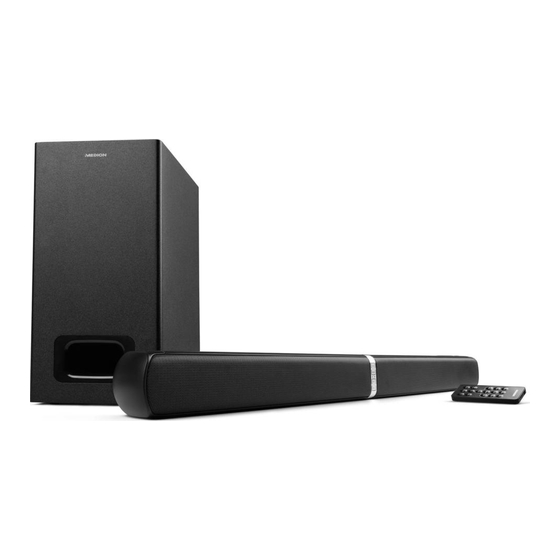
Page 11: Geräteübersicht
5. Geräteübersicht Lautsprecher NFC-Zone (Near Field Communication) : Ein-/Ausschalten SOURCE: Audioquelle wählen LED-Betriebsanzeigen VOL+/VOL–: Lautstärke einstellen AUX: Anschlussbuchse für TV und andere Audiogeräte OPTICAL: Optischer Eingang für TV und andere Audiogeräte HDMI: Eingang für (ARC-fähige) TV, Computer und andere Audiogeräte AC~: Anschlussbuchse für Netzkabel Fernbedienungssensor Standfuß... -
Page 12: Fernbedienung
5.1. Fernbedienung MUTE: Stumm schalten HDMI ARC: HDMI ARC-Eingang wählen VOL+/VOL–: Lautstärke einstellen Klangeffekt MUSIC einstellen Klangeffekt FLAT einstellen (kein Klangeffekt) Klangeffekt MOVIE einstellen : Vorheriger Titel/nächster Titel : Play/Pause: Audiowiedergabe starten/stoppen; PAIR: Bluetooth-Verbindung herstellen AUX: AUX-Eingang wählen BT: Bluetooth-Betrieb wählen : Ein-/Ausschalten OPTICAL: Optical-Eingang wählen BASS+/BASS–: Bass-Lautstärke einstellen... -
Page 13: Subwoover
5.2. Subwoover Netzanschluss Pair LED PAIR Taste... -
Page 14: Batterien In Die Fernbedienung Einlegen
6. Batterien in die Fernbedienung einlegen In der Fernbedienung ist eine Lithium Batterie CR2025 3V eingesetzt. HINWEIS! Wenn Sie die Fernbedienung zum ersten Mal in Betrieb nehmen, ziehen Sie die trans- parente Folie heraus ohne das Batteriefach zu öffnen. Wenn das Gerät nicht oder nur schlecht auf die Fernbe- dienung reagiert, muss die Batterie ausgetauscht wer- den. -
Page 15: Soundbar Montieren
7. Soundbar montieren Es gibt drei Varianten, wie Sie die Soundbar verwenden können: stehend als zwei Lautsprecher-Türme, liegend oder an der Wand montiert. 7.1. Variante stehende Lautsprecher Nehmen Sie jeweils den rechten und linken Lautsprecher und verbinden ihn mit dem passenden Standfuß. -
Page 16: Variante Liegende Soundbar
7.2. Variante liegende Soundbar Nehmen Sie die beiden Lautsprecher und verbinden Sie sie wie auf der Abbil- dung dargestellt. Achten Sie darauf, dass die Steckvorrichtung eines Lautsprechers passgenau in die des anderen passt. Halten Sie den einen Lautsprecher fest und drehen Sie den anderen in Richtung des geschlossenen Schlosssymbols. -
Page 17: Audiogerät Anschließen
Entfernen Sie die beiden Schrauben, die sich jeweils am Ende der Soundbar be- finden. Schrauben Sie die beiden Wandhalterun- gen mit den gerade entfernten Schrau- ben an den Enden der Soundbar an. Bohren Sie 2 Löcher parallel (Ø 3-8 mm je nach Wandtyp) in ie Wand. - Page 18 Media player HDMI ARC GEFAHR! Stromschlaggefahr/Möglicher Geräteschaden! Es besteht die Gefahr des elektrischen Schlags durch das Anschließen nicht zugelassener Geräte. Achten Sie beim Anschluss von Geräten an den AUX-, Klinken- oder Cinch-Anschlüssen darauf, dass die je- weiligen Geräte der Niederspannungsrichtlinie ent- sprechen müssen.
-
Page 19: Gerät Über Aux Anschließen
8.1. Gerät über AUX anschließen 8.1.1. Audiokabel mit 2 x 3,5mm Ø Klinke Sie benötigen ein Audiokabel mit 2 x 3,5mm Ø Klinke (im Lieferumfang enthalten) zum Anschluss an einen Kopfhöreranschluss von z. B. CD- oder MP3-Playern (siehe Abb. Variante A). ... -
Page 20: Geräte Über Hdmi (Arc) Anschließen
8.3. Geräte über HDMI (ARC) anschließen Sie benötigen ein HDMI-Kabel (siehe Abb. Variante D). Das HDMI-Kabel ist nicht im Lieferumfang enthalten. Stellen Sie bei dem Audiogerät eine mittlere Lautstärke ein. Schalten Sie es dann aus. Verbinden Sie den HDMI-Anschluss mit dem HDMI IN-Anschluss Ihres Fernse- hers. -
Page 21: Nfc-Fähiges Smartgerät
Der Gerätename der Soundbar wird angezeigt, sobald das Signal gefunden wurde. Falls eine Passworteingabe erforderlich ist, geben Sie 0000 ein. Die Geräteabstimmung beider Geräte ist abgeschlossen, wenn die Ansage PAIRED ertönt und die Betriebsanzeige blau leuchtet. Wird die Verbindung unterbrochen, ertönt die Ansage DISCONNECTED. 9.1. -
Page 22: Suwoover Verbinden
10.1. Suwoover verbinden Der Subwoover verbindet sich automatisch mit der Soundbar, sobald beide einge- schaltet werden. Sollte sich der Subwoover nicht automatische mit der Soundbar verbinden, gehen Sie wie folgt vor: Drücken und halten Sie die PAIR Taste am Subwoover für ca. 3 Sekunden ge- drückt. -
Page 23: Soundbar Einschalten
12. Soundbar einschalten Schalten Sie die Soundbar ein, indem Sie die -Taste auf der Fernbedienung oder an der Soundbar drücken. Schalten Sie Ihr Audiogerät ein, wählen Sie eine mittlere Lautstärke und starten Sie die Wiedergabe. HINWEIS! Ist ein TV oder externes Gerät über die Anschlüsse AUX oder HDMI an- geschlossen, wird sich die Soundbar nach wenigen Augenblicken auto- matisch einschalten, wenn der Fernseher oder das externe Gerät einge- schaltet werden. -
Page 24: Audiowiedergabe Im Aux-/Bluetooth-Betrieb
15. Audiowiedergabe im AUX-/Bluetooth- Betrieb Wenn Sie die Soundbar mit einem Gerät verbunden haben, das das A2DP-Profil so- wie AVRCP-Profil (Audio Video Remote Control) unterstützt, wird die Soundbar als Ausgabemedium verwendet und die Audiosignale werden so ausschließlich von der Soundbar ausgegeben. HINWEIS! Wenn Sie die Soundbar mit Ihrem Bluetooth-fähigen Mobiltelefon ver- bunden haben, wird bei einem eingehenden Anruf die Musikwiederga-... -
Page 25: Wartung
17. Wartung WARNUNG Verletzungsgefahr durch Stromschlag! Versuchen Sie auf keinen Fall, das Gerät selbst zu öff- nen oder zu reparieren. Es besteht die Gefahr des elektrischen Schlags! Bitte wenden Sie sich an unser Service Cen ter wenn Sie technische Probleme mit Ihrem Gerät haben. -
Page 26: Wenn Störungen Auftreten
19. Wenn Störungen auftreten Bei einer Störung des Geräts prüfen Sie bitte zunächst, ob Sie das Problem mit Hilfe der folgenden Übersicht selbst beheben können. Versuchen Sie auf keinen Fall, die Geräte selbst zu reparieren. Wenn eine Reparatur notwendig ist, wenden Sie sich bitte an unser Service Center oder eine andere ge- eignete Fachwerkstatt. -
Page 27: Entsorgung
20. Entsorgung Verpackung Ihr Gerät ist zum Schutz vor Transportschäden in einer Verpackung. Ver- packungen sind Rohstoffe und somit wieder verwendungsfähig oder können dem Rohstoffkreislauf zurückgeführt werden. Gerät Werfen Sie das Gerät am Ende seiner Lebenszeit keinesfalls in den nor- malen Hausmüll. -
Page 28: Technische Daten
150 x 303 x 220 mm Subwoover Fernbedienung: 1 x 3 V Batterie, Typ Knopfzelle CR2025 (im Lieferumfang enthalten) Reichweite: ca. 6 m 22. Konformitätsinformation Hiermit erklärt die Medion AG, dass das Produkt MD 80122 mit den folgenden europäischen Anforderungen überein- stimmt: • RE Richtlinie 2014/53/EU •... -
Page 29: Serviceinformationen
Ihre Erfahrungen austauschen und Ihr Wissen weiter- geben. Sie finden unsere Service Community unter http://community.medion.com. • Gerne können Sie auch unser Kontaktformular unter www.medion.com/contact nutzen. • Selbstverständlich steht Ihnen unser Serviceteam auch über unsere Hotline oder postalisch zur Verfügung. -
Page 30: Impressum
Diese Bedienungsanleitung ist urheberrechtlich geschützt. Vervielfältigung in mechanischer, elektronischer und jeder anderen Form ohne die schriftliche Genehmigung des Herstellers ist verboten. Das Copyright liegt bei der Firma: MEDION AG Am Zehnthof 77 45307 Essen Deutschland Bitte beachten Sie, dass die oben stehende Anschrift keine Retourenanschrift ist. Kon-... - Page 32 Sommaire À propos de ce mode d’emploi ..............31 1.1. Explication des symboles .................31 Contenu de l'emballage ................32 Utilisation conforme .................. 32 Consignes de sécurité................33 4.1. Installation de l'appareil en toute sécurité ..........34 4.2. Alimentation électrique ..................35 4.3. Manipulation des piles ..................36 4.4.
- Page 33 Page 32...
-
Page 34: À Propos De Ce Mode D'emploi
1. À propos de ce mode d’emploi Veuillez lire attentivement le présent mode d’emploi dans son intégralité et respecter toutes les consignes indiquées. Vous serez ainsi assuré du bon fonctionnement et de la durée de vie de votre appareil. Gardez tou- jours le présent mode d’emploi à... -
Page 35: Contenu De L'emballage
Action à exécuter Déclaration de conformité (voir chapitre « Information relative à la conformité ») : les produits portant ce symbole respectent toutes les dispositions communautaires applicables de l‘Espace économique européen. La signalétique « Triman » informe le consommateur que le produit est recyclable, est soumis à... -
Page 36: Consignes De Sécurité
Tenez compte de toutes les informations contenues dans le présent mode d'emploi, en particulier des consignes de sé- curité. Toute autre utilisation est considérée comme non conforme et peut entraîner des dommages corporels ou ma- tériels. N'utilisez pas l'appareil dans des zones potentiellement ex- plosives. -
Page 37: Installation De L'appareil En Toute Sécurité
AVERTISSEMENT ! Risque de blessure en cas de manipulation incor- recte Cet appareil n'est pas destiné à être utilisé par des personnes (y compris les enfants) dont les capacités physiques, sensorielles ou mentales sont limitées ou manquant d'expérience et/ou de connaissances, sauf si elles sont surveillées par une personne respon- sable de leur sécurité... -
Page 38: Alimentation Électrique
Ne posez pas de récipients remplis de liquide (p. ex. un vase) sur ou à proximité de l'appareil et du cordon d'alimentation. Le récipient pourrait se renverser et le liquide porter atteinte à la sécurité électrique. Protégez l'appareil et tous les périphériques raccordés de l'hu- midité, des gouttes et projections d'eau. -
Page 39: Manipulation Des Piles
Branchez l'appareil uniquement sur des prises mises à la ter- re de 220-240 V ~ 50/60 Hz. Si vous n'êtes pas sûr du voltage sur le lieu d'installation, renseignez-vous auprès de votre cen- tre EDF. N'utilisez plus la fiche d'alimentation de l'appareil si le boîtier ou le cordon d'alimentation de l'appareil est endommagé. -
Page 40: Réparation
Si le compartiment à piles ne peut plus être refermé correc- tement, n‘utilisez plus la télécommande et rangez-le dans un endroit hors de portée des enfants. Avant d‘insérer les piles, vérifiez que les contacts des piles et de l‘appareil sont bien propres et nettoyez-les si nécessaire. ... -
Page 41: Vue D'ensemble De L'appareil
5. Vue d'ensemble de l'appareil Haut-parleur Zone NFC (Near Field Communication) : mise en marche/arrêt SOURCE : sélection de la source audio LED de fonctionnement VOL+/VOL– : réglage du volume AUX : prise pour téléviseurs et autres périphériques audio OPTICAL : entrée optique pour téléviseurs et autres périphériques audio HDMI : entrée pour téléviseurs (compatibles ARC), ordinateurs et autres péri- phériques audio AC~ : prise pour cordon d'alimentation... -
Page 42: Télécommande
5.1. Télécommande MUTE : désactivation du son HDMI ARC : sélectionner entrée ARC HDMI VOL+/VOL– : réglage du volume Régler effet sonore MUSIC Régler effet sonore FLAT (aucun effet sonore) Régler effet sonore MOVIE : titre précédent / titre suivant : Play/Pause : lancer/arrêter la lecture audio ; PAIR : établir la connexion Blue- tooth AUX : sélectionner entrée AUX BT : sélectionner mode Bluetooth... -
Page 43: Caisson Des Basses
5.2. Caisson des basses Raccordement secteur LED PAIR Bouton PAIR Page 42... -
Page 44: Insertion De La Pile Dans La Télécommande
6. Insertion de la pile dans la télécommande Une pile lithium CR2025 de 3 V est déjà insérée dans la télécommande. REMARQUE ! Lorsque vous utilisez la télécommande pour la première fois, retirez le film transparent sans ouvrir le compartiment à pile. Si l'appareil ne réagit pas ou mal à... -
Page 45: Montage De La Barre De Son
7. Montage de la barre de son Vous pouvez utiliser cette barre de son de trois manières différentes : Sous forme de deux tours haut-parleurs debout, posée à plat ou fixée sur un mur. 7.1. Utilisation comme tours haut-parleurs Prenez le haut-parleur droit et gauche et raccordez chaque haut-parleur avec le pied approprié. -
Page 46: Utilisation Comme Barre De Son Posée À Plat
7.2. Utilisation comme barre de son posée à plat Prenez les deux haut-parleurs et assemblez-les comme illustré ci-dessus. Veillez à ce que les connecteurs des deux haut-parleurs s'emboîtent parfaite- ment l'un dans l'autre. Tenez fermement un des haut-parleurs et tournez l'autre haut-parleur dans le sens du symbole de cadenas fermé. - Page 47 Pour monter l'appareil, choisissez un endroit approprié et veil- lez à ne pas endommager de lignes électriques ou d'installa- tion passant dans le mur lorsque vous percez les trous. Enlevez les deux vis se trouvant à cha- que extrémité de la barre de son. ...
-
Page 48: Raccordement D'un Périphérique Audio
8. Raccordement d'un périphérique audio Respectez les consignes indiquées au chapitre « 4. Consignes de sécurité ». Respectez également le mode d'emploi du périphérique auquel vous voulez rac- corder la barre de son. Éteignez tous les appareils avant de les raccorder entre eux. Vous pouvez raccorder cette barre de son à... -
Page 49: Raccordement De Périphériques Via Aux
8.1. Raccordement de périphériques via AUX 8.1.1. Câble audio avec 2 x jack Ø 3,5 mm Vous avez besoin d'un câble audio avec 2 x jack Ø 3,5 mm (fourni) pour raccorder la barre de son à la prise casque p. ex. d'un lecteur CD ou MP3 (voir fig. Variante A). ... -
Page 50: Raccordement De Périphériques Via Hdmi (Arc)
8.3. Raccordement de périphériques via HDMI (ARC) Vous avez besoin d'un câble HDMI (voir fig. Variante D). Ce câble n'est pas fourni avec la barre de son. Réglez un volume moyen sur le périphérique audio. Puis éteignez-le. Raccordez la prise HDMI à la prise HDMI IN de votre téléviseur. ... -
Page 51: Périphérique Mobile Compatible Nfc
Le nom d'appareil de la barre de son s'affiche dès que le signal a été trouvé. Si la saisie d'un mot de passe est nécessaire, entrez 0000. La synchronisation des deux appareils est terminée lorsque vous entendez l'an- nonce « PAIRED » et que la LED de fonctionnement est allumée en bleu. Si la connexion est interrompue, vous entendez l'annonce « DISCONNECTED ». -
Page 52: Raccordement Du Caisson Des Basses
10.1. Raccordement du caisson des basses Le caisson des basses est raccordé automatiquement à la barre de sons dès que les deux éléments sont allumés. Si le caisson des basses n'est pas raccordé automatiquement à la barre des sons, sui- vez la procédure indiquée ci-après : ... -
Page 53: Mise En Marche De La Barre De Son
12. Mise en marche de la barre de son Allumez la barre de son en appuyant sur la touche de l'appareil ou de la télé- commande. Allumez votre périphérique audio, réglez le volume sur un niveau moyen et lan- cez la lecture. -
Page 54: Réglage Du Volume
14. Réglage du volume Pour régler le volume, utilisez les touches VOL +/VOL- de la barre de son ou / de la télécommande : + Augmenter le volume – Réduire le volume Vous pouvez régler le volume des basses à l'aide des boutons BASS+ / BASS -. La touche MUTE de la télécommande vous permet de couper le son. -
Page 55: Maintenance
17. Maintenance AVERTISSEMENT ! Risque de blessure par électrocution ! N'essayez en aucun cas d'ouvrir ou de réparer vous- même l'appareil. Vous risqueriez de vous électrocu- ter ! Veuillez vous adresser à notre centre de service après-vente si vous rencontrez des problèmes techniques avec votre appareil. -
Page 56: En Cas De Dysfonctionnements
19. En cas de dysfonctionnements En cas de problème avec l'appareil, vérifiez tout d'abord si vous pouvez y remédier vous-même à l'aide du récapitulatif suivant. N'essayez en aucun cas de réparer vous-même l'appareil. Si une réparation s'avère nécessaire, veuillez vous adresser à notre centre de service après-vente ou à un autre atelier spécialisé. -
Page 57: Élimination
20. Élimination Emballage Les différents emballages usagés sont recyclables et doivent par prin- cipe être recyclés. Élimination correcte de ce produit À l'intérieur de l'UE, ce symbole indique que ce produit ne doit pas être éliminé avec les ordures ménagères. Les appareils usagés contiennent de précieux matériaux recyclables qu'il convient de réutiliser pour éviter toute élimination incontrôlée des déchets qui nuirait à... -
Page 58: Caractéristiques Techniques
1 pile bouton 3 V, type CR2025 (fournie) Portée : Env. 6 m 22. Informations relatives à la conformité Par la présente, la société Medion AG déclare que le produit MD 80122 est conforme aux exigences européennes sui- vantes : •... - Page 59 Hotline SAV Lun - Ven : 9h00 à 19h00 02 43 16 60 30 Adresse du service après-vente MEDION France 75 Rue de la Foucaudière 72100 LE MANS France Le présent mode d’emploi et bien d’autres sont disponibles au téléchargement sur le portail de service après-vente www.medion.com/fr/service/accueil/.
-
Page 60: Mentions Légales
Le présent mode d’emploi est protégé par les droits d’auteur. Toute reproduction sous forme mécanique, électronique ou sous toute autre forme que ce soit est interdite sans l’autorisation préalable écrite du fabricant. L’entreprise suivante possède les droits d’auteur : MEDION AG Am Zehnthof 77 45307 Essen Allemagne Veuillez noter que l’adresse ci-dessus n’est pas celle du service des retours. - Page 61 Page 60...
- Page 62 Inhoud Betreffende deze handleiding ..............59 1.1. Verklaring van de tekens ..................59 Inhoud van de verpakking ................ 60 Gebruik voor het beoogde doel ............... 60 Veiligheidsinstructies ................61 4.1. Het apparaat veilig monteren ................62 4.2. Stroomvoorziening .....................63 4.3. Omgang met batterijen ..................64 4.4.
-
Page 64: Betreffende Deze Handleiding
1. Betreff ende deze handleiding Lees deze handleiding nauwkeurig door en neem alle aanwijzingen in acht. Hiermee garandeert u een betrouwbare werking en een lange le- vensduur van uw apparaat. Houd deze handleiding steeds binnen hand- bereik bij uw apparaat. Bewaar de bedieningshandleiding goed, zodat u deze bij de verkoop van het apparaat kunt doorgeven aan de nieuwe ei- genaar. -
Page 65: Inhoud Van De Verpakking
Verklaring van conformiteit (zie het hoofdstuk „Conformiteitsinforma- tie“): Producten die met dit symbool zijn gemarkeerd voldoen aan de eisen zoals vastgelegd in de EG-richtlijnen. 2. Inhoud van de verpakking Controleer na het uitpakken of de volgende onderdelen zijn meegeleverd: • Soundbar •... -
Page 66: Nl En
kinstallaties, brandstofopslag of omgevingen waarin oplos- middelen worden verwerkt. Dit apparaat mag ook niet wor- den gebruikt in omgevingen waar de lucht belast is met fijne deeltjes (zoals meel- of houtstof ). Stel het apparaat niet bloot aan extreme omstandigheden. Het is uitsluitend bedoeld voor gebruik in binnenruimten. -
Page 67: Het Apparaat Veilig Monteren
4.1. Het apparaat veilig monteren WAARSCHUWING! Gevaar voor letsel door elektrische schok! Er bestaat gevaar voor een elektrische schok door span- ningvoerende onderdelen. Kies een geschikte locatie voor de montage van het apparaat en let erop dat u bij het boren geen elektri- citeitskabels of installatieleidingen beschadigt. -
Page 68: Stroomvoorziening
Plaats en gebruik alle onderdelen op een stabiele, vlakke en trillingvrije ondergrond zodat het apparaat niet kan vallen. Houd een afstand van minimaal één meter aan tussen het ap- paraat en hoogfrequente en magnetische storingsbronnen (televisietoestel, andere luidsprekerboxen, mobiele telefoons etc.) om storingen te vermijden. -
Page 69: Omgang Met Batterijen
OPMERKING! Haal bij onweer of als u het apparaat langere tijd niet gebruikt de stekker uit het stopcontact. Als u het apparaat niet gebruikt, verwijder dan de stekker van het netsnoer uit het stopcontact of maak gebruik van een master-/slavevoorziening om te voorkomen dat stroom wordt verbruikt in uitgeschakelde toestand. -
Page 70: Reparatie
Bij onjuist vervangen van de batterijen bestaat gevaar voor explosie! Vervang de batterij alleen door eenzelfde of een ge- lijkwaardig type. Probeer gewone batterijen nooit op te laden. Hierbij bestaat gevaar voor explosie! Stel batterijen nooit bloot aan overmatige hitte (zoals rechtstreeks zonlicht, vuur etc.). -
Page 71: Overzicht Van Het Apparaat
5. Overzicht van het apparaat luidspreker NFC-zone (Near Field Communication) : in-/uitschakelen SOURCE: audiobron kiezen Led functie-indicaties VOL+/VOL–: volume instellen AUX: aansluiting voor tv en andere audioapparatuur OPTICAL: optische ingang voor tv en andere audioapparatuur HDMI: ingang voor (ARC-compatibele) tv, computer en andere audioappara- tuur AC~: aansluiting voor netsnoer sensor afstandsbediening... -
Page 72: Afstandsbediening
5.1. Afstandsbediening MUTE: geluid dempen HDMI ARC: HDMI ARC-ingang kiezen VOL+/VOL–: volume instellen Geluidseffect MUSIC kiezen Geluidseffect FLAT kiezen (geen geluidseffect) Geluidseffect MOVIE kiezen : vorig nummer/volgend nummer : Play/Pause: audioweergave starten/stoppen; PAIR: Bluetooth-verbinding ma- AUX: AUX-ingang kiezen BT: Bluetooth-modus kiezen : in-/uitschakelen OPTICAL: optische ingang kiezen BASS+/BASS–: Basvolume instellen... -
Page 73: Subwoofer
5.2. Subwoofer Lichtnetaansluiting Pair-LED Toets PAIR... -
Page 74: Batterijen In De Afstandsbediening Plaatsen
6. Batterijen in de afstandsbediening plaatsen In de afstandsbediening is een 3 V lithiumbatterij geplaatst van het type CR2025. OPMERKING! Als u de afstandsbediening voor het eerst in gebruik neemt, verwijdert u de transparante folie zonder het batterijvak te openen. Als het apparaat niet of slecht op de afstandsbediening reageert, moet de batterij worden vervangen. -
Page 75: Soundbar Monteren
7. Soundbar monteren Er zijn drie mogelijkheden om de soundbar te gebruiken: staande als twee luidsprekerzuilen, liggend of aan de wand gemonteerd. 7.1. Variant staande luidsprekers Neem de resp. rechter en linker luidspreker en bevestig de passende voet. Let erop dat de bevestiging van de luidspreker exact in de voet moet vallen (zie afb. -
Page 76: Variant Liggende Soundbar
7.2. Variant liggende soundbar Neem de beide luidsprekers en verbind deze zoals op de afbeelding weergege- ven. Let erop dat de bevestiging van de ene luidspreker exact in de bevestiging op de andere luidspreker valt. Houd de ene luidspreker vast en draai deze in de richting van het gesloten slotje. ... - Page 77 Verwijder de beide schroeven aan de uit- einden van de soundbar. Schroef de beide wandhouders met de zojuist verwijderde schroeven aan de ui- teinden van de soundbar. Boor twee gaten op gelijke hoogte (Ø 3-8 mm afhankelijk van het type wand) in de wand.
-
Page 78: Audioapparaat Aansluiten
8. Audioapparaat aansluiten Neem de opmerkingen in hoofdstuk „4. Veiligheidsinstructies“ in acht. Neem ook handleiding in acht van het apparaat waarop u de soundbar wilt aansluiten. Schakel alle apparaten uit, voordat u deze met elkaar verbindt. U kunt een groot aantal verschillende audioapparaten op dit apparaat aansluiten, zoals een mp3- of cd-speler, de tuner van uw stereo-installatie, uw computer of uw televisie. -
Page 79: Apparaat Aansluiten Via Aux
8.1. Apparaat aansluiten via AUX 8.1.1. Audiokabel met 2x 3,5 mm Ø klinkstekker U heeft een audiokabel nodig met 2x 3,5 mm Ø klinkstekker (meegeleverd) om de soundbar aan te sluiten op de hoofdtelefoonaansluiting van bijvoorbeeld een cd- of mp3-speler (zie afb. variant A). ... -
Page 80: Apparaten Aansluiten Via Hdmi (Arc)
OPMERKING! Wanneer er geen audiosignalen worden weergegeven, moet u het uit- voerformaat van uw uitvoerapparaat omschakelen naar het PCM-modus (Pulse Code Modulation). 8.3. Apparaten aansluiten via HDMI (ARC) U heeft een HDMI-kabel nodig (zie afb. variant D). De HDMI-kabel is niet bij de lever- ing inbegrepen. -
Page 81: Smartapparaat Met Nfc-Ondersteuning
OPMERKING! Informatie over de Bluetooth-functie van uw audio-uitvoerapparaat vindt u in de bijbehorende handleiding. Op de soundbar wordt de naam van het apparaat weergegeven zodra het signaal is gevonden. Wanneer er om een wachtwoord wordt gevraagd, voert u 0000 in. De koppeling van de beide apparaten is afgerond wanneer de melding PAIRED klinkt en de indicator blauw knippert. -
Page 82: Subwoofer Aansluiten Op Het Lichtnet
10. Subwoofer aansluiten op het lichtnet Sluit het netsnoer aan op de AC~-aansluiting voor het netsnoer. Controleer of alle gewenste apparaten zijn aangesloten. Steek de stekker van het netsnoer in een stopcontact voor 220-240 V~ 50/60 Hz. 10.1. Subwoofer verbinden De subwoofer maakt automatisch verbinding met de soundbar, zodra beide wor- den ingeschakeld. -
Page 83: Soundbar Aansluiten Op Het Lichtnet
11. Soundbar aansluiten op het lichtnet Sluit het netsnoer aan op de AC~-aansluiting voor het netsnoer. Controleer of alle gewenste apparaten zijn aangesloten. Steek de stekker van het netsnoer in een stopcontact voor 220-240 V ~ 50/60 Hz. 12. -
Page 84: Audiobron Kiezen
13. Audiobron kiezen Met de toets SOURCE op de soundbar of de toetsen OPTICAL, AUX, BT en HDMI ARC op de afstandsbediening kunt u de gewenste audiobron kiezen: AUX, BT, HDMI ARC of Optical. De keuze van de bedrijfsmodi wordt met behulp van gekleurde led's weergegeven: Statusindicatie Knippert Brandt permanent... -
Page 85: Geluidsinstelling Kiezen
Met de toets : op de afstandsbediening start of stopt u de audioweergave. Met de toetsen op de afstandsbediening kiest u de gewenste titel: indrukken volgende titel indrukken vorige nummer 16. Geluidsinstelling kiezen Met de toetsen FLAT, MOVIE en MUSIC op de afstandsbediening stelt u het geluid- seffect MOVIE of MUSIC in, resp. -
Page 86: In Geval Van Storingen
19. In geval van storingen Wanneer het apparaat niet correct werkt, ga dan eerst aan de hand van de onder- staande lijst na of u het probleem zelf kunt verhelpen. Probeer in geen geval zelf reparaties uit te voeren. Neem voor reparaties contact op met ons servicecentrum of een ander deskundig bedrijf. -
Page 87: Afvoer
20. Afvoer Verpakking Niet meer benodigde verpakkingen en hulpmiddelen kunnen worden gerecycled en dienen als herbruikbaar materiaal te worden afgevoerd. Correcte afvoer van dit product Binnen de EU wijst dit symbool erop dat dit product niet met het huis- vuil mag worden afgevoerd. Oude apparatuur bevat waardevolle mate- rialen die kunnen worden hergebruikt en mag niet ongecontroleerd worden afgevoerd om schade aan de gezondheid of het milieu te voor- komen. -
Page 88: Technische Gegevens
22. Verklaring van conformiteit Hiermee verklaart Medion AG dat het product MD 80122 voldoet aan de volgende Europese eisen: • RE Richtlijn 2014/53/EU • Ecodesign-richtlijn 2009/125/EG • RoHS-richtlijn 2011/65/EU. De complete verklaring van conformiteit is te vinden op www.medion.com/confor- mity. -
Page 89: Informatie Over De Bluetooth
• In onze Service Community vindt u andere gebruikers en onze medewerkers en daar kunt u uw ervaringen uitwisselen en uw kennis delen. U vindt onze Service Community onder http://community.medion.com. • U kunt natuurlijk ook ons contactformulier gebruiken onder www.medion.com/contact. -
Page 90: Colofon
Deze gebruiksaanwijzing is auteursrechtelijk beschermd. Verveelvoudiging in mechanische, elektronische of welke andere vorm dan ook zonder schriftelijke toestemming van de fabrikant is verboden. Het copyright berust bij de firma: MEDION AG Am Zehnthof 77 45307 Essen Duitsland Houd er rekening mee dat het bovenstaande adres geen retouradres is. Neem eerst... - Page 92 Contents About these Operating Instructions ............89 1.1. Key to symbols .....................89 Package Contents ..................90 Proper Use ....................90 Safety Information ..................91 4.1. Ensure the equipment is securely installed ..........92 4.2. Power supply ......................93 4.3. Handling batteries ....................94 4.4.
-
Page 94: About These Operating Instructions
1. About these Operating Instructions Read these Operating Instructions carefully and comply with the infor- mation provided in them. This will ensure that your device works reliably and has a long service life. Always keep these Operating Instructions close to hand. Keep these Operating Instructions in good condition so they can be passed on to the new owner if you decide to sell the device or give it to someone else. -
Page 95: Package Contents
Mandatory handling instructions Declaration of Conformity (see "Declaration of Conformity" section): Products that feature this symbol meet the requirements of the EC di- rectives. 2. Package Contents When you unpack the package, check that the following parts have been supplied: •... -
Page 96: Safety Information
Comply with all the information in these Operating Instruc- tions, especially the safety information. Any other use is im- proper, and might cause personal injury or damage to prop- erty. Do not use the device in potentially explosive atmospheres. This includes petrol stations, fuel storage areas or areas where solvents are processed. -
Page 97: Ensure The Equipment Is Securely Installed
Children are not always able to recognise and avoid possible dangers. 4.1. Ensure the equipment is securely installed WARNING! Risk of injury due to electric shock! There is a risk of electric shock due to live cables and wiring. Install the device in a suitable location, and take care not to hit any hidden electrical cables or pipework when drilling. -
Page 98: Power Supply
this may damage the cable. To prevent the device from falling, only install and operate it and its components on a sturdy, level, vibration-free surface. Keep the device at a distance of at least one metre from sources of high-frequency or magnetic interference (televi- sions, other loudspeakers, mobile telephones, etc.) to avoid malfunctions. -
Page 99: Handling Batteries
Never open the device housing. Touching live parts or at- tempting to modify the device's electrical or mechanical func- tionality puts you at risk, and may also damage the device. PLEASE NOTE! Unplug the device from the power socket if it is not go- ing to be used for a longer period of time, or during a thunderstorm. -
Page 100: Repairs
Stop using the remote control if you cannot close the battery compartment securely, and keep it well away from children. Before inserting the batteries, check that the contacts in the device and on the batteries are clean and, if necessary, clean them. -
Page 101: Device Overview
5. Device Overview Loudspeaker NFC (Near Field Communication) zone : Switch on/off SOURCE: Select audio source LED operating displays VOL+/VOL–: Volume control AUX: Connection socket for TV and other audio equipment OPTICAL: Optical input for TV and other audio equipment HDMI: Input for (ARC-enabled) TVs, computers and other audio equipment AC~: Connection socket for power cable Remote control sensor... -
Page 102: Remote Control
5.1. Remote control MUTE: Mute function HDMI ARC: Select HDMI ARC input VOL+/VOL–: Volume control Set MUSIC sound effect Set FLAT sound effect (no sound effect) Set MOVIE sound effect : Previous track/next track : Play/Pause: Start/pause audio playback; PAIR: Set up Bluetooth connection AUX: Select AUX input BT: Select Bluetooth operation : Switch on/off... -
Page 103: Subwoofer
5.2. Subwoofer Mains connection Pair LED PAIR button... -
Page 104: Insert Batteries In The Remote Control
6. Insert batteries in the remote control The remote control contains a CR2025 3V lithium battery. PLEASE NOTE! The first time you use the remote control, pull off the transparent film without open- ing the battery compartment. Replace the battery if the device fails to react to com- mands from the remote control properly. -
Page 105: Installing The Soundbars
7. Installing the Soundbars The Soundbars can be used in three different ways: vertically, as two loudspeaker towers, horizontally or wall-mounted. 7.1. Vertical variant, as standing loudspeakers Connect each of the loudspeakers to its base. Check that the plug on the bottom of each loudspeaker fits securely into its base socket (see Figures a and b). -
Page 106: Horizontal Variant
7.2. Horizontal variant Connect the two loudspeakers as shown in the Figure. Check that the plug connection on one loudspeaker fits securely into the plug connection on the other loudspeaker. Holding one loudspeaker firmly, rotate the other one in the direction of the closed padlock symbol. -
Page 107: Connecting Audio Equipment
Remove the two screws, one at each end of the Soundbar. Use the screws you have just removed to attach a wall bracket to each end of the Soundbar. Drill 2 holes into the wall, parallel to each other (diameter 3 to 8 mm, depending on the wall construction). - Page 108 Media player HDMI ARC DANGER! Risk of electric shock/possible damage to the de- vice! There is a risk of electric shock if you connect unap- proved equipment. Check that the device you want to connect complies with the low-voltage directive before connecting it to the AUX, jack or cinch connection.
-
Page 109: Connecting The Device Via Aux
8.1. Connecting the device via AUX 8.1.1. Audio cable with a 2 x 3.5mm diameter jack You need an audio cable with a 2 x 3.5mm diameter jack (supplied with the device) to connect the headsets of CD or MP3 players (see Figure, Variant A). ... -
Page 110: Connecting Equipment Via Hdmi (Arc)
8.3. Connecting equipment via HDMI (ARC) You require an HDMI cable (see Figure, Variant D). The HDMI cable is supplied with the Soundbar. Set the volume on the audio device to a medium level. Then switch the device off. ... -
Page 111: Nfc-Enabled Smart Device
The Soundbar's device name is displayed as soon as it finds a signal. If you are prompted to enter a password, enter 0000. When you hear "PAIRED", and the operating display lights up blue, this means the two devices are synchronised with each other. If the connection is interrupted, you hear "DISCONNECTED". -
Page 112: Connecting The Subwoofer
10.1. Connecting the subwoofer The subwoofer automatically connects to the Soundbar as soon as both devices are switched on. However, if the subwoofer does not connect with the Soundbar automatically, pro- ceed as follows: Press and hold down the PAIR button on the subwoofer for approximately 3 sec- onds. -
Page 113: Switching On The Soundbar
12. Switching On the Soundbar Switch the Soundbar on, either by pressing its button, or with the remote con- trol. Switch on your audio device, select a medium volume and start playing the sound. PLEASE NOTE! If a TV or an external device is connected via the AUX or HDMI sockets, the Soundbar will switch on automatically, a few seconds after the tele- vision or the external device is switched on. -
Page 114: Audio Playback In Aux/Bluetooth Mode
15. Audio Playback in AUX/Bluetooth Mode If you have connected the Soundbar to a device that supports the A2DP and AVRCP profiles (Audio Video Remote Control), the Soundbar is used as an output medium and the audio signals are only output through the Soundbar. PLEASE NOTE! If you have connected the Soundbar with your Bluetooth-enabled mo- bile phone, the music playing through the Soundbar is interrupted... -
Page 115: Maintenance
17. Maintenance WARNING Risk of injury due to electric shock! Never, under any circumstances, attempt to open or repair the device yourself. There is the risk of electri- cal shock! Please contact our Service Center if you have technical problems with your device. Repairs must only be performed by our authorised service partners. -
Page 116: If Faults Occur
19. If Faults Occur If the device stops working properly, refer to the troubleshooting table shown be- low to see if you can resolve the problem yourself. Never attempt to repair the devices yourself. If a repair is necessary, please contact our Service Center or a suitable authorised repair workshop. -
Page 117: Disposal
20. Disposal Packaging Your device has been packaged to protect it from damage in transit. The packaging is made of raw materials, and can therefore be either reused or recycled. Device At the end of its service life, do not dispose of the device in the normal household rubbish. -
Page 118: Technical Data
Remote control: 1 x 3 V battery, button cell CR2025 (supplied with the device) Range: approximately 6 m 22. Declaration of Conformity Medion AG hereby declares that product MD 80122 complies with the following European directives: • EMC Directive 2014/53/EU •... -
Page 119: Service Information
In our Service Community, you can meet other users, as well as our staff, and you can exchange your experiences and pass on your knowledge there. You will find our Service Community at http://community.medion.com. • Alternatively, use our contact form at www.medion.com/contact. -
Page 120: Legal Notice
These operating instructions are protected by copyright. Mechanical, electronic and any other forms of reproduction are prohibited without the written permission of the manufacturer. Copyright is owned by the company: MEDION AG Am Zehnthof 77 45307 Essen Germany Please note that you cannot use the address above for returns. Please always con-... - Page 122 Contenido Acerca de este manual de instrucciones ..........119 1.1. Explicación de los símbolos ................119 Volumen de suministro ................120 Uso debido ....................120 Indicaciones de seguridad ..............121 4.1. Montaje seguro del aparato ................. 122 4.2. Alimentación eléctrica ................... 123 4.3.
-
Page 124: Acerca De Este Manual De Instrucciones
1. Acerca de este manual de instrucciones Lea sin falta atentamente este manual de instrucciones y observe todas las indicaciones descritas. De este modo, se garantizará que su aparato tenga un funcionamiento fiable y una larga vida útil. Guarde este ma- nual de instrucciones cerca de su aparato para tenerlo siempre a mano. -
Page 125: Volumen De Suministro
• Signo de enumeración/información sobre eventos durante el manejo Instrucción operativa Declaración de conformidad (véase el capítulo "Información de con- formidad"): los productos marcados con este símbolo cumplen los re- quisitos de las directivas CE. 2. Volumen de suministro Después de desembalar el aparato, asegúrese de que estén incluidos los siguientes componentes: •... -
Page 126: Indicaciones De Seguridad
Tenga en cuenta toda la información contenida en este ma- nual de instrucciones, especialmente las indicaciones de se- guridad. Cualquier otro uso se considerará contrario al uso previsto y puede provocar daños materiales o personales. Nunca utilice el aparato en entornos con un riesgo potencial de explosión. -
Page 127: Montaje Seguro Del Aparato
No permita que los niños utilicen aparatos eléctricos sin su- pervisión. Los niños no siempre reconocen los posibles peli- gros de manera correcta. 4.1. Montaje seguro del aparato ¡ADVERTENCIA! ¡Peligro de lesiones por descarga eléctrica! Existe peligro de descarga eléctrica por líneas conduc- toras de electricidad. -
Page 128: Alimentación Eléctrica
No coloque ningún objeto sobre los cables, ya que podrían dañarse. Para evitar cualquier caída del aparato, coloque todos los componentes sobre una base estable, nivelada y libre de vi- braciones al ponerlo en funcionamiento. Mantenga una distancia de un metro como mínimo frente a fuentes de interferencias de alta frecuencia y magnéticas (te- levisor, otros altavoces, teléfono móvil, etc.) para evitar pro- blemas de funcionamiento. -
Page 129: Manipulación De Las Pilas
En ningún caso abra la carcasa del aparato. El posible con- tacto con piezas conductoras de tensión, así como las modi- ficaciones en la estructura eléctrica o mecánica suponen un peligro para usted y pueden llevar a un funcionamiento de- fectuoso del aparato. -
Page 130: Reparación
No siga utilizando el mando a distancia si el compartimento de las pilas no cierra correctamente y manténgalo alejado de los niños. Antes de colocar las pilas, compruebe si los contactos en el aparato y en las baterías están limpios y, dado el caso, límpie- los. -
Page 131: Vista General Del Aparato
5. Vista general del aparato Altavoces Zona NFC (Near Field Communication) : encender/apagar SOURCE: seleccionar la fuente de audio Indicaciones de servicio LED VOL+/VOL–: ajustar el volumen AUX: jack para TV y otros aparatos de audio OPTICAL: entrada óptica para TV y otros aparatos de audio HDMI: entrada para TV (compatible con ARC), ordenador y otros aparatos de audio AC~: jack para cable de red... -
Page 132: Mando A Distancia
5.1. Mando a distancia MUTE: silenciar HDMI ARC: seleccionar entrada HDMI ARC VOL+/VOL–: ajustar el volumen ajustar el efecto de sonido MUSIC ajustar el efecto de sonido FLAT (sin efecto de sonido) ajustar el efecto de sonido MOVIE : pista anterior/siguiente : Play/Pause: iniciar/detener la reproducción de audio;... -
Page 133: Subwoofer
5.2. Subwoofer Conexión a la red eléctrica LED de emparejamiento Botón PAIR... -
Page 134: Colocación De Las Pilas En El Mando A Distancia
6. Colocación de las pilas en el mando a distancia En el mando a distancia hay una pila de litio CR2025 de 3 V. ¡AVISO! Al poner en marcha por primera vez el man- do a distancia, extraiga la lámina transpa- rente tirando de ella, sin necesidad de abrir el compartimento de la pila. -
Page 135: Montaje De La Barra De Sonido
7. Montaje de la barra de sonido Puede usar la barra de sonido de tres maneras diferentes: de pie como dos torres de altavoces, en horizontal o montado en la pared. 7.1. Variante de altavoces en disposición vertical Tome los altavoces izquierdo y derecho y conecte cada uno al pie correspon- diente. -
Page 136: Variante De Barra De Sonido En Disposición Horizontal
7.2. Variante de barra de sonido en disposición horizontal Tome los dos altavoces y conéctelos como se muestra en la figura. Preste atención a que el conector de un altavoz se adapte con exactitud al otro. Sujete firmemente un altavoz y gire el otro en sentido del símbolo de candado cerrado. -
Page 137: Conexión Del Aparato De Audio
Retire los dos tornillos que se encuen- tran en cada extremo de la barra de so- nido. Atornille los dos soportes de pared con los tornillos que se han retirado a los ex- tremos de la barra de sonido. ... - Page 138 Media player HDMI ARC ¡PELIGRO! ¡Peligro de descarga eléctrica/posibles daños en el aparato! Existe peligro de descarga eléctrica por la conexión de aparatos no autorizados. Al conectar aparatos a las conexiones AUX, jack o RCA, preste atención a que los aparatos correspon- dientes deben cumplir la directiva sobre baja ten- sión.
-
Page 139: Conexión Del Aparato Mediante Aux
8.1. Conexión del aparato mediante AUX 8.1.1. Cable de audio con 2 clavijas jack de 3,5mm de diámetro Requiere un cable de audio con 2 conectores jack de 3,5mm de diámetro (inclui- do en el volumen de suministro) para la conexión a una toma de auriculares de, por ejemplo, reproductores de CD o MP3 (véase la fig. -
Page 140: Conexión De Aparatos Mediante Hdmi (Arc)
8.3. Conexión de aparatos mediante HDMI (ARC) Necesita un cable HDMI (véase la fig. Variante D). El cable HDMI no se incluye en el volumen de suministro. Ajuste un volumen medio en el aparato de audio. Después desconéctelo. Conecte la conexión HDMI con la conexión HDMI IN del televisor. ... -
Page 141: Dispositivo Inteligente Compatible Con Nfc
El nombre de dispositivo de la barra de sonido se muestra en cuanto se haya encon- trado la señal. En caso de que se solicite una contraseña, introduzca 0000. La vinculación de los dos aparatos se ha realizado cuando suena el mensaje PAIRED (vinculado) y la indicación de funcionamiento está... -
Page 142: Conexión Del Subwoofer A La Red Eléctrica
10. Conexión del subwoofer a la red eléctrica Conecte el cable de red al jack CA~ para cable de red. Cerciórese de que todos los aparatos deseados están conectados. Enchufe el cable de red a una toma de corriente de 220-240 V ~ 50/60 Hz. 10.1. -
Page 143: Conexión De La Barra De Sonido A La Red Eléctrica
11. Conexión de la barra de sonido a la red eléctrica Conecte el cable de red al jack CA~ para cable de red. Cerciórese de que todos los aparatos deseados están conectados. Enchufe el cable de red a una toma de corriente de 220-240 V ~ 50/60 Hz. 12. -
Page 144: Selección De La Fuente De Audio
13. Selección de la fuente de audio Con la tecla SOURCE de la barra de sonido o las teclas OPTICAL, AUX, BT y HDMI ARC del mando a distancia establece la fuente de audio deseada: AUX, BT, HDMI ARC u Optical. La selección de los modos de funcionamiento se indica mediante las indicaciones de funcionamiento LED de colores: Indicación de ser-... -
Page 145: Reproducción De Audio En El Funcionamiento Aux/Bluetooth
15. Reproducción de audio en el funcionamiento AUX/Bluetooth Si ha conectado la barra de sonido con un aparato compatible con el perfil A2DP, así como con el perfil AVRCP (Audio Video Remote Control), la barra de sonido se em- plea como medio de salida y las señales de audio se emiten entonces exclusivamen- te a través de la barra de sonido. -
Page 146: Mantenimiento
17. Mantenimiento ADVERTENCIA ¡Peligro de lesiones por descarga eléctrica! No intente en ningún caso abrir o arreglar el aparato usted mismo. Existe peligro de descarga eléctrica. Rogamos que se dirija a nuestro Centro de servicio en caso de proble- mas técnicos con su aparato. -
Page 147: En Caso De Fallos
19. En caso de fallos Si se produce una avería en el aparato, compruebe primero si puede solucionar el problema con ayuda del siguiente resumen. En ningún caso trate de reparar usted mismo el aparato. Si fuera necesario reparar el aparato, diríjase a nuestro Centro de servicio o a cualquier otro taller especializa- do autorizado. -
Page 148: Eliminación
20. Eliminación Embalaje Su aparato se encuentra en un embalaje para protegerlo de posibles da- ños durante el transporte. Los embalajes son materias primas y por ello son reutilizables o aptos para ser devueltos al ciclo de reciclaje de mate- rias primas. -
Page 149: Datos Técnicos
21. Datos técnicos Conexión a la red eléctrica 220-240 V ~ 50/60 Hz Potencia de salida: Altavoces: 2 x 15 W RMS Subwoofer 30 W Potencia de absorción: Altavoces: 20 W Subwoofer: 20 W Conexiones: 1 entrada de audio de jack de 3,5mm 1 entrada de audio digital (óptica) HDMI (ARC) con CEC Conexión de cable de red... -
Page 150: Información De Conformidad
22. Información de conformidad Por la presente, Medion AG declara que el producto MD 80122 cumple los requisitos de la siguiente normativa eu- ropea: • Directiva 2014/53/UE sobre la comercialización de equi- pos radioeléctricos • Directiva 2009/125/CE sobre diseño ecológico •... -
Page 151: Aviso Legal
Este manual de instrucciones está protegido por derechos de autor. Queda prohibida la reproducción mecánica, electrónica o de cualquier otro tipo sin la autorización por escrito del fabricante. El copyright pertenece a la empresa: MEDION AG Am Zehnthof 77 45307 Essen Alemania Tenga en cuenta que la dirección indicada arriba no es una dirección para devolu-... - Page 152 Contenuto Informazioni sulle presenti istruzioni per l’uso ........149 1.1. Spiegazione dei simboli ................. 149 Contenuto della confezione ..............150 Utilizzo conforme ..................150 Indicazioni di sicurezza ................151 4.1. Montaggio sicuro del dispositivo ............... 152 4.2. Alimentazione elettrica .................. 153 4.3.
-
Page 154: Informazioni Sulle Presenti Istruzioni Per L'uso
1. Informazioni sulle presenti istruzioni per l’uso Leggere attentamente le presenti istruzioni per l’uso e seguire tutte le indicazioni in esse riportate. In tal modo si potranno garantire il funzio- namento sicuro e la lunga durata del dispositivo. Tenere queste istruzio- ni sempre a portata di mano in prossimità... -
Page 155: Contenuto Della Confezione
Punto elenco / Informazione relativa a un evento che si può verificare • durante l’utilizzo Istruzioni da seguire Dichiarazione di conformità (vedere capitolo “Informazioni sulla con- formità”): i prodotti contrassegnati con questo simbolo soddisfano i requisiti delle direttive CE. 2. -
Page 156: Indicazioni Di Sicurezza
Attenersi a tutte le indicazioni fornite nelle presenti istruzio- ni per l’uso, in particolare alle indicazioni di sicurezza. Qualsi- asi altro utilizzo è considerato non conforme e può provocare danni a persone o cose. Non utilizzare il dispositivo in ambienti a rischio di esplosione, quali, per esempio, stazioni di servizio, zone di stoccaggio di carburanti o aree adibite alla lavorazione di solventi. -
Page 157: Montaggio Sicuro Del Dispositivo
spositivo. Non lasciare che i bambini giochino incustoditi con i dispositi- vi elettrici. I bambini non sempre sono in grado di riconoscere i possibili pericoli. 4.1. Montaggio sicuro del dispositivo AVVERTENZA! Pericolo di lesioni causate da scosse elettriche! I cavi sotto tensione possono causare scosse elettriche. ... -
Page 158: Alimentazione Elettrica
Non appoggiare alcun oggetto sui cavi, in quanto potrebbero danneggiarsi. Sistemare tutti i componenti su una base piana, stabile e non soggetta a vibrazioni per evitare la caduta del dispositivo. Mantenere una distanza di almeno un metro da fonti di di- sturbo magnetiche e ad alta frequenza (televisori, altri diffu- sori acustici, cellulari ecc.) per evitare malfunzionamenti. -
Page 159: Utilizzo Delle Batterie
In caso di inutilizzo, scollegare la spina dalla presa elettrica oppure usare una presa multipla master/slave per evitare di consumare corrente quando il dispositivo è spento. 4.3. Utilizzo delle batterie Il telecomando funziona a batterie. Osservare le indicazioni se- guenti: •... -
Page 160: Riparazione
Mai esporre le batterie a un calore eccessivo (ad esempio ir- raggiamento solare diretto, fuoco o simili). Conservare le batterie in un luogo fresco e asciutto. Fonti di calore diretto possono danneggiare le batterie. Non esporre quindi il dispositivo a fonti di calore eccessive. ... -
Page 161: Panoramica Del Dispositivo
5. Panoramica del dispositivo Altoparlante Zona NFC (Near Field Communication) : accensione/spegnimento SOURCE: selezione della sorgente audio Indicatori di funzionamento a LED VOL+/VOL–: regolazione del volume AUX: presa di collegamento per TV e altri dispositivi audio OPTICAL: ingresso ottico per TV e altri dispositivi audio HDMI: ingresso per dispositivi audio, computer e TV (che supportano la fun- zione ARC) AC~: presa di collegamento per cavo di alimentazione... -
Page 162: Telecomando
5.1. Telecomando MUTE: disattivazione dell’audio HDMI ARC: selezione dell’ingresso HDMI ARC VOL+/VOL–: regolazione del volume Impostazione dell’effetto sonoro MUSIC Impostazione della modalità FLAT (nessun effetto sonoro) Impostazione dell’effetto sonoro MOVIE : traccia precedente/successiva : play/pausa: avvio/arresto della riproduzione audio PAIR: creazione di una connessione Bluetooth AUX: selezione dell’ingresso AUX BT: selezione della modalità... -
Page 163: Subwoofer
5.2. Subwoofer Collegamento alla rete elettrica LED di accoppiamento Tasto PAIR... -
Page 164: Inserimento Delle Batterie Nel Telecomando
6. Inserimento delle batterie nel telecomando Nel telecomando è inserita una batteria al litio di tipo CR2025 da 3 V. AVVISO! Quando si mette in funzione il telecoman- do per la prima volta, estrarre la pellicola tra- sparente senza aprire il vano batterie. Se il dispositivo non risponde al telecomando o rispon- de in modo scorretto, sostituire la batteria. -
Page 165: Montaggio Della Soundbar
7. Montaggio della soundbar La soundbar può essere utilizzata in tre diversi modi: in verticale, come due altoparlanti a colonna, in orizzontale, o montata a parete. 7.1. Variante con altoparlanti verticali Prendere l’altoparlante destro e sinistro e montarli ciascuno sul relativo suppor- to d’appoggio. -
Page 166: Variante Con Altoparlanti Orizzontali
7.2. Variante con altoparlanti orizzontali Prendere i due altoparlanti e unirli l’uno all’altro come illustrato nella figura. Assicurarsi che il dispositivo d’incastro di un altoparlante combaci perfettamen- te con quello dell’altro. Tenere fermo un altoparlante e ruotare l’altro verso il simbolo del lucchetto chiu- ... -
Page 167: Collegamento Di Un Dispositivo Audio
Rimuovere le due viti che si trovano su ciascuna estremità della soundbar. Utilizzando le due viti appena rimos- se, avvitare i due supporti da parete alle estremità della soundbar. Praticare nella parete 2 fori paralleli (Ø 3-8 mm a seconda del tipo di parete). La distanza tra i fori dovrebbe essere di 744 mm. - Page 168 Media player HDMI ARC PERICOLO! Pericolo di scossa elettrica/possibili danni al dispo- sitivo! Pericolo di scossa elettrica in caso di collegamento di dispositivi non consentiti. Prima di collegare un dispositivo alle porte AUX, per jack o RCA, accertarsi che tale dispositivo sia confor- me alla direttiva Bassa tensione.
-
Page 169: Collegamento Di Un Dispositivo Alla Presa Aux
8.1. Collegamento di un dispositivo alla presa AUX 8.1.1. Cavo audio con 2 jack Ø 3,5 mm Per il collegamento a una presa cuffie, ad es. di un lettore CD o MP3, è necessario un cavo audio con 2 jack Ø 3,5 mm (fornito in dotazione, vedere la variante A della figu- ra). -
Page 170: Collegamento Di Un Dispositivo Tramite Hdmi (Arc)
8.3. Collegamento di un dispositivo tramite HDMI (ARC) È necessario un cavo HDMI (vedere la variante D della figura). Il cavo HDMI non è fornito in dotazione. Impostare un volume medio sul dispositivo audio. In seguito spegnerlo. Collegare la presa HDMI alla presa HDMI IN del televisore. ... -
Page 171: Dispositivo Smart Con Tecnologia Nfc
Non appena il segnale viene individuato, viene visualizzato il nome della soundbar. Se dovesse essere necessario immettere una password, digitare 0000. La sincronizzazione dei due dispositivi è conclusa quando viene emesso l’annuncio PAIRED e l’indicatore di funzionamento si accende di colore blu. Se il collegamento viene interrotto, il sistema emette l’annuncio DISCONNECTED. -
Page 172: Connessione Del Subwoofer
10.1. Connessione del subwoofer Il subwoofer si connette automaticamente alla soundbar non appena entrambi ven- gono accesi. Qualora il subwoofer non si connetta automaticamente alla soundbar, procedere come segue: premere il tasto PAIR sul subwoofer e mantenerlo premuto per circa 3 secondi. Il subwoofer passa in modalità... -
Page 173: Accensione Della Soundbar
12. Accensione della soundbar Accendere la soundbar premendo il tasto sul telecomando o sulla soundbar. Accendere il dispositivo audio, impostare un volume medio e avviare la riprodu- zione. AVVISO! In presenza di un televisore o un dispositivo esterno collegati tramite le prese AUX o HDMI, la soundbar si accenderà... -
Page 174: Riproduzione Audio In Modalità Aux/Bluetooth
15. Riproduzione audio in modalità AUX/ Bluetooth Dopo aver collegato la soundbar a un dispositivo che supporta il profilo A2DP e AVRCP (Audio Video Remote Control), la soundbar viene utilizzata come dispositivo di riproduzione e i segnali audio vengono riprodotti esclusivamente dalla soundbar. AVVISO! Se la soundbar è... -
Page 175: Manutenzione
17. Manutenzione AVVERTENZA Pericolo di lesioni causate da scosse elettriche! Non tentare in alcun caso di aprire o riparare autono- mamente il dispositivo. Pericolo di scossa elettrica! In caso di problemi tecnici con il dispositivo rivolgersi al nostro servizio di assistenza. -
Page 176: In Caso Di Anomalie
19. In caso di anomalie In caso di anomalia del dispositivo, verificare per prima cosa se sia possibile risolvere il problema con l’ausilio del prospetto seguente. Non tentare mai di riparare personalmente i dispositivi. Se è necessaria una ripara- zione, rivolgersi al nostro servizio di assistenza o a un altro centro specializzato. Causa Risoluzione dei problemi ... -
Page 177: Smaltimento
20. Smaltimento Imballaggio L’imballaggio protegge il dispositivo da eventuali danni durante il tra- sporto. Gli imballaggi sono costituiti da materiali grezzi e quindi sono ri- utilizzabili oppure possono essere riciclati. Dispositivo Al termine del ciclo di vita del dispositivo, non smaltirlo in nessun caso assieme ai normali rifiuti domestici. -
Page 178: Dati Tecnici
21. Dati tecnici Collegamento alla rete 220-240 V ~ 50/60 Hz elettrica Potenza di uscita: Altoparlanti: 2 x 15 W RMS Subwoofer 30 W Potenza assorbita: Altoparlanti: 20 W Subwoofer: 20 W Collegamenti: 1 ingresso audio con jack da 3,5 mm 1 ingresso audio digitale (ottico) HDMI (ARC) con CEC Collegamento del cavo di alimentazione Specifiche Bluetooth:... -
Page 179: Informazioni Sulla Conformità
22. Informazioni sulla conformità MEDION AG dichiara che il prodotto MD 80122 è conforme ai seguenti requisiti europei: • Direttiva RED 2014/53/UE • Direttiva sulla progettazione ecocompatibile 2009/125/CE • Direttiva RoHS 2011/65/UE. Le dichiarazioni di conformità complete sono disponibili all’in- dirizzo www.medion.com/conformity. -
Page 180: Note Legali
Le presenti istruzioni per l’uso sono protette da copyright. È vietata la riproduzione in forma meccanica, elettronica e in qualsiasi altra forma senza l’autorizzazione scritta da parte del produttore. Il copyright appartiene all’azienda: MEDION AG Am Zehnthof 77 45307 Essen Germania L’indirizzo riportato sopra non è...
Need help?
Do you have a question about the LIFE E64126 and is the answer not in the manual?
Questions and answers