
Summary of Contents for EZPnP Technologies DP330 Series
- Page 1 High Speed Audio CD to Digital Music Converter, Burner, & Player User's Manual Model: DP330 Series...
-
Page 3: Table Of Contents
Table of Contents 1. Introduction................ P.2 2. Features................P.2 3. Product Views..............P.3 3.1 Front View..............P.3 3.2 Top View..............P.4 3.3 Rear View..............P.6 3.4 Battery Compartment..........P.6 4. Menu Instructions.............. P.8 4.1 LCD Display..............P.8 4.2 Icon List..............P.8 4.3 Menu List.............. -
Page 4: Introduction
Thank you for purchasing our EZDigiPod DP330. Now you can convert your audio CD's to DIGITAL MUSIC format without a computer. The new EZDigiPod DP330, from EZPnP Technologies, retrieves audio files from a CD, and converts them to DIGITAL MUSIC format quickly with the touch of a single button. Once converted to DIGITAL MUSIC, the files are then transferred to a DIGITAL MUSIC... -
Page 5: Product Views
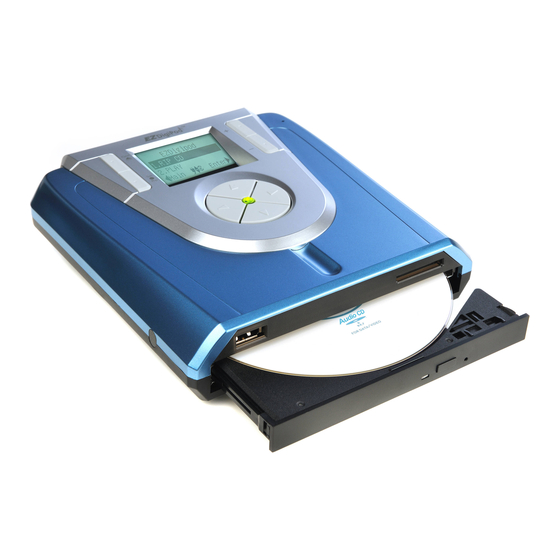
• Perfect travel companion in compact size can be powered by either AC adapter or batteries • Enjoy true CD-quality digital sound with song information On-The-Go! 3. Product Views 3.1 Front View Figure 1 (1) USB Host Port (2) SD/MMC Card Slot (3) CD Burner... -
Page 6: Top View
3.2 Top View Figure 2 (1) LCD display screen : Displays the operating menu & working status (2) Control Keypad: One-touch operations to control EZDigiPod functions. Function Description Eject Eject Open tray or eject Disc Go to setup menu;for value setting; or Quick Set/Rip Set or Rip Increase... - Page 7 ▲ Up key Move up ▼ Down key Move down Back out of a sub-menu and goes to the ◄ Left key next higher level; or hold for 2 sec. to return to the main menu Enter key; or navigate into a sub-menu or ►...
-
Page 8: Rear View
3.3 Rear View Figure 3 (1) Power Switch: Slide the switch to the LEFT for the “ON” position to start the unit; or slide the switch to the RIGHT for the “OFF” position to shut down the unit. (2) Power Connector: Insert the power connector from the AC adaptor or the car kit adapter into this socket. - Page 9 Figure 4 NOTE: Usage time and repeated discharge cycles will cause the capacity of rechargeable batteries to diminish. (1) The red LED indicator may blink occasionally during the conversion and transfer operation. This is normal even if the battery is fully charged. (2) If the red LED indicator blinks continuously, connect an AC power adapter or recharge the batteries immediately after completing the current ripping operation;...
-
Page 10: Menu Instructions
4. Menu Instructions 4-1 LCD Display 1. Line 1: EZDigiPod Logo / Main Menu Title 2. Menu items for selection (use ▲ / ▼key to move up/down) 3. Line 4: 4-way button selection menu Figure 5 4-2 Icon List Description Icons Arrows Battery High, Low... -
Page 11: Menu List
4.3 Menu List Main Menu Sub-Function Function Description Rip CD to USB Quick Rip CD to USB RIP CD Rip CD to SD Quick Rip CD to SD (Can select "Rip All" or "Rip Select Song") CD Play Plays audio CD & digital audio files PLAY USB Play Plays digital audio files... - Page 12 Display copy destination folder name Folder Name set. CD Label Display copied disc label Set "disc auto tray-out" when ripping or Auto Tray-out burning is finished Setup Show Backup Show numbers of burning count Show Drive Info Show optical drive model version Sets the duration of time before Standby Timer Screensaver is displayed...
- Page 13 (4) Insert a USB storage device or SD card into the appropriate slot. (NOTE: For best results, it is recommended that only one storage device be inserted into the EZDigiPod at a time) (5) Use the UP/DOWN arrow keys (▲▼) to move to menu selection 1,"RIP CD" (the selected item will be highlighted by a shaded bar).
- Page 14 (9) Once the selection is completed, DP330 will automatically connect to Internet to search for the CD’s song title/artist information from the FreeDB website. Once the search is completed, the display will show the source disk and disc capacity. This allows the user to make sure the target device has sufficient space for receiving the ripped files.
- Page 15 5.1.2 Rip Selected Song (When only selected song is to be ripped) (1) Select “Rip Selected Song” and press the RIGHT arrow key (►). The unit will first connect to the Internet to search for the CD’s song title/artist information from the FreeDB website. Figure 13 (2) Select “Rip Selected Song”...
-
Page 16: Playback Cd
5.2 PLAYBACK CD (1) (NOTE: During the play mode, the sound level can be controlled by using the + or - keys) Figure 16 (2) From the PLAY sub-menu, the user can choose "CD Play", "USB Play", or "SD Play". Figure 17 (3) When only one play source (USB player, SD Card or Music CD) is inserted, DP330 will automatically detect the inserted device and indicate that with... -
Page 17: Audio Recording
(5) If either SD PLAY or USB PLAY is selected, the display will show the songs that can be played from the device. Use the UP/DOWN arrow keys (▲▼) to select the song. The highlighted song will start a pre-play. Press the RIGHT arrow key (►) to start the play mode. - Page 18 (4) Once the selection is made, press RIGHT arrow key (►) to confirm. The display will show the file name of the recording. Press the RIGHT arrow key (►) to start recording. Figure 25 (for FLAC format) Figure 26 (for MP3 format) (5) While recording, the display will show the amount of time used for recording.
-
Page 19: File Manager
5.4 FILE MANAGER 5.4.1 Operating Instructions (1) Use the UP/DOWN arrow keys (▲▼) to select item #4, FILE MANAGER Figure 33 (2) If only one file source is inserted, DP330 will automatically detect the inserted device and indicate that with the shaded bar. If two file sources are inserted, the DP330 will default to the USB device. -
Page 20: File Copy & Delete Instructions
5.4.2 File Copy & Delete Instructions Select the source and enter the folder. Use ”UP/DOWN” arrow keys (▲▼) to move to the desired file or folder. (Note: only one item can be selected from the same folder, no multiple selections are available.) Figure 38 (1) Once the selection is made, press the SET key (●). -
Page 21: Make Cd
2-2 During the copying process, the progress will be displayed as a completion percentage. Figure 41 2-3 Once the copy is made, the display will show a completion message. Press the RIGHT arrow key (►) to return to the "Source Selection Menu". Press the LEFT arrow key (◄) to return to the "Source Catalog and File Selection Menu". - Page 22 (2) When only one device slot is occupied, DP330 will automatically detect the inserted device and show the device and indicate that with a shaded bar. If two slots are occupied, DP330 will default to the USB device. Figure 44 Select the desired source and press RIGHT arrow key (►) to enter.
-
Page 23: Setup
Show progress. Figure 48 "Make CD" function completed. Figure 49 (During selection of the songs, if you do not want to select any song and wish to go back to the previous menu, you may press the Eject key to return to the previous screen.) 5.6 SETUP (1) Network: Press the RIGHT (►) arrow to enter this mode. - Page 24 Figure 52 ~ 58 (2) Bit Rate: This allows for setting of the music sampling rate when music is ripped from the CD. Press the RIGHT arrow key to enter this mode. Use the UP/DOWN arrow keys to highlight the desired bit rate, and press the RIGHT arrow key to confi...
- Page 25 (4) Format: Press the RIGHT arrow key (►)to enter this mode. The sub- menu will show the source format selection menu. The inserted device will be detected automatically and be highlighted by the shaded bar. If two devices are inserted, the user needs to select the desired device and press the RIGHT arrow (►) to confirm.
- Page 26 (7) Firmware Update: Press the RIGHT arrow key (►) to enter this mode. The display will show the current firmware version number. If the firmware needs to be updated, the update fi le can be placed in an SD or USB device. After the SD or USB device is inserted in the unit, pressing the RIGHT arrow key (►) will start the firmware update from SD or USB.
- Page 27 (10) Repeat Playback: Press the RIGHT arrow to enter this mode. Use UP/ DOWN arrow keys (▲▼) to make selection from the sub-menu options "Repeat Folder" or "Repeat All". Press the RIGHT arrow key (►) to confirm. Figure 69 (11) LCD Contrast: Press the RIGHT arrow key (►) to enter the mode. Use UP/ DOWN arrow keys (▲▼)to adjustment the LCD brightness.
- Page 28 (15) CD Label (optional): Press the RIGHT arrow key (►) to enter this mode. The display will show the disc label written on the disc. (16) Auto Tray-out: Press RIGHT arrow key (►) to enter this mode. Use UP/ DOWN arrow keys (▲▼) to select "On" or "Off" from the sub-menu, and press RIGHT arrow key (►) to confirm.
-
Page 29: Important Notice
(19) Standby Timer: This function allows the user to adjust the amount of time allowed for entering keystrokes when changing settings in the SETUP mode. The machine’s default setting is 120 seconds. From the SETUP screen, press the UP arrow key (▲) to enter this mode. Use the UP/DOWN arrow keys (▲▼) to increase or decrease the timer in increments of one second. - Page 30 b. Optical disc format not supported. Figure 78 If this message appears, the unit will return to normal system display after ejection of the disc. (2) In case you are converting an old CD or any CD with contaminated surface or scratches, if the resulting file has noise or pop sound during play back, please try the following remedies.
-
Page 31: Fcc & Safety
6. FCC & Safety FCC Compliance Statement: This device complies with Part 15 of the FCC Rules. Operation is subject to the following two conditions: (1) This device may not cause harmful interference, and (2) This device must accept any interference received, including interference that may cause undesired operation. - Page 32 (13) Please observe all Cautions and Warnings found on the product. (14) If the product is not in use for several days, disconnect it from the power outlets to. (15) Never pour any liquids into the openings; this could cause fire or electrical shock.
-
Page 33: Caution
8. Caution Performing unauthorized modifi cations and adjustments to the unit, or using this product in a manner other than specified herein may result in hazardous radiation exposure. 9. DANGER! Invisible laser radiation may be present when opened. Avoid direct exposure to the beam. -
Page 34: Disclaimer
NOTE: EZPnP and EZDigiPod are trademarks of EZPnP Technologies Corp. All other trademarks mentioned herein are the property of their respective owners. - Page 36 For Technical Support Please Contact: EZPnP USA E-Mail: tech@ezpnp-usa.com (888)393-9960 EZPnP Taiwan E-Mail: service@ezpnp.com PN: 1PAPDP33NM03...
Need help?
Do you have a question about the DP330 Series and is the answer not in the manual?
Questions and answers