Table of Contents

Summary of Contents for Dome Kitchen Wizard DKM9801-DC
- Page 1 Kitchen Wizard User Manual Model No.: DKM9801-DC Item No.: 900838 220-240Va.c. 50Hz 300W Rev 3 READ AND SAVE THESE INSTRUCTIONS Note: The specifications and/or components of this appliance are subject to change without prior notice.
-
Page 2: Table Of Contents
Your Attention ..............3 Important Safeguards ............3 Description ................6 Before Using For The First Time ........6 Operating Instructions ............7 Stick Mixer ................7 5.1.1 Assembly .................... 7 Operation ................8 Chopper ................. 9 5.3.1 Assembly .................... 9 5.3.2 Processing Guide ................11 Whisk ................... -
Page 3: Your Attention
1 Your Attention Read and follow all the instructions in this “Use and Care” even if you feel you are familiar with the appliance, and find a place to keep it handy for future reference. Your attention is drawn particularly to the sections concerning “IMPORTANT SAFEGUARDS”. - Page 4 • Do not operate on an inclined surface. Note: Failure to observe these cautions may result in damage to the appliance. • To reduce the risk of electric shock, do not immerse or expose the appliance or flexible cord to rain, moisture or any liquid other than those necessary for correct operation of the appliance.
- Page 5 • The use of attachments or accessories not recommended or sold by the appliance distributor may cause personal or property hazards or injuries. • This appliance is not intended to be operated by means of an external timer or separate remote-control system. •...
-
Page 6: Description
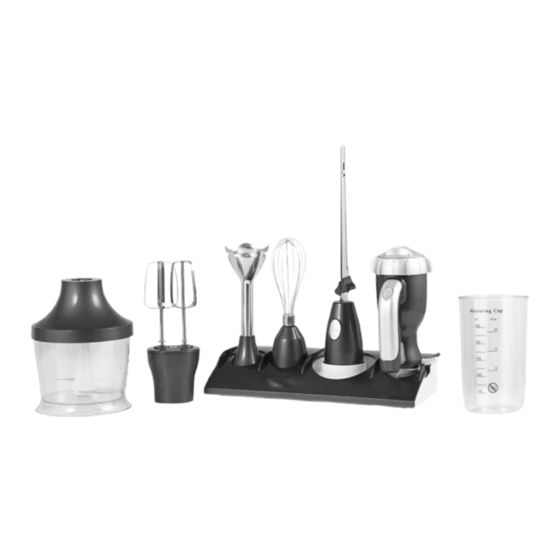
3 Description Chopper Lid / Bowl Assembly Measuring Beaker Beaters Storage Tray Stick Mixer Attachment Knife to Motor Coupling Whisk Attachment Whisk to Motor Coupling Knife Attachment Beater to Motor Coupling Power Handle Chopper Blade DO NOT TOUCH CUTTING BLADES 4 Before Using For The First Time •... -
Page 7: Operating Instructions
5 Operating Instructions 5.1 Stick Mixer • You can blend baby food, soups, sauces, milk shakes, mayonnaise etc. • Note: Do Not use for more than 60 Seconds at a time. Allow to cool between uses. 5.1.1 Assembly • Ensure the appliance is unplugged from the powerpoint. •... -
Page 8: Operation
5.2 Operation For Beaker Blending • Do Not chop hard foods such as coffee beans, ice cubes, spices or chocolate as this will damage the blades • Do Not fill the beaker above 500ml. This may need to be less depending on the ingredients being blended For Saucepan Blending •... -
Page 9: Chopper
5.3 Chopper • Care is needed when handing the cutting blade, especially when removing the blade from the bowl, emptying the bowl and during cleaning, Do Not touch the sharp blades. • Always switch off and unplug before removing the lid. •... - Page 10 NOTE: Ensure the lid is fitted and locked properly before operation • Fit the Power Handle onto the top of the lid, hold the bowl firmly then rotate the Power Handle clockwise to lock in place. To unlock, rotate anti- clockwise and pull apart •...
-
Page 11: Processing Guide
1. Remove any bones and cut food into 1 - 2cm cubes. 2. Fit the chopper blade over the pin in the bowl before adding food. 3. Add your food. 4. Do Not fill the bowl above the 500ml mark. This may need to be less depending on the ingredients being chopped. - Page 12 • Insert the Whisk Coupling into the Power Handle then rotate clockwise to lock in place. To unlock, rotate anti-clockwise and pull apart. • Push the Whisk into the end of the Coupling until it lock in place. To remove the Whisk, pull straight out.
-
Page 13: Knife
• Grasp the body of the Power Handle (not the handle. This is for use with the Knife Blade Attachment only) and hold vertically. Then press the “On” button located on the body. (Not the button on Handle). Press this “On” Button •... -
Page 14: Assembly
5.5.1 Assembly • Ensure the appliance is unplugged from the powerpoint. • Remove the Cap from the Power Handle as shown under instructions for the Stick Mixer. • Insert the Knife Coupling into the Power Handle then rotate clockwise to lock in place. -
Page 15: Removing Blades
• Test the security of the blades by applying a light pressure in the reverse direction. (Attempting to remove the blades.) For this operation, it is recommended to have the protective sheath over the blades in order to avoid injury. 5.5.2 Removing Blades •... -
Page 16: Beaters
5.6 Beaters Note: Do Not use for more than 2 minutes at a time. Allow to cool between • uses. • You can beat light ingredients such as egg whites; cream; instant desserts, eggs and sugar for cakes etc. • Do Not beat heavier mixtures such as biscuit or bread dough as this will damage the appliance. -
Page 17: Storage
• Grasp the body of the Power Handle (not the handle. This is for use with the Knife Blade Attachment only) and hold vertically. Then press the “On” button located on the body. (Not the button on Handle). Press this “On” Button •... -
Page 18: Cleaning
• The Knife blades can be stored in the back on the tray as shown. 7 Cleaning • Before cleaning the appliance, ensure it is disconnected from the power supply and has cooled down completely. • Do Not touch the sharp blades. •... -
Page 19: Stick Mixer
7.3 Stick Mixer Part-fill the beaker with warm, soapy water. Then insert the blender shaft • and switch on. • Repeat in fresh clean wash to rinse. • Unplug, and then dry. • To Prevent injury, Do not touch the blades. Never Immerse the Power Handle in Water or Wash Under a Tap. -
Page 20: Guarantee
9 Guarantee WHAT’S COVERED H.E. Group Pty Ltd guarantees this appliance for a full replacement or refund for a period of twelve months from the date of purchase. This guarantee is valid with the presentation of the original proof of purchase receipt from the store from which you purchased the product in order to establish the purchase price and provide the correct value of the product paid for by you.
Need help?
Do you have a question about the Kitchen Wizard DKM9801-DC and is the answer not in the manual?
Questions and answers