Advertisement
Advertisement
Table of Contents

Summary of Contents for Caltex LX-100
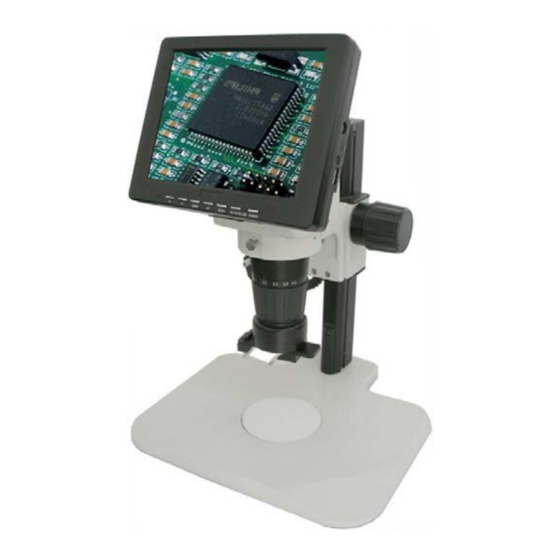
- Page 1 LX-100 Video Microscope User Guide...
- Page 2 P. 949.788.0101 Irvine, CA 92618 USA info@caltexsci.com F. 949.788.0202 TRODUCTION Welcome! Thank you for purchasing CALTEX LX-100 Video Microscope System. Please read this user guide first before installation and operation. 1. CONTENTS 1. Contents 2. Specifications 2.1. Brief introduction 2.2.
- Page 3 LX-100 Video Microscope 2.5. Optical Data (1/3” CCD, 8” monitor and 10.4” monitor) 3. Packing list 4. Installation 5. Adjustment and operating instructions 5.1. Adjustment of optic unit 5.2. Adjust and calibrate the position of laser pointer 5.3. Rotate 3D attachment to view the object to be inspected.
-
Page 4: Specifications
LX-100 Video Microscope 2. SPECIFICATIONS 2.1. Brief introduction Total Magnification: 2.5x-152x (8” LCD Monitor) Compact and light weight, low power consumption 16MS high definition color, Intelligent screen image setting High contrast and brightness Additional Video out delivers high resolution color images for microscopy documentation with capture software compatible with Windows based system. -
Page 5: Packing List
LX-100 Video Microscope 2.5. Optical Data (1/3” CCD, 8” monitor, 0.35x or 0.5x CCD Coupler) Coupler 0.35x 0.5x W. D. Auxiliary Lens Mag. FOV mm Mag. FOV mm 0.3x 2.5x~16x 81~12.7 3.6x~22.9x 57.1~8.9 0.5x 4.2x~26.7x 48.8~7.6 5.9x~38.1x 34.3~5.3 0.75x 6.2x~40x 32.6~5... -
Page 6: Installation
4.2.1. Place the stand on the table. 4.2.2. Lift out LX-100 Microscope carefully, and place the scope body to the focus block which is also the scope holder (76mm diameter) on the stand and lock it tight with screw. - Page 7 LX-100 Video Microscope 5. ADJUSTMENT AND OPERATING INSTRUCTIONS 5.1. Adjustment of optic unit 5.1.1. Turn on the Main Power on the Microscope Body first, and turn on the LCD Screen Power. 5.1.2. Turn on the light and press the button to adjust the brightness till the appropriate lighting 5.1.3.
- Page 8 LX-100 Video Microscope 5.4 Lighting Adjustment:Keep pressing the light button till appropriate lighting 5.5 Auto White Balance: One-press of W.B key 5.6 Video Out: 5.6.1 The video out connecter is for connect with the other video monitor when needed. Or you can connect with the computer with a frame grabber when needed.
- Page 9 LX-100 Video Microscope 5.7.2. Viewing the Display mode Press the “Menu” button. Display the On Screen Display menu. The signal information should be display on the screen. You may see different information on different signal mode. VGA mode: TV mode:...
- Page 10 LX-100 Video Microscope Press the “VOL+” or “VOL-” button, adjust the brightness 5.7.4. System setting You can choose the language that you need. When there is no TV signal, you can open the Blue Background.
- Page 11 LX-100 Video Microscope You can choose 15 to 20 minutes Auto Power Down time. On PC mode, you can use the Auto adjust to do automatic adjustment. Use “Reset”, you can reset to factory default setting.
-
Page 12: Troubleshooting
LX-100 Video Microscope 5.7.5. Display Mode Display Mode V-Frequency Pixel Rate Resolution H Frequency Standard Type Remark (KHz) (MHz) 720x400 31.46 28.32 VESA Standard 31.46 25.17 Industry Standard 640x480 37.86 31.50 VESA Standard 37.50 31.50 VESA Standard 37.88 40.00 VESA Guidelines 800x600 48.08... -
Page 13: Safety Guide
LX-100 Video Microscope 7. SAFETY GUIDE Important precautions! Hazardous, High Voltage devices inside! Do NOT open the chassis. The equipment has device with high voltage. Please do NOT open the chassis to avoid electric shock. Qualified serviceman is required for repair. - Page 14 LX-100 Video Microscope 8. VICA-USB2 (optional) 1. The computer must be USB 2.0 ready for VICA-USB2 to work. Please consult with your computer hardware to make sure it is USB 2.0 high speed ready. 2. Follow instructions in the package for installation.
- Page 15 LX-100 Video Microscope Screen shot of live image, context windows, and image capture Calibration Calibrate zoom lens (15x, 20x etc) against stage micrometer at all detents, before performing measurement 1. Place scale under scope, choose zoom magnification, focus 2. Measure > Calibration > Calibration Manual...
- Page 16 LX-100 Video Microscope Spatial Calibration box 3. click New 4. double click to modify name, for example 100x corresponding to magnification detents on zoom lens 5. choose unit of measurement 6. click “x” to start calibration 7. click and drag line on image of scale 8.
-
Page 17: Perform Measurement
LX-100 Video Microscope ********************************************************************************************************* You have completed calibration at one magnification detents. Repeat the same procedures for all magnification detents (15x-100x) ********************************************************************************************************* Perform Measurement 1. Position the sample under the scope, and focus 2. Click calibration corresponding to your magnification on the zoom lens. - Page 18 LX-100 Video Microscope Save images To save image with measurement and annotation together on the image 1. Apply vector 2. Click File | Save image CONTACT US CALTEX Scientific 192-T Technology Dr. Irvine, CA 92618 USA P. 949.788.0101 F. 949.788.0202 www.caltexsci.com...
Need help?
Do you have a question about the LX-100 and is the answer not in the manual?
Questions and answers