
Related Manuals for Parrot Products OP0475


Summary of Contents for Parrot Products OP0475
-
Page 1: User Manual
MODEL: OP0475 USER MANUAL Before using the projector, read this manual carefully... -
Page 2: Table Of Contents
Contents Safety Instructions……………………………………………………… 2 Installation………………………………………………………………. 4 Projector Overview……………………………………………………… 5 Placement…………………………………………………………………7 Connection of external devices………………………………………… 8 Control Panel…………………………………………………………… 9 Remote control Function………………………………………………. 10 Powering On/Off The Projector……………………………………… 11 Image Adjustment…………………………………………………….. 12 Menu Settings…………………………………………………………. 15 Trouble Shooting……………………………………………………… 18 Packing List…………………………………………………………… 19 Specifications……………………………………………………….…. 20... -
Page 3: Safety Instructions
Safety Instructions Read all of these instructions before you operate your projector and save for future reference. Whilst precautions have been taken to ensure the safety of this projector, misuse or improper application may result in electrocution or fire. 1. Read instructions All the safety and operating instructions should be read before the appliance is operated. - Page 4 -10℃~+45℃ 11. Handling When handling the projector, be sure not to drop or shake the unit. This could cause damage to the lens. Disconnect all cables and plugs from the unit before moving. Do not hold the lens. 12. Humid Environment Do not use the unit in a humid environment or near water, this may result in electrocution.
-
Page 5: Installation
Installation In order to minimize the risk of damages to the projector unit, the projector needs to be placed in a dust free environment. 1. Direct Sunlight The projector should not be placed in direct sunlight as this will result in unclear images and viewing difficulty. -
Page 6: Projector Overview
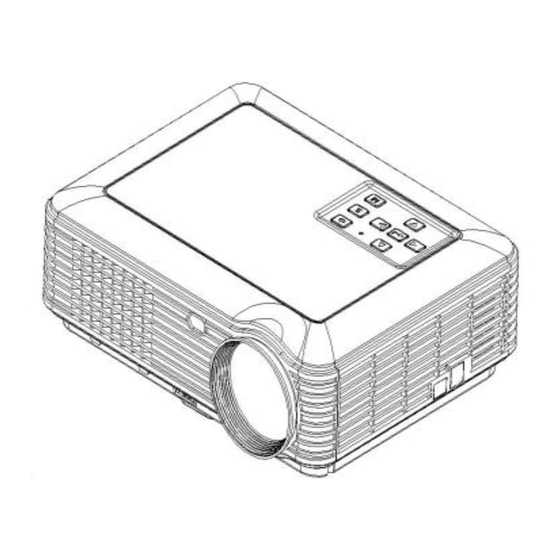
Projector Overview The appearance and function of the projector The following inputs can be used: HDMI, Composite Video, VGA and USB. Videos and documents can be read by the projector unit through USB. Supports audio signal input and output. Top View Bottom View ①... - Page 7 Front view Rear view ① ② ③ ④ ⑤ ⑥ ⑦ ① Ventilation Holes ② Angle Adjustment Mechanism ③ Window of remote control ④ Projection Lens ⑤ Keystone Correction ⑥ Power input ⑦ Signal input Left side view Right side view ①...
-
Page 8: Placement
Placement The quality of the images will be affected by direct or bright lighting. For best viewing capabilities view in a dark room. Standard Setting ( Front projection ) - meters away from projector screen Projection size 16:9 56inch 2.84 Meters 2.28 Meters 60inch 2.66 Meters... -
Page 9: Connection Of External Devices
Connection of external devices 1. Component video signal input 2. Composite video signal input 3. Audio signal input 4. Sound equipment or earphone 5. Composite cable TV 6. VGA input 7. Composite computer/DVD’s HDMI 8. USB ports Note : Turn off the projector and the signal source before connecting any device. -
Page 10: Control Panel
Control Panel ④ ⑤ ③ ⑤ ② ⑥ ⑤ ① ⑤ 1. Menu key Display or exit the on-screen display menus. 2. Source key Switches the projector input source i.e. Video/SV/ HDMI/TV/USB. 3. Power keys Turn the projector on or off. 4. -
Page 11: Remote Control Function
Remote Control Functions Note: The remote control may not operate when there is sunlight or other strong light such as fluorescent lamp shining on the remote sensor. Operate the remote control from a position where the remote sensor is visible. ... -
Page 12: Powering On/Off The Projector
Powering On/Off The Projector Boot operation 1. Complete the AC power cord and peripheral signal cable(s) connections 2. Switch on power switch or alternatively press the “Power” button on the remote 3. The projector takes a minute or so to warm up, after a few seconds an image will appear on the screen. -
Page 13: Image Adjustment
Image Adjustments A new projector may have distorted proportions, in this instance use the Keystone to correct and realign the image Focus adjustment 1. Focus the image by rotating the focus ring in a clockwise direction (Picture 1) and then again slowing in a counter clockwise rotation. -
Page 14: Menu Settings
Menu Settings 1. Press Main Menu button on the projector 2. Use the ‘ ’ Arrow buttons to change the current menu – Picture, Channel, Sound, Time, Options and Application. 3. When the required menu has been found press “ok”. 4. - Page 15 Channel menu CHANNEL Menu interface Auto Tuning Auto scan and install TV channel Manual Manual scan and install TV Tuning channels Programme Edit TV Programme Edit Signal Display current signal information information Software Update system Update(USB) Picture menu Picture menu interface Picture mode Picture Mode Setting...
- Page 16 Time menu Time menu interface Clock The current time setting Off time Off time setting On time On time setting Sleep time Sleep time setting Auto Sleep Auto Time standby setting Option menu Option menu interface OSD Language Menu Language Setting Country Set local country time area Restore...
- Page 17 Application mode instructions Figure 1 1. Insert USB and select the Application Mode. The screen will display the multimedia options Menu (Figure 1) 2. Press " " key to choose the required Multi Media Option - Picture, Channel, Sound, Time, Options and Application.
- Page 18 Operating a Movie File 1. In the Application menu use the " " to select the movie option. 2. Use the arrow keys to select the movie file and press “OK” or play. The operation of the text file 1. In the Application menu use the " "...
-
Page 19: Troubleshooting
Troubleshooting Refer to the symptoms and measures listed below before sending the projector for repairs. If the problem persists, contact your local reseller or service center. Start-up problems If no lights turn on: Be sure that the power cord is securely connected to the projector and the other end is plugged into an outlet with power. -
Page 20: Packing List
Packing List The user needs to ensure that the unit comes complete with the following: Projector…………………………………..1pcs Remote control ……………………..…..1pcs Power Cable……………………………..…..1pcs AV Signal Cable……………………………1pcs VGA Cable………………………………..1pcs User Manual………………………………..1pcs... -
Page 21: Specifications
Specifications Note: Design and Specifications are subject to change without prior notice.
Need help?
Do you have a question about the OP0475 and is the answer not in the manual?
Questions and answers