
Summary of Contents for FIBER FOX Mini 22A
- Page 1 Mini 22A User Manual website youtube Sales : sales@fiberfox.co.kr Technical Support : support@fiberfox.co.kr 80, Dongseo-daero 179beon-gil, yuseong-gu, Daejeon 34159, Korea www.fiberfox.co.kr...
-
Page 2: Table Of Contents
Contents · Introduction · Technical specifications · Splicer description & Part name · How to the replace the fiber folder · Cleaning · Splice Program - Stabilize Electrodes - Arc Calibration - Splice Menu 1) Splice Mode 2) Splice Option 3) Heater Mode 4) Data Storage 5) Menu Lock... - Page 3 · Appendix III Important FiberFox highly recommend that all users read this manual before operating Mini 22A. This manual is valid for the recent software version. Cautions The Battery must be taken out of the splicer, when stored in the Hand carrying case.
-
Page 4: Introduction
Introduction Thank you for choosing Mini 22A FTTx Master from FiberFox. The Mini 22A with innovative design and excellent manufacturing technology gives customers assurance of trust. Exceptional splicing experience and new technology greatly reduces splicing and heating time. Advanced estimate method and clad alignment technique ensure the accuracy of the splice loss estimation. - Page 5 Standard : 20, 25, 30, 35, 40, 60mm Applicable Sleeve Custom : 4*32mm sleeve (For SOC) Heating Time 8~900sec (Typical: 18sec) Heater Factory pre-set 4 ea Heater mode Edit Mode 23 ea Standard 1 ea(Pre-installed) Heating block SOC Customized 1 ea(In Package) Fiber count : Single core Applicable Fiber Type : SM(ITU-TG.652)/ DS(ITU-TG.653)/ NZDS(ITU-TG.655)/...
-
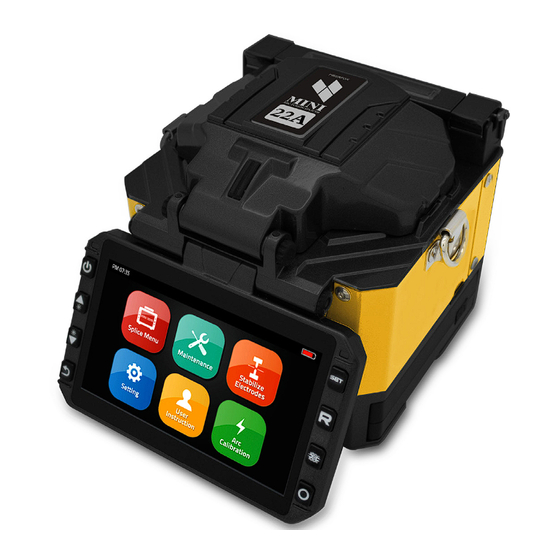
Page 6: Splicer Description & Part Name
Splicer description & part name Sleeve Heater ON/OFF Button Return Button Power Supply / Battery Monitor Micro HDMI Port Connector for Charging Battery - 6 -... -
Page 7: Cleaning
How to replace the fiber holder Caution 1) Loosen the screws 2) Take out the universal holder 1) The unscrewed screws remain in the holder 3) Replace compatible with holder (Do not remove the screws out) 4) Tighten the screw 2) Do not screw down the holder too tight Cleaning V-Grooves... -
Page 8: Splice Program
Splice Programs Splice Menu, Maintenance, Stabilize Electrodes, Setting, User Instruction, Arc Calibration [Stabilize Electrodes] In the event of sudden change in environmental conditions or after cleaning electrodes, the arc power sometimes becomes unstable, resulting in higher splice loss. This is especially a concern when the splicer is moved from lower altitudes to higher , it takes time for the arc power to stabilize. -
Page 9: Splice Menu
[Splice Menu] 1) Splice Mode Factory Pre-Set Mode 11 ea User Mode User Edit : 128 ea Delete Splice Mode - 9 -... -
Page 10: Splice Option
2) Splice Option ON : Automatic splicing procedure Auto Start OFF : Manual Splicing procedure ON : Pause after the fiber gap position process Pause 1 (Press Motor) OFF : Proceeding without the pause ON : Pause after camera focus & Axis alignment process Pause 2 (Align Motor) OFF : Proceeding without the pause... -
Page 11: Heater Mode
3) Heater Mode Factory Pre-Set Mode 4 ea User Mode User Edit : 23 ea Delete Heater Mode - 11 -... - Page 12 ▶ Preheat Mode It is performed for reducing heating time and rapid heating task. When it comes to turned on program, red LED keeps blinking which means it is warming up the heater about 120 to 160℃ itself. After a few minutes, it is available to shrink the sleeve in 15 seconds (Refer to 60mm sleeve which used to perform in 20 seconds) However, Please be attention, it wastes more the battery power than Normal heating mode.
-
Page 13: Data Storage
4) Data Storage Display Splice Record Displaying your detailed splice record Delete Splice Record Export Splice Data Downloading saved data (Splice record or Image) User Information Record the work information into the data save file ON : Automatic data save * Image data is saved manually * Splice Data Save OFF : Do not save splice record... -
Page 14: Menu Lock
5) Menu Lock Input password to access the sub-menu ON : Disable ‘Splice mode’ edit Splice Mode Lock OFF : Enable ‘Splice mode’ edit ON : Disable ‘Heater mode’ edit Heater Mode Lock OFF : Enable ‘Heater mode’ edit ON : Disable ‘Record mode’ edit Records Delete Lock OFF : Enable ‘Heater mode’... -
Page 15: Reset
6) Reset Unexpected the malfunction occurring on splicer, it is necessary to make reset all the parameter through the reset mode. However, it is highly recommend to carry out the reset function after discussed with a technician to reduce second problem. Lower 1.34 version must try Reset function for applying new function of program on the fusion splicer after upgrade process. -
Page 16: Maintenance
[Maintenance] 1) Maintenance Menu ▶ Quick Optimize Quick & Easy overall maintenance Automatic process ‘Focus Adjust > Motor calibration (Press) > fiber training’. ▶ Adjust Position Find the optimized position of optic fiber especially Focus Motor position. ▶ Replace Electrodes Instruction on how to replace electrodes FiberFox recommendation It is highly recommended to change the electrodes after every 5,000 splicing. - Page 17 ▶ Diagnostic Test LED Calibration Measures and adjusts the brightness of LED Dust Check Dust checking process Motor Calibration Automatically calibrates the motor speed Arc Calibration Automatically calibrates the Arc power ▶ LED Calibration Measures and adjusts the brightness of LED ▶...
- Page 18 ▶ Electrode Setting Caution alarm will be displayed when it reach the number of Electrode Caution splicing cycle you set Caution alarm will be displayed when it reach the number of Electrode Warning splicing cycle you set - 18 -...
- Page 19 ▶ Motor Drive This checks the operation status of motors. * Method : Chosen one of motor by Tapping in middle of motor name, And move to press up and down arrow keys ▶ Update Software Upgrade to the latest software version. Procedure Prepare the USB device.
-
Page 20: Setting
[Setting] 1) System Setting ON : Sound on Buzzer OFF : Sound off ℃ : Celsius Temperature Unit ℉ : Fahrenheit ON : Auto start Automatic Heating OFF : Manual start Front : Normal direction display Monitor Position Rear : Opposite direction display ON : Check the dust density Dust Check OFF : Skip dust checking process... -
Page 21: Language
2) Language Set your own language. Language Available 繁体中文 Việt English العربية Español 한글 Русский Italiano Deutsch Português Français فارسی ไทย There are included over 30 languages option on the fusion splicer. Please request to sales department if your language is not contained. - 21 -... -
Page 22: Power Save Option
3) Power Save Option 1) No input during the time you set, the splicer will block the power supply toward LCD 2) System will be switched over to standby mode. Monitor Shut Down Press the power button to resume (Screen will be back on) No input during the time you set, the splicer will be shut down to save the power Splicer Shut Down... -
Page 23: Set Calendar
4) Set Calendar 5) Password Change your password. Procedure Input 4-digit old password number Input new 4-digit number for new password - 23 -... -
Page 24: System Information
6) System Information Machine Serial No. Identification number of the splicer Software Version Software version being installed FPGA Field programmable gate array’ version Total Arc Count Total number of Arc discharges Current Arc Count Current number of Arc discharge Last Maintenance Last maintenance date First Maintenance First manufacturing date... -
Page 25: Notice : Warning And Cautions
Notes: Warning and Cautions Warnings! Disconnect the AC/DC power cord from the wall socket(outlet) immediately if user observes the following or if the splicer receives the following faults: • Fumes, bad odor, noise, or over-heating occurs. • Liquid or foreign matter falls into cabinet. •... - Page 26 Warnings! Do not store splicer in any area where temperature and humidity are extremely high. Possible equipment failure may result. Do not touch protection sleeve or tube-heater during heating or immediately after completion of heating. Their surfaces are very hot and touching these may result in burn. The splicer is precision adjusted and aligned.
-
Page 27: Appendix I
Appendix I Splice loss increase : Reason and solution. Symptom Name Reason Solution Core Axial Dust on v-groove or fiber Clean v-groove and fiber Offset clamp chip clamp chip Dust on v-groove or fiber Clean v-groove and fiber clamp chip clamp chip Core Angle Check if fiber cleaver is well... - Page 28 Decrease [Overlap] and Fiber stuffing too much perform [Motor calibration] Arc power not adequate Perform [Arc calibration] Thin Some arc parameters not Adjust [Prefuse power], adequate [Pre-fuse time] or [Overlap] Some arc parameters not Adjust [Prefuse power], Line adequate [Pre-fuse time] or [Overlap] Note : A vertical line sometimes appears at the splice point when MM fibers, or dissimilar fibers (different diam- eters) are spliced.
-
Page 29: Appendix Ii
Appendix II If error message is shown as below during the process, Please follow the instruction accordingly. If the problem still remains, please contact us. Error Message Reason Solution L Fiber Place Press the “Reset” Button. Reload Error The fiber end-face is placed on the the fibers, make sure fiber end electrode centerline, or beyond it face between V-groove and the... - Page 30 Execute “Motor Calibration” Unidentified Shock occurred to the splicer If the [problem still exist, please Type of Fibers during the splicing process contact the sale agent Overlap too much Adjust overlap parameter Contact of Fiber End-faces Motor is not calibrated Calibrate and maintain the motor Press the “Reset”...
- Page 31 There’s dust or dirt on the fiber Prepare the fiber again surface The lens or LEDs are coated in Execute the dust check after dust cleaning the lenses and LEDs Set the cleaning arc time to be Cleaning Arc time is too short 180ms It is difficult to identify the fiber It is difficult to identify the fiber...
-
Page 32: Appendix Iii
Appendix III [Questions and troubleshooting] · Power does not turn off when pressing On / Off button. - Press and hold the key until the LED color changes from green to red. · Few splices can be made with a fully charged battery pack ·... - Page 33 · Press Heat key to stop during heating process. The LED light will go off after pressing. · Fiber protection sleeve adhered to heating plate after shrinking use a cotton swab or a similar soft tip object to push and remove the sleeve. ·...
Need help?
Do you have a question about the Mini 22A and is the answer not in the manual?
Questions and answers