Table of Contents
Advertisement
Advertisement
Table of Contents

Summary of Contents for Reichert Technologies PT100
- Page 1 PT100 Portable Non-Contact Tonometer User’s Guide...
- Page 2 ©2019 AMETEK, Inc. Reichert and Reichert Technologies are registered trademarks of Reichert, Inc. AMETEK is a registered trademark of AMETEK, Inc. All other trademarks are property of their respective owners. The information contained in this document was accurate at time of publication. Specifications subject to change without notice.
-
Page 3: Table Of Contents
Communication Menu Date Submenu Time Submenu Language Menu Measurement Mode Alignment System Taking an IOP Measurement Measurement Results Low Confidence Readings No Applanation Override Communications Helpful Tips for Using the PT100 Maintenance Troubleshooting Product Specifications Classification Guidance Tables Warranty 13850-101-Rev. L... -
Page 4: Warnings & Cautions
WARNING: TO AVOID RISK OF ELECTRIC SHOCK, THIS EQUIPMENT MUST ONLY BE CONNECTED TO A SUPPLY MAINS WITH PROTECTIVE EARTH OR DAMAGE TO THE PT100 AND/OR INJURY TO THE OPERATOR OR PATIENT MAY OCCUR. WARNING: THIS INSTRUMENT CONTAINS A LITHIUM ION BATTERY INSIDE THE REPLACEABLE BATTERY HANDLE. - Page 5 Warnings & Cautions (Continued) WARNING: DO NOT USE THIS INSTRUMENT IF THERE IS EVIDENCE OF FLUID LEAKING FROM THE BATTERY HANDLE. BATTERIES AND OTHER ELECTRONIC DEVICES MAY CONTAIN FLUIDS THAT ARE HAZARDOUS TO YOUR HEALTH. DIRECT CONTACT WITH SUCH FLUIDS MAY CAUSE BURNS, BLINDNESS, OR DEATH.
- Page 6 Warnings & Cautions (Continued) CAUTION: AN INSTRUCTION THAT DRAWS ATTENTION TO THE RISK OF DAMAGE TO THE PRODUCT. CAUTION: THE INTERNAL CIRCUITRY OF THE INSTRUMENT CONTAINS ELECTROSTATIC DISCHARGE SENSITIVE DEVICES (ESDS) THAT MAY BE SENSITIVE TO STATIC CHARGES PRODUCED BY THE HUMAN BODY. DO NOT REMOVE THE COVERS WITHOUT TAKING PROPER ESDS PRECAU- TIONS.
-
Page 7: Symbol Information
Symbol Information The following symbols appear on the instrument: Caution Alternating Current Power Protective Earth Connection ON / OFF Manufacturer Date of Manufacture 2019 Catalog Number Serial Number Waste of Electrical and Electronic Equipment Authorized to mark given by Intertek ETL Semko for con- formance with electrical standards Consult Instructions for Use Fragile Contents in Shipping Container - handle with care... -
Page 8: Introduction
Congratulations on the purchase of your new PT100 Portable Non-Contact Tonometer. The PT100 is the world’s first completely portable, cordless, Non- Contact Tonometer. The measurement head is fully self contained, utilizing a rechargeable battery. Additionally, the unit features an infrared data port for wireless transmission of measurement data. -
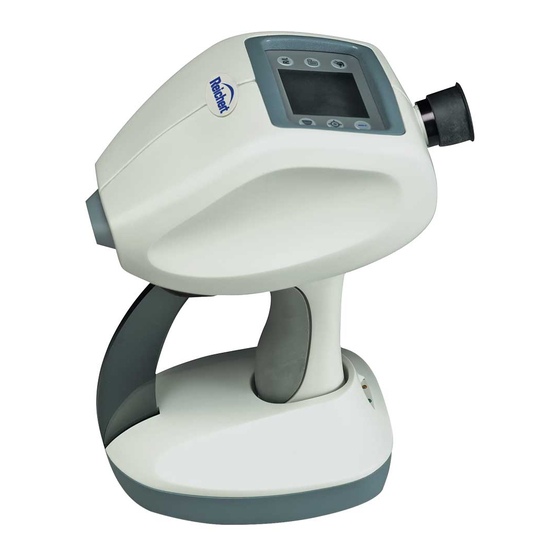
Page 9: System Components
System Components PT100 System (P/N 13850) 1. Charging Base 2. Transport Case 3. Battery Handle 4. PT100 Measurement Head 5. Printer 6. Slit Lamp Holder PT100 Measurement Head (P/N 13851) 7. Display and Controls 8. Nosepiece 9. Infrared Data Window 10. - Page 10 18. On / Off Button 19. Paper Feed Button 20. Status Indicator (green light) Accessories: • PT100 Carrying Case (13850-300) • Battery Handle (13851-853; Without ON/OFF Button) (13851-873; With ON/OFF Button) • Slit Lamp Holder (13854) • Wrist Strap (13851-096) •...
-
Page 11: Installation, Features, And Functions
• When the PT100 is fully charged the amber LED will go out. If the PT100 is in the charging base and the amber LED is blinking, the unit is not fully seated. -
Page 12: Battery Indicator
(Cont’d) On/Off Switch The PT100 is equipped with an On/Off switch located on the lower left side of the handle. To power on the instrument, slide the switch toward the I symbol, which indicates the ON position. To power off the instrument, slide the switch toward the O symbol, which indicates the OFF position. - Page 13 Installation, Features, and Functions (Cont’d) Control Panel Functions The illustration below identifies the control panel icons and button functions. Press any button to proceed to the measurement screen. Function Icons DEMO Press to allow patient to feel demonstration air puff. OVERRIDE Permits quicker measurement of difficult patients.
- Page 14 Insert the shaft of the mount into the focusing rod hole and place the PT100 into the holder. Tighten the set screw to hold the PT100 in place and utilize the controls of the slit lamp to take measurements.
-
Page 15: Setup Mode
Setup Mode Setup Menu The PT100 comes configured with the most commonly used instru- ment settings. Default settings can be changed in the setup mode. Once changes are made, they will remain set until further changes are made. To enter the SETUP mode press the... -
Page 16: Contrast Menu
Illumination Menu This menu option allows operators to turn the patient eye illumination On or Off. Patient eye illumination is helpful when using the PT100 in low light environments. Current instrument settings are indicated by highlighting around the characters. Use the UP, DOWN, and SELECT buttons to navigate and activate the options. -
Page 17: Communication Menu
Setup Mode (Continued) Communications Menu This menu option allows operators to choose the type of device to which data are transmitted when the print button is pressed, and to access the Date and Time submenus. Operators can select Printer to send IR data to the wireless printer, or IR COM to send data to an IR enabled device (contact Reichert Technical Support for more informa- tion). -
Page 18: Time Submenu
Setup Mode (Continued) To set the current date, move the arrow to the bottom line and press select. The first two characters will be highlighted. Use the DOWN buttons to change the characters. Press SELECT when the desired setting has been attained. Repeat this procedure until all date fields (year, month, and day) are set. -
Page 19: Language Menu
Setup Mode (Continued) Language Menu This menu option allows operators to choose the language that will be displayed on the screen and on printouts. Operators can select from Eng (English), Fra (French), Deu (German), Esp (Spanish), Ita (Italian), and Por (Portuguese). Current instrument settings are indicated by highlighting around the characters. -
Page 20: Measurement Mode
Measurement Mode In order to take a measurement the PT100 must be in the measurement mode. To bring up the measurement mode screen, select Exit from the SETUP mode or press any button to bring the instrument out of sleep mode. -
Page 21: Taking An Iop Measurement
(Continued) Taking an IOP Measurement Operators should hold the PT100 with two hands. Place one hand on the handle and the other between the top-front of the instrument and the patient’s brow. This will help stabilize the instrument and serves as a good starting point for establishing correct distance from the eye. - Page 22 Move Down & Left Applanation Achieved Once the correct alignment has been reached, the PT100 will automati- cally take an IOP measurement. The operator will hear the air puff and see the IOP measurement value briefly displayed in the eyepiece view.
-
Page 23: Measurement Results
Operators can take more than three measurements per eye, but the PT100 will only display and average the last three readings. Only the measurements visible on the screen are used in the average IOP computation and will appear on the printout. Results can be cleared... -
Page 24: Low Confidence Readings
Measurement Mode (Continued) Low Confidence Readings During the measurement process, the PT100 may detect certain condi- tions that result in a low confidence reading. Depending on the situation, low confidence readings will be indicated by an asterisk next to the reading or by brackets around the reading. - Page 25 Continued Bracket readings will only appear on the screen after 3 measurements have been taken on the same eye. The PT100 compares all three measurements, looking for a reading that is more than 4 mmHg higher or lower than the other two.
-
Page 26: No Applanation
Measurement Mode (Continued) No Applanation During the measurement process, the PT100 may detect certain condi- tions that cause “No Applanation” to be displayed on the screen. No Applanation readings can occur for various reasons including sudden movements, blinks, and corneal disorders. -
Page 27: Communications
PT100 at the IR window on the printer and pressing the PRINT button. An hourglass symbol will appear at the top of the PT100 display dur- ing data transmission. Operators should continue to point the PT100 towards the printer until the hourglass disappears (approximately 3 seconds). -
Page 28: Helpful Tips For Using The Pt100
In order to become proficient with the PT100, Reichert recommends the following: • Use both hands when operating the PT100. One to hold the instrument and the other to act as a support between the patient’s forehead and the top-front of the instrument. On the grip-hand, operators should extend their index finger along the underside of the unit to provide additional stabilization. -
Page 29: Maintenance
• Press the assembly into place, ensuring that the locking clip properly secures the replaceable battery handle. Note: If the PT100 is not used for extended periods of time, the bat- tery should be removed and placed in its location in the carrying case. -
Page 30: Fuse Replacement
Maintenance (Continued) Fuse Replacement Fuses are located on the bottom of the charging base near the power cord receptacle. If required, replace with fuses as indicated in the Specifications section of this manual. WARNING: ANY REPAIR OR SERVICE TO THIS INSTRUMENT MUST BE PER- FORMED BY EXPERIENCED PERSONNEL OR DEALERS WHO ARE TRAINED BY REICHERT SO THAT CORRECT OPERATION OF THIS INSTRUMENT IS MAIN- TAINED. -
Page 31: Troubleshooting
Printer not turned on or asleep. Communication menu set to IR COM - change in Setup mode. Printer out of paper - replace paper. PT100 battery too low to send data - recharge battery. Printer batteries dead - replace the batteries. Paper feeds but no... -
Page 32: Product Specifications
Product Specifications PT100 Measurement Head Height 10 in. (2.5 cm) Width 4¾ in. (12 cm) Depth 7¾ in. (20 cm) Weight, unpacked 2.7 lbs. (1.3 kg) Lithium Ion Battery Voltage 3.7 VDC Charging Base Input Voltage 100 VAC to 240 VAC... -
Page 33: Classification
According to the degree of safety of application in the presence of a flammable anaesthetic mixture with air or with oxygen or nitrous oxide: The PT100 is not suitable for use in the presence of the above flam- mable mixtures. -
Page 34: Guidance Tables
Guidance and Manufacturer’s Declaration – Electromagnetic Emissions The PT100 is intended for use in the electromagnetic environment specified below. The cus- tomer or user of the PT100 should ensure that it is used in such an environment. Electromagnetic Environment Emissions Test... - Page 35 All Equipment and Systems Guidance and Manufacturer’s Declaration – Electromagnetic Immunity The PT100 is suitable for use in electromagnetic environment specified below. The customer or user of the PT100 should ensure that it is used in such an environment. Immunity...
- Page 36 Guidance and Manufacturer’s Declaration – Electromagnetic Immunity The PT100 is intended for use in the electromagnetic environment specified below. The cus- tomer or user of the PT100 should ensure that it is used in such an environment. Immunity IEC 60601...
- Page 37 Recommended Separation Distances for between Portable and Mobile RF Communications Equipment and the PT100 The PT100 is intended for use in the electromagnetic environment in which radiated RF distur- bances are controlled. The customer or user of the PT100 can help prevent electromagnetic...
-
Page 38: Warranty
Warranty This product is warranted by Reichert, Inc. against defective material and workmanship under normal use for a period of one year from the date of invoice to the original purchaser. (An authorized dealer shall not be considered an original purchaser.) Under this warranty, Reichert’s sole obligation is to repair or replace the defective part or product at Reichert’s discretion. - Page 39 Warranty (Continued) PATENT WARRANTY If notified promptly in writing of any action brought against the purchaser based on a claim that the instrument infringes a U.S. Patent, Reichert will defend such action at its expense and will pay costs and damages awarded in any such action, provided that Reichert shall have sole con- trol of the defense of any such action with information and assistance (at Reichert’s expense) for such defense, and of all negotiation for the...
- Page 40 Manufactured by Reichert Technologies 3362 Walden Ave Depew, NY 14043 Toll Free 888-849-8955 Phone: 716-686-4500 Fax: 716-686-4555 reichert.information@ametek.com www.reichert.com ISO 13485 Certified 2019-01-15 13850-101 Rev. L...
Need help?
Do you have a question about the PT100 and is the answer not in the manual?
Questions and answers