
Related Manuals for Relcom FBT-6

Summary of Contents for Relcom FBT-6
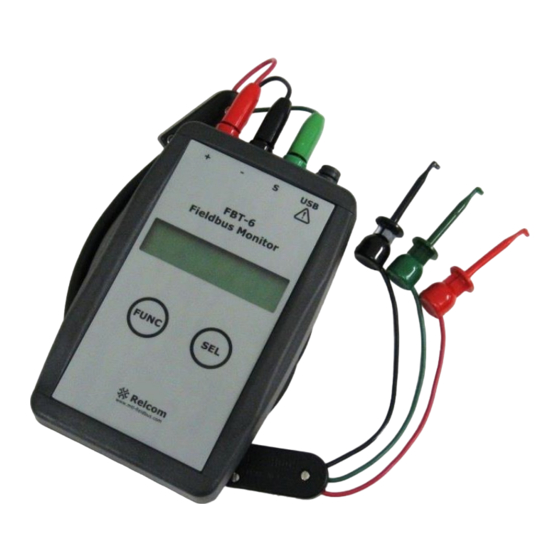
- Page 1 FBT-6 Fieldbus Monitor User Manual Relcom http://relcominc.com/ 501-338 FBT-6 User Manual Rev M.0...
- Page 2 © Copyright Relcom, Inc. 2011-2017 All rights reserved. No part of this manual may be reproduced, photocopied, stored on a retrieval system or transmitted without the express prior written consent of Relcom, Inc. Relcom, Inc. 2221 Yew St. Forest Grove, OR 97116...
-
Page 3: Table Of Contents
Table of Contents Table of Contents ..............3 Introduction ................5 III. Certifications ................. 6 IV. FBT-6 Assistant Software Installation Instructions ....7 Before Starting ................. 7 FBT-6 Assistant Installation ............. 8 Windows 7 Driver Installation ..........14 Windows Vista Driver Installation ........... 15 Windows XP Driver Installation .......... - Page 4 Table of Contents 501-338 FBT-6 User Manual Rev M.0...
-
Page 5: Introduction
Introduction Introduction The FBT-6 Fieldbus Monitor is a Foundation Fieldbus physical segment and signal testing tool. It allows both engineering and service technicians to determine the health of fieldbus segments. The Monitor supports segment troubleshooting without interfering with segment operation. -
Page 6: Certifications
Class I Zone 2 Group IIC T4 Class I Division 1 Groups A,B,C, and D T4 Class I Zone 0 and 1 Ex/AEx ia IIC T4 ATEX Ex ia IIC T4 ATEX Ex ic IIC T4 Gc 501-338 FBT-6 User Manual Rev M.0... -
Page 7: Fbt-6 Assistant Software Installation Instructions
FBT-6 Assistant software included with the Monitor supports the USB features of the Monitor. The FBT-6 Assistant software is on the FBT-6 Software and Documents CD included with the Monitor shipment. The FBT-6 User Manual is also included on the CD and will be installed along with the FBT-6 Assistant software. -
Page 8: Fbt-6 Assistant Installation
You may see a screen similar to the one shown below: If you do see this screen, click Run setup.exe. You may also see a screen asking if you want to allow the FBT-6 Assistant software to make changes to the computer. Click Yes/Run/Continue as appropriate if you see this screen. - Page 9 FBT-6 Assistant Software Installation Instructions The following screen will be displayed: Press the Next button to continue. 501-338 FBT-6 User Manual Rev M.0...
- Page 10 To generate full-featured reports, Microsoft Excel must be installed on the PC and the PC must be ready to print. If not, text reports will be generated instead. Press the Next button to continue. 501-338 FBT-6 User Manual Rev M.0...
- Page 11 FBT-6 Assistant Software Installation Instructions Choose an installation location or use the default location displayed and press the Next button to continue. Press the Next button to continue. 501-338 FBT-6 User Manual Rev M.0...
- Page 12 FBT-6 Assistant Software Installation Instructions You may see the following screen: Click Install. 501-338 FBT-6 User Manual Rev M.0...
- Page 13 Your computer may need to be restarted. If so, you will see the screens below. Click Restart Now. Click OK. Your computer will restart. The FBT-6 Assistant application is now installed. Turn to the driver installation instructions appropriate for your PC as listed below:...
-
Page 14: Windows 7 Driver Installation
FBT-6 Assistant Software Installation Instructions Windows 8 (32- and 64-bit) Driver Installation The driver is installed with the FBT-6 Assistant application. No further action is needed. Windows 7 (32- and 64-bit) and 64-bit Vista Driver Installation After installing the FBT-6 Assistant application, the USB driver needs to be installed. -
Page 15: Windows Vista Driver Installation
FBT-6 Assistant Software Installation Instructions Windows Vista 32-bit Driver Installation After installing the FBT-6 Assistant application, the USB driver needs to be installed. Attach the Monitor to a USB port on the PC with the provided cable. Note: Connect the Monitor directly to a USB port on the PC. - Page 16 FBT-6 Assistant Software Installation Instructions Click Install this driver software anyway. This text bubble shows that the driver successfully installed. The Windows Vista driver installation is now complete and the FBT-6 Assistant program is ready for use. 501-338 FBT-6 User Manual Rev M.0...
-
Page 17: Windows Xp Driver Installation
FBT-6 Assistant Software Installation Instructions Windows XP Driver Installation After installing the FBT-6 Assistant application, the USB driver needs to be installed. Attach the Monitor to a USB port on the PC with the provided cable. Note: Connect the Monitor directly to a USB port on the PC. - Page 18 FBT-6 Assistant Software Installation Instructions Select the first option, Install the software automatically (Recommended), and press the Next button to continue. The computer searches for the driver. 501-338 FBT-6 User Manual Rev M.0...
- Page 19 FBT-6 Assistant Software Installation Instructions Press Continue Anyway. 501-338 FBT-6 User Manual Rev M.0...
- Page 20 Finish button to exit. The Windows XP driver installation is now complete and the FBT-6 Assistant program is ready for use. Important note: The driver must be installed on each USB port that the Monitor will be connected to on the PC. The “Found New Hardware Wizard”...
-
Page 21: Windows 2000 Driver Installation
FBT-6 Assistant Software Installation Instructions Windows 2000 Driver Installation After installing the FBT-6 Assistant application, the USB driver needs to be installed. Attach the Monitor to a USB port on the PC with the provided cable. Note: Connect the Monitor directly to a USB port on the PC. - Page 22 FBT-6 Assistant Software Installation Instructions Select the Hardware tab. Click the Device Manager button. 501-338 FBT-6 User Manual Rev M.0...
- Page 23 FBT-6 Assistant Software Installation Instructions Look for Other Devices and expand this by selecting +. Right- click on FBT-6 Fieldbus Monitor and click Properties. 501-338 FBT-6 User Manual Rev M.0...
- Page 24 Select OK. Select OK on the System Properties screen. Restart the computer. The Windows 2000 driver installation is now complete and the FBT-6 Assistant program is ready for use. 501-338 FBT-6 User Manual Rev M.0...
-
Page 25: Uninstalling The Fbt-6 Assistant
FBT-6 Assistant Software Installation Instructions Uninstalling the FBT-6 Assistant To uninstall the FBT-6 Assistant use the Windows Add or Remove Programs feature in the Control Panel. In Vista use the Uninstall a program feature in the Control Panel. After the uninstall is complete, restart the computer. -
Page 26: Operation
Verify adequate current is available before connecting the Monitor or bus communications may be impacted. Install the FBT-6 Assistant software by following the section FBT-6 Assistant Software Installation Instructions on page 7 before attempting to connect the Monitor to the USB port. - Page 27 Monitor was disconnected then re-connected to the segment. Short button presses (less than 2 seconds) are acted upon when the button is released, not when depressed. Figure 1 shows a block diagram of how to navigate through the Monitor functions. 501-338 FBT-6 User Manual Rev M.0...
- Page 28 High Frequency Wiring (Shield Short Detect) Retransmit Device X Device Y Device Z Add / Drop Device Device X Device Y Device Z Device Count FUNC Save Report Figure 1: Navigating through the Monitor’s Functions 501-338 FBT-6 User Manual Rev M.0...
-
Page 29: Segment Check Mode
Monitor as a Fieldbus signal and causes the Monitor to get “stuck” in Segment Check Mode. In this case, troubleshoot and eliminate the source of the noise. 501-338 FBT-6 User Manual Rev M.0... - Page 30 Operation Parameters are evaluated against limits as OK or BAD. The limits can be set using the Set Alert Limits feature of the FBT-6 Assistant software. See the section Set Alert Limits function on page 54 for details. Table 1 lists the parameters checked in Segment Check Mode and the default limit values.
-
Page 31: Manual Mode Functions
BAD is displayed instead of OK. VOLTAGE 8.5V The DC voltage limit is configurable using the Set Alert Limits function in the FBT-6 Assistant software. See Set Alert Limits function on page 54 for details. 501-338 FBT-6 User Manual Rev M.0... -
Page 32: Peak Noise
PK LF NOISE 199 mV BAD The FF, LF, and HF noise level limits are configurable using the Set Alert Limits function in the FBT-6 Assistant software. See Set Alert Limits function on page 54 for details. Holding down the SELECT button for 2 seconds resets the selected peak noise value. - Page 33 Operation The approximate frequency bands monitored are listed below. Low Frequency Band 50Hz to 4KHz Fieldbus Frequency Band 9KHz to 40KHz High Frequency Band 90KHz to 350KHz 501-338 FBT-6 User Manual Rev M.0...
-
Page 34: Average Noise
AVG HF NOISE 200mV BAD The FF, LF, and HF noise level limits are configurable using the Set Alert Limits function in the FBT-6 Assistant software. See Set Alert Limits function on page 54 for details. Holding down the SELECT button for 2 seconds resets the selected average noise value. - Page 35 Operation The approximate frequency bands monitored are listed below. Low Frequency Band 50Hz to 4KHz Fieldbus Frequency Band 9KHz to 40KHz High Frequency Band 90KHz to 350KHz 501-338 FBT-6 User Manual Rev M.0...
-
Page 36: Shield Short
(+) TO SHIELD INTERMITTENT Holding the SELECT button down for 2 seconds resets the Shield Short function. Resetting the Shield Short function clears intermittent short indications. 501-338 FBT-6 User Manual Rev M.0... -
Page 37: Retransmit
RETRANSMITS=250+ DEVICE 19(13H) Holding down the SELECT button for 2 seconds resets the number of retransmits for all devices to 0. Resetting the Retransmit function also resets the Add-Drop, Device, and Device Count functions. 501-338 FBT-6 User Manual Rev M.0... -
Page 38: Add-Drop
Live List provided by the control system is unchanged. Holding down the SELECT button for 2 seconds resets the Add-Drop function. Resetting the Add-Drop function also resets the Retransmit, Device, and Device Count functions. 501-338 FBT-6 User Manual Rev M.0... -
Page 39: Device
DEVICE 41 (29H) 140mV BAD The minimum allowed signal level limit is configurable using the Set Alert Limits function in the FBT-6 Assistant software. See Set Alert Limits function on page 54 for details. 501-338 FBT-6 User Manual Rev M.0... - Page 40 Monitor (or since the last reset). Holding down the SELECT button for 2 seconds also deletes dropped devices from the Monitor’s internal device list. Resetting the Device function also resets the Retransmit, Add-Drop, and Device Count functions. 501-338 FBT-6 User Manual Rev M.0...
-
Page 41: Low
The minimum and maximum allowed signal level limits are configurable using the Set Alert Limits function in the FBT-6 Assistant software. See Set Alert Limits function on page 54 for details. Holding down the SELECT button for 2 seconds resets the low signal level value. -
Page 42: Device Count 12
To make it easier to detect the adding or dropping of a device, the device count and initial count can be reset by holding down the SELECT button for 2 seconds. Resetting the Device Count function also resets the Retransmit, Add-Drop, and Device functions. 501-338 FBT-6 User Manual Rev M.0... -
Page 43: Save Report
8. Report 8 LOCATION 8 USED When the last report location, location 8, is displayed and the SELECT button is pressed, the display rolls back to the first report location, location 1. 501-338 FBT-6 User Manual Rev M.0... - Page 44 2 seconds the report is overwritten with a new report. Use the Set Report Names feature in the FBT-6 Assistant to change the report names. See the section Set Report Names function on page 52 for details.
-
Page 45: Usb Port And Associated Features
USB Port and Associated Features The USB port on the Monitor can be connected to a PC. Using the FBT-6 Assistant program installed on a PC, reports collected on the Monitor can be transferred to an Excel file on the PC and the firmware in the Monitor can be updated. -
Page 46: Connecting The Monitor To The Pc Usb Port And Starting The Fbt-6 Assistant
FBT-6 Assistant Connect the Monitor to the USB port using the supplied USB cable. Connect only one Monitor at a time. Open the FBT-6 Assistant program by double clicking on the FBT-6 Assistant desktop icon or selecting Start – All Programs – FBT-6 Assistant –... -
Page 47: Transfer Reports Function
Operation 2. Transfer Reports function Click the Transfer Reports from FBT-6 button to transfer the reports saved in all eight Monitor report locations to a PC via the USB port. NOTE: Excel must be installed and the PC must be ready to print to generate full-featured Excel spreadsheet reports. - Page 48 Monitor reports and file names must be specified for each report transferred from the Monitor. In this case, the FBT-6 Assistant prompts for a file name as shown below. The suggested file name is in the format <Report location name>.xls.
- Page 49 When all files have been saved, the main menu is displayed. The reports are saved in a formatted Excel spreadsheet file. The contents of the file and how it will look when opened in Excel are shown in Table 2. 501-338 FBT-6 User Manual Rev M.0...
- Page 50 Device Measurements Data Acceptable Values OK/BAD Device Address 16 (10H) Signal Level 729mV 150mV Minimum Added/Dropped Not Added/Dropped Not Added/Dropped Retransmits Measurement Summary: All Measurements are OK Data collected by _______________________________________________ Report approved by _______________________________________________ 501-338 FBT-6 User Manual Rev M.0...
-
Page 51: Erase Reports Function
The reports in a Monitor may also be erased without first downloading them. From the File pull-down menu in the upper left corner of the main screen click Erase Reports in FBT-6. A window appears asking for confirmation to erase all of the reports stored in the Monitor. -
Page 52: Set Report Names Function
Names window appears showing the current report names. Type in the desired report names and click Save Report Names to FBT-6. This writes the report names to the Monitor. The report names must be 1-15 characters long and cannot contain the following characters: \ / : * ? <... - Page 53 Click Show Default Names to show the default report names. To save the default names in the Monitor, Click Save Report Names to FBT-6. Click Read Current Report Names from FBT-6 to display the report names stored in the Monitor. Click Cancel to leave the Display/Edit Report Names window without changing the report names stored in the Monitor.
-
Page 54: Set Alert Limits Function
BAD based upon user configurable alert limits. To display and edit these limits click the Set pull-down menu and select Alert Limits. Type in the desired limits for each parameter and click Save Limits to FBT-6 to write the limits to the Monitor. 501-338 FBT-6 User Manual Rev M.0... - Page 55 Limits to FBT-6. The default limits are based upon the Foundation Fieldbus physical layer standard (IEC 61158) where possible. Click Read Limits from FBT-6 to display the limit values stored in the Monitor. Click Cancel to leave the Set Alert Limits window without changing the limits stored in the Monitor.
-
Page 56: Update Firmware Function
Download the Monitor firmware file from www.relcominc.com save it on the PC. Start the FBT-6 Assistant and click the Update Firmware button to begin the update process. The Choose Hex File window opens. 501-338 FBT-6 User Manual Rev M.0... - Page 57 The Final Check! Window opens as shown below. Updating the firmware erases any reports saved in the Monitor. Click OK to proceed with the update. Click Cancel to stop the update and return to the main FBT-6 Assistant screen. 501-338 FBT-6 User Manual Rev M.0...
- Page 58 After clicking OK, the following screen appears. Once the firmware update is complete, the FBT-6 Assistant status line in the middle of the FBT-6 Assistant main menu will change from, “Firmware update will take a few moments. Please wait…” to “FBT-6 firmware loaded. Ready...”. Close the FBT-6 Assistant program by clicking the Exit button and begin using the Monitor.
-
Page 59: Using The Clip-On Probe Cable
The second cable has a clip-on probe for easy attachment to Phoenix Contact style screw terminal connectors such as those on the Relcom Megablock wiring blocks. The pictures below show the best methods for attaching and removing the clip-on probe. -
Page 60: Operation In Special Cases
(DC Volts, Noise, etc.). In addition, if the segment remains silent for about 2 seconds, the Monitor will mark all devices as dropped and set the (active) device count to 0. 501-338 FBT-6 User Manual Rev M.0... - Page 61 Note that in Excess Noise Mode, the Monitor cannot differentiate between fieldbus signals and noise. As a result, the Monitor measures noise plus signal when it displays noise values. The noise level measurements displayed will be very high. 501-338 FBT-6 User Manual Rev M.0...
- Page 62 In this case, only the selected Monitor function name is displayed. The FUNCTION and SELECT buttons still navigate through the menus as they normally would. 501-338 FBT-6 User Manual Rev M.0...
-
Page 63: Accessories
Cable with Mini- Hook Probes FBT-A62 FBT-6 USB Cable FBT-A63 FBT-6 Fieldbus Cable with Clip- on Probe FBT-A64 Clip-on Probe Contact your local MTL representative for pricing and availability. http://www.mtl-inst.com/ (or in the U.S. call 1-713-595-6100) 501-338 FBT-6 User Manual Rev M.0... -
Page 64: Specifications
* Display updates very slowly below –10°C. The Monitor is powered by the Fieldbus and draws approximately 9.4 mA of current from the segment (depending on bus voltage and ambient temperature). Specifications are subject to change without notice. 501-338 FBT-6 User Manual Rev M.0... -
Page 65: Service
The Monitor does not contain any user serviceable parts. All adjustments and/or repairs have to be performed at the factory. If the Monitor needs to be serviced, return it to Relcom, Inc. If the Monitor is covered by the limited warranty, the repairs or replacement will be made free of charge. -
Page 66: Warranty
Monitor without notice and with no obligation to make the same or similar changes to units previously manufactured. Relcom, Inc. has made every effort to assure the accuracy of the information contained in this manual. Relcom is not, however, responsible for any errors or omissions. Please contact us with any questions or suggestions. -
Page 67: Emc Summary Information
EQUIPMENT – IMMUNITY CHARACTERISTICS – LIMITS AND METHODS OF MEASUREMENT Tested Products: FBT-6 Other products that conform based on these tests: FBT-6-PA European Union Electromagnetic Compatibility (EMC) Tests in accordance with EC Council Directive 89/336/EEC Emissions Tests per EN61326 Class A... - Page 68 Cyrus Kelly , representative for Relcom, Inc., verify that the product tested is representative of production products to be sold. Based on the results presented in this report the FBT-6 product family can be marked with the FCC mark (as a Class A digital device) and the CE mark.
-
Page 69: Revision History
Release 2 (updated Save Data function, intermittent shield short detect, generation of reports in Excel, date/time stamps, erase reports in FBT-6 from Assistant software, support for FBT-5. Reset in Add/Drop, Device, and Device Count screens now affect all 3 screens. Added Accessory section. - Page 70 4/10/2013 Removed ATEX Ex nL IIC T4 marking as “nL” is no longer supported in the EU. Added instructions for installation on Windows 8. 3/31/2017 Removed MTL logo from product photo and front cover. 501-338 FBT-6 User Manual Rev M.0...
- Page 71 Navigating through the Monitor’s Functions 501-338 FBT-6 User Manual Rev M.0...
- Page 72 Relcom, Inc. 2221 Yew St. Forest Grove, OR 97116 Tel: (503) 357-5607 Fax: (503) 357-0491 www.relcominc.com 501-338 FBT-6 User Manual Rev M.0...
Need help?
Do you have a question about the FBT-6 and is the answer not in the manual?
Questions and answers