
Related Manuals for Highly Reliable SYSTEMS High-Rely NetSwap

Summary of Contents for Highly Reliable SYSTEMS High-Rely NetSwap
- Page 1 High-Rely NetSwap/NetSwap Plus/RAIDFrame Plus Backup System User Manual V2.16 Copyright © 2011-2019 by Highly Reliable Systems, Inc. All rights reserved.
- Page 2 The information in this manual primarily documents Windows. Although our products are known to work with Windows NT, Linux, Mac OS X and other operating systems, at this time, our tech support can assist with Windows platforms only. Copyright © 2011-2019 by Highly Reliable Systems, Inc. All rights reserved.
- Page 3 In no event shall the publisher and the author be liable for any loss of profit or any other commercial damage caused or alleged to have been caused directly or indirectly by this document Copyright © 2011-2019 by Highly Reliable Systems, Inc. All rights reserved.
-
Page 4: Table Of Contents
3.4.2 Status Menu.........................39 3.4.2.1 Status..........................39 3.4.2.2 Tasks...........................41 3.4.2.3 View Log........................42 3.4.3 Settings Menu........................43 3.4.3.1 Network........................43 3.4.3.2 Dynamic DNS (NetSwap/RAIDFrame Plus Only)............46 3.4.3.3 Admin.........................47 3.4.3.4 Disks...........................49 3.4.3.5 iSCSI..........................51 3.4.3.6 Windows Networking....................55 Copyright © 2011-2019 by Highly Reliable Systems, Inc. All rights reserved. - Page 5 3.4.9 Create RAID Disk (NetSwap/RAIDFrame Plus only).............132 3.4.10 RAID Properties (NetSwap/RAIDFrame Plus only)............134 3.4.10.1 Resume RAID......................137 3.4.10.2 Pause RAID......................137 3.4.10.3 Break RAID......................138 3.4.10.4 Add Disk........................139 3.4.10.5 Remove Disk......................140 4 High-Rely iSCSI Connector Software....................141 4.1 Installation..........................141 Copyright © 2011-2019 by Highly Reliable Systems, Inc. All rights reserved.
- Page 6 8.3.1 Network Monitor.......................174 8.3.2 File Based Monitor......................181 8.4 Level Platforms Managed Workplace 2012................186 8.4.1 Device Availability Monitor....................186 8.4.2 Custom Log File Monitor....................194 8.4.3 Performance Counters Monitor..................201 9 GPL Code Statement...........................207 Copyright © 2011-2019 by Highly Reliable Systems, Inc. All rights reserved.
-
Page 7: Introduction
Some models add the ability to replicate backups off site; either to another NetSwap or to various cloud storage providers (including Dropbox, Amazon S3, Google Cloud Storage) or servers or providers using FTP or SFTP protocols. Copyright © 2011-2019 by Highly Reliable Systems, Inc. All rights reserved. -
Page 8: Netswap/Raidframe Plus Hardware
Power Button Removable Drive Bay Clear Alarm Button* Disk Activity Indicator USB Port Bay Status Indicators* *Note: Bay Status Indicators, Alarm Indicator and Clear Alarm button only on G2 models. Copyright © 2011-2019 by Highly Reliable Systems, Inc. All rights reserved. -
Page 9: Rackmount Chassis (Netswap Plus Only)
Bay 3 Status Indicator* Bay 4 Status Indicator* Clear Alarm Button* Removable Boot Disk Bay *Note: Bay Status Indicators, Alarm Indicator and Clear Alarm button only on G2 models. Copyright © 2011-2019 by Highly Reliable Systems, Inc. All rights reserved. -
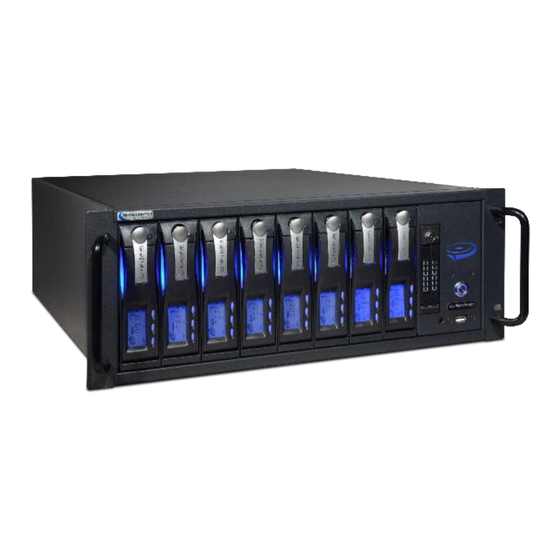
Page 10: Bay Rackmount Chassis (Netswap Plus Only)
Removable Bay 8 Removable Boot Disk Bay Power/Alarm Indicator Power Button USB Port Clear Alarm Button *Note: Bay Status Indicators, Alarm Indicator and Clear Alarm button only on G2 models. Copyright © 2011-2019 by Highly Reliable Systems, Inc. All rights reserved. -
Page 11: Raidframe Rackmount Chassis (Raidframe Plus Only)(Legacy)
Power Button USB Port Bay 1 Indicator Bay 2 Indicator Bay 3 Indicator Bay 4 Indicator *Note: Bay Status Indicators, Alarm Indicator and Clear Alarm button only on G2 models. Copyright © 2011-2019 by Highly Reliable Systems, Inc. All rights reserved. -
Page 12: Mini Chassis
Power On Procedure To power on the device, press and release the power button. The clear ring surrounding the power button will glow blue when the power is on. Copyright © 2011-2019 by Highly Reliable Systems, Inc. All rights reserved. -
Page 13: Power Off Procedure
Illustration 6: Desktop Chassis Back View PS/2 Keyboard/Mouse VGA/DVI Video Connectors USB Ports 10/100/1000 MB Ethernet Port Power Receptacle - Auto-switch 110/220 Volts Note layout may vary depending on motherboard used. Copyright © 2011-2019 by Highly Reliable Systems, Inc. All rights reserved. -
Page 14: Rackmount Chassis (2 Or 4 Bay)
– check power supply before connecting power. PS/2 Keyboard/Mouse 10/100/1000 MB Ethernet Port USB Ports DVI/VGA Video Connectors eSATA Ports (optional) Note layout may vary depending on motherboard used. Copyright © 2011-2019 by Highly Reliable Systems, Inc. All rights reserved. -
Page 15: Rackmount Chassis (8 Bay Or Raidframe)(Legacy)
Power Receptacle - 110/220 Volts Some power supplies are auto- switch and some are not – check power supply before connecting power. Note layout may vary depending on motherboard used. Copyright © 2011-2019 by Highly Reliable Systems, Inc. All rights reserved. -
Page 16: Mini Chassis
Illustration 9: 2 Bay Mini Power Receptacle - Auto-switch 110/220 Volts Video Connectors Gigabit Ethernet Port USB 3.0 Ports PCIE Expansion Slot Note layout may vary depending on motherboard used. Copyright © 2011-2019 by Highly Reliable Systems, Inc. All rights reserved. -
Page 17: Netswap/Raidframe Plus Administration
3. When prompted enter for username and password: User Name: hradmin Password: password Please NOTE: the username and password are BOTH case sensitive – you will need to use all lower case. Copyright © 2011-2019 by Highly Reliable Systems, Inc. All rights reserved. -
Page 18: Quick Setup
When using iSCSI we recommend turning off off default indexing service. Right click the drive in Explorer and select properties. Uncheck “Allow files on this drive to have contents indexed in addition to file properties.” Copyright © 2011-2019 by Highly Reliable Systems, Inc. All rights reserved. - Page 19 You may want to verify that your Windows network card is at the highest possible speed (e.g. Gigabit Ethernet). Right click your network connection, select status and verify Speed: Copyright © 2011-2019 by Highly Reliable Systems, Inc. All rights reserved.
- Page 20 NTFS and SHARE level permissions. If you copy files directly to NetSwap/RAIDFrame Plus drive using explorer, Robocopy or similar file program to the NetSwap/RAIDFrame Plus drive may not preserve all user and group permissions. Copyright © 2011-2019 by Highly Reliable Systems, Inc. All rights reserved.
-
Page 21: Disk Preparation
'Disks' menu option as shown below: Format Disk Action Button Illustration 14: Format Disk Action Button See the 'Format' section below for more information on formatting disks. Copyright © 2011-2019 by Highly Reliable Systems, Inc. All rights reserved. -
Page 22: Sharing Disks
Share Mode. Note that if a disk is part of a mirror disk it cannot be shared directly, the mirror disk must be shared. See the 'Disk Properties' section below for more details. Copyright © 2011-2019 by Highly Reliable Systems, Inc. All rights reserved. -
Page 23: Creating Raid Disks (Netswap/Raidframe Plus Only)
RAID using the 'Add Disk' action from the 'RAID Properties' screen as shown below: Copyright © 2011-2019 by Highly Reliable Systems, Inc. All rights reserved. -
Page 24: Replication (Netswap/Raidframe Plus Only)
Only disks that are shared in NAS mode can be used for a source or destination, unshared and disks shared iSCSI cannot be used. Normally the source for the Replication Copyright © 2011-2019 by Highly Reliable Systems, Inc. All rights reserved. -
Page 25: Setting Up A Basic Replication Job
Next, on the NetSwap to be replicated, create a Job by clicking on the 'Jobs' menu option under 'Replication' and then clicking the 'New' button. This will popup the Job wizard that will guide you through setting the details of the new Job. Copyright © 2011-2019 by Highly Reliable Systems, Inc. All rights reserved. - Page 26 Illustration 19: Replication Job - Source Select the 'Local Disk' as the 'Source Type' and select a disk and folder to be replicated and click the 'Next' button. Copyright © 2011-2019 by Highly Reliable Systems, Inc. All rights reserved.
- Page 27 'Save' to save the new Remote Location. The default TCP/IP port for unencrypted replication is 873 and for encrypted replication is 8873. The ports are defined on the remote NetSwap in the 'Settings' menu option under 'Replication'. Copyright © 2011-2019 by Highly Reliable Systems, Inc. All rights reserved.
- Page 28 Target. Click the 'Test' button to verify the username and password are correct and then click 'Next'. Illustration 22: Replication Job - Options Enter a name for the Job and click 'Next'. Copyright © 2011-2019 by Highly Reliable Systems, Inc. All rights reserved.
- Page 29 To run the Job immediately, click the checkbox next to Job and click the 'Start' button. Once the Job is started, the Status column will show that the Job is 'Running' and will display a progress bar. You may Copyright © 2011-2019 by Highly Reliable Systems, Inc. All rights reserved.
-
Page 30: Seeding
Insert the disk to be used as the seed disk into the NetSwap (format if necessary). From the Replication Jobs screen, select the Replication Job you wish to seed and click the 'Seed Out' button. Select the Copyright © 2011-2019 by Highly Reliable Systems, Inc. All rights reserved. -
Page 31: Seed Using Speedseed
For this example we will be using two NetSwap Plus's each with a 4TB internal disk. To create the seed disk on the NetSwap to be replicated from a synced RAID 1 Disk, select the 'Disks' menu option. Copyright © 2011-2019 by Highly Reliable Systems, Inc. All rights reserved. - Page 32 RAID 1 Disk and mark it as a seed disk. Once completed, remove the disk from the NetSwap and transport it to the remote site and insert into the remote NetSwap. Copyright © 2011-2019 by Highly Reliable Systems, Inc. All rights reserved.
- Page 33 In the image above from the remote NetSwap, we see our seed disk installed, the internal disk, and we have no RAID 1 Disks. Click the 'Seed RAID Disk' button for the seed disk. Copyright © 2011-2019 by Highly Reliable Systems, Inc. All rights reserved.
- Page 34 NetSwap. Next we will add the internal disk (DISK-0226) to the RAID Disk. Click the 'RAID Properties' button for the RAID Disk. Copyright © 2011-2019 by Highly Reliable Systems, Inc. All rights reserved.
- Page 35 Illustration 29: RAID Properties From the RAID Properties screen click the 'Add Disk' button. Illustration 30: Add Disk Select the internal disk and click the 'Add' button. Copyright © 2011-2019 by Highly Reliable Systems, Inc. All rights reserved.
-
Page 36: Snapshots
To specify that a Replication Job is to create a snapshot when it is run, select a disk for 'Snapshot Storage' for the 'Source' of the Replication Job as shown below: Copyright © 2011-2019 by Highly Reliable Systems, Inc. All rights reserved. - Page 37 Illustration 32: Replication Job - Snapshot Storage Selection Copyright © 2011-2019 by Highly Reliable Systems, Inc. All rights reserved.
-
Page 38: Administration Reference
Administration Reference 3.4.1 Page Layout Header Help Form Area Menu Illustration 33: Form Layout Copyright © 2011-2019 by Highly Reliable Systems, Inc. All rights reserved. -
Page 39: Status Menu
Displays whether or not the alarm is on and if it is muted. If the alarm is on, a 'Clear Alarm' button will appear allowing the alarm to be cleared. Copyright © 2011-2019 by Highly Reliable Systems, Inc. All rights reserved. - Page 40 DNS server 2 IP address. Physical Disk/RAID Disks (RAID Disks only appears on NetSwap/RAIDFrame Plus) Displays information on the currently installed physical and RAID disks. Bay # Bay in which disk is installed. Copyright © 2011-2019 by Highly Reliable Systems, Inc. All rights reserved.
-
Page 41: Tasks
RAID disks are only applicable to NetSwap/RAIDFrame Plus. 3.4.2.2 Tasks Displays the tasks status for currently active tasks and a history of the last 10 completed tasks. Updates automatically. Illustration 35: Tasks Task ID. Copyright © 2011-2019 by Highly Reliable Systems, Inc. All rights reserved. -
Page 42: View Log
Displays the last 200 lines of the current log and allows one to download the complete NetSwap/RAIDFrame Plus, System, Kernel, and Boot logs as text files. Illustration 36: View Log Copyright © 2011-2019 by Highly Reliable Systems, Inc. All rights reserved. -
Page 43: Settings Menu
3.4.3 Settings Menu 3.4.3.1 Network Configure TCP/IP network settings. Illustration 37: Network Settings - DHCP Illustration 38: Network Settings - STATIC Copyright © 2011-2019 by Highly Reliable Systems, Inc. All rights reserved. - Page 44 IP Address. In DHCP mode, this is assigned automatically. Netmask Netmask. In DHCP mode, this is assigned automatically. Gateway Gateway. In DHCP mode, this is assigned automatically. DNS1 DNS1. In DHCP mode, this is assigned automatically. Copyright © 2011-2019 by Highly Reliable Systems, Inc. All rights reserved.
- Page 45 Illustration 40: Network Diagnostics Enter a hostname or IP and click the button to run the desire tool (Ping, Trace Route, or NS Lookup). The result will be displayed below “Result:”. Copyright © 2011-2019 by Highly Reliable Systems, Inc. All rights reserved.
-
Page 46: Dynamic Dns (Netswap/Raidframe Plus Only)
The hostname to update. This is the hostname defined on your dynamic DNS service. For namecheap.com, this the machine name only (e.g. if the complete hostname is netswap1.yourdomain.com, this would be netswap1). Copyright © 2011-2019 by Highly Reliable Systems, Inc. All rights reserved. -
Page 47: Admin
Enable or disable the remote administration port. This port is provided as an alternate port to access the NetSwap/RAIDFrame Plus administration and can be used to map an IP address Copyright © 2011-2019 by Highly Reliable Systems, Inc. All rights reserved. - Page 48 Admin password. This is optional, only fill in if you wish to change the admin password. Confirm Password If changing the admin password, reenter the new password to confirm. Copyright © 2011-2019 by Highly Reliable Systems, Inc. All rights reserved.
-
Page 49: Disks
Share mode assigned to the disk in 'Properties'. Options are N/A (not shared), NAS (Windows Networking/NFS), and iSCSI. If the disk is part of a RAID Disk, RAID will be displayed. Copyright © 2011-2019 by Highly Reliable Systems, Inc. All rights reserved. - Page 50 RAID configuration information will be lost. This action should only be used before "breaking" a RAID or as directed by Technical Support personnel. Only displayed if the RAID is enabled. Copyright © 2011-2019 by Highly Reliable Systems, Inc. All rights reserved.
-
Page 51: Iscsi
Internet SCSI and allows client machines to send SCSI commands to remote storage servers such as the NetSwap/RAIDFrame Plus. This allows you to connect a single machine over the Copyright © 2011-2019 by Highly Reliable Systems, Inc. All rights reserved. - Page 52 Hostname as defined in Network settings. In 'iSCSI Qualified Name (IQN)' mode, the base portion of the target name may be user modified and must conform the the IQN standard as Copyright © 2011-2019 by Highly Reliable Systems, Inc. All rights reserved.
- Page 53 In the iSCSI Initiator on Windows after changing the target name, the old target name can sometimes be seen and Windows will possibly try to reconnect to it. This doesn't cause any problems, however to remove the old target name do the following: Copyright © 2011-2019 by Highly Reliable Systems, Inc. All rights reserved.
- Page 54 Open iSCSI Initiator - Targets tab - Select the target showing status of "Reconnecting" - Select Details button - place check mark in box for Identifier - Select Log Off - Select OK on all screens to exit: Illustration 45: iSCSI Initiator: Targets Copyright © 2011-2019 by Highly Reliable Systems, Inc. All rights reserved.
-
Page 55: Windows Networking
For example, if you had two NetSwap/RAIDFrame Plus, It would be important to make sure they were not both set to default. Copyright © 2011-2019 by Highly Reliable Systems, Inc. All rights reserved. - Page 56 Password Password required to access the share. It is not necessary that this be a valid user password on your existing network or domain. Copyright © 2011-2019 by Highly Reliable Systems, Inc. All rights reserved.
- Page 57 Global options applied when in 'Active Directory' security mode. User Share Options applied to each share when in 'User' security mode. ADS Share Options applied to each share when in 'Active Directory' security mode. Copyright © 2011-2019 by Highly Reliable Systems, Inc. All rights reserved.
- Page 58 Hostname or IP of Domain Controller. This is optional and generally not needed. Administrative Credentials Username Username of domain user with authority to join computers to domains. Password Password for user on domain. Copyright © 2011-2019 by Highly Reliable Systems, Inc. All rights reserved.
- Page 59 Testing the Connection Please note that a disk formatted before accessing via Windows Networking as shown below. Please refer to the appropriate walk through for that. To test the connection: Copyright © 2011-2019 by Highly Reliable Systems, Inc. All rights reserved.
- Page 60 Technique #3: Right Click Network Devices and select Map Network Drive. Enter \\hostname\sharename and select “reconnect at logon”. You can also use \\ipaddress\sharename. You will be asked for username and password entered into the NetSwap/RAIDFrame Plus device earlier Copyright © 2011-2019 by Highly Reliable Systems, Inc. All rights reserved.
-
Page 61: Nfs
Displays the current hostname as defined in 'Network' settings. Sharing Enable Advanced Sharing This enables exports for disks, disks-by-id, and disks-by-name which are exports that contain all disks shared in separate folders by id or name. Copyright © 2011-2019 by Highly Reliable Systems, Inc. All rights reserved. -
Page 62: Smtp
If SMTP Relay username/password are left blank, no authentication will be performed. Illustration 54: SMTP Settings SMTP Domain The domain name this device should use when sending email. Copyright © 2011-2019 by Highly Reliable Systems, Inc. All rights reserved. - Page 63 Username for authentication with the Relay host. Leave blank if no authentication is required. SMTP Relay Password Password for authentication with the Relay host. Leave blank if no authentication is required. Confirm Password SMTP Relay Password again for verification. Copyright © 2011-2019 by Highly Reliable Systems, Inc. All rights reserved.
-
Page 64: Alerts
If checked, the Hardware Watchdog Timer will be enabled. The Hardware Watchdog Timer will perform a hardware reboot if it detects that the device is locked up or frozen. This option is only available on the G2 models of the NetSwap/RAIDFrame Plus. Copyright © 2011-2019 by Highly Reliable Systems, Inc. All rights reserved. - Page 65 In this case, the disk has not actually failed. Alert on RAID Disk Fail Spare Alert whenever a spare disk in a RAID disk fails. Alert on RAID Disk Disappeared Alert whenever a RAID disk disappears. Copyright © 2011-2019 by Highly Reliable Systems, Inc. All rights reserved.
- Page 66 Alert when available internal hard drive space is below the threshold set by 'Minimum Drive Space'. Minimum Drive Space Specifies the minimum drive space in MB (megabytes) allowed before an alert is sent. Copyright © 2011-2019 by Highly Reliable Systems, Inc. All rights reserved.
-
Page 67: Date/Time
If Update Method is Windows Server, the NetSwap/RAIDFrame Plus will automatically update date and time from the specified Windows server. Illustration 56: Date/Time Settings: NTP Illustration 57: Date/Time Settings: Windows Server Copyright © 2011-2019 by Highly Reliable Systems, Inc. All rights reserved. - Page 68 Set Date Enter a date in MM/DD/YYYY format to set the date or leave blank to leave the date set to it's current setting. Only appears when using Manual updates. Copyright © 2011-2019 by Highly Reliable Systems, Inc. All rights reserved.
-
Page 69: Dashboard Registration
ID for the NetSwap on the NetSwap Dashboard. Leave blank to have an ID assigned by the Dashboard. Administrative Credentials Username Username of user with that is an Administrator on the NetSwap Dashboard. Password Password for user on the NetSwap Dashboard. Copyright © 2011-2019 by Highly Reliable Systems, Inc. All rights reserved. -
Page 70: Export Configuration
Select a folder and click 'Ok' to download the configuration file. 3.4.3.13 Import Configuration This option is used to import a previously exported configuration file. Illustration 61: Import Configuration Copyright © 2011-2019 by Highly Reliable Systems, Inc. All rights reserved. -
Page 71: Restore Default Configuration
3.4.3.15 Docs & Software This option provides documentation and software for use with the NetSwap/RAIDFrame Plus that may be downloaded through your web browser. Illustration 63: Docs & Software Copyright © 2011-2019 by Highly Reliable Systems, Inc. All rights reserved. -
Page 72: Replication (Netswap/Raidframe Plus Only)
Rsync Bi-direction Options Rsync options used for a bi-directional replication job. Write Sync Output to Log Check this box to have the log output from replication job written to the log. Copyright © 2011-2019 by Highly Reliable Systems, Inc. All rights reserved. -
Page 73: Jobs
Action Buttons Start Start (run) the selected job(s) immediately. Stop Stop the selected job(s) immediately. Create a new Replication Job. Delete Delete the selected job(s). Running jobs cannot be deleted. Copyright © 2011-2019 by Highly Reliable Systems, Inc. All rights reserved. - Page 74 Select Job Type: Illustration 66: Select Job Type NetSwap Replicate to or from another NetSwap device or from disk to disk on this NetSwap. Supports secure transfers over SSL. Copyright © 2011-2019 by Highly Reliable Systems, Inc. All rights reserved.
- Page 75 Source Disk Select the disk for the source. Note: this will only display disks that are shared in NAS mode; disks shared iSCSI cannot be used as source or destination. Copyright © 2011-2019 by Highly Reliable Systems, Inc. All rights reserved.
- Page 76 Password Enter the Password for the selected Target. Dropbox: Source Folder Select the folder. S3/S3 Compatible: Bucket Select desired bucket. Click 'Get Buckets' to retrieve the list of buckets. Copyright © 2011-2019 by Highly Reliable Systems, Inc. All rights reserved.
- Page 77 Select the disk for the destination. Note: this will only display disks that are shared in NAS mode; disks shared iSCSI cannot be used as source or destination. Source Folder Select the folder on the disk. Copyright © 2011-2019 by Highly Reliable Systems, Inc. All rights reserved.
- Page 78 Select desired bucket. Click 'Get Buckets' to retrieve the list of buckets. Destination Folder Select the folder. FTP: Destination Folder Select the folder. SFTP: Destination Folder Select the folder. Copyright © 2011-2019 by Highly Reliable Systems, Inc. All rights reserved.
- Page 79 Sync will cause both the Source and Destination to be synchronized such that changes to the Source will be copied to the Destination and changes to the Destination will be copied to the Source. Copyright © 2011-2019 by Highly Reliable Systems, Inc. All rights reserved.
- Page 80 This prevents incomplete or corrupt files in the case where replication terminates unexpectedly. Requires additional disk space on destination to store temporary files. Stats Update Time Maximum time in seconds between updates of file stats. Copyright © 2011-2019 by Highly Reliable Systems, Inc. All rights reserved.
- Page 81 1024 (1MB). Window Size (SFTP only) SSH channel window size in KB. Larger values can increase transfer speed. Set to 0 to use default value of 2048 (2MB). Copyright © 2011-2019 by Highly Reliable Systems, Inc. All rights reserved.
- Page 82 Leave blank to include all files, otherwise only files matching an include pattern will be included. See the section below for details on the syntax of the patterns. Copyright © 2011-2019 by Highly Reliable Systems, Inc. All rights reserved.
- Page 83 '/' it will only be matched against the base file name. Schedule: Illustration 71: New/Edit Replication Job: Schedule Enable Schedule Enable or disable the scheduling of this job. If enabled, the job will be scheduled according the defined schedule. Copyright © 2011-2019 by Highly Reliable Systems, Inc. All rights reserved.
- Page 84 Right click on the URL and select 'Copy link address' and use that to create a shortcut on your desktop or download the VBScript program to your desktop. Start Job URL and program download to start this replication job. Copyright © 2011-2019 by Highly Reliable Systems, Inc. All rights reserved.
- Page 85 Select Seed Type: Illustration 72: Seed In Job - Seed Type Standard Seed Copy data to/from seed disk. Speed Seed Seed to/from Mirror Disk member. Copyright © 2011-2019 by Highly Reliable Systems, Inc. All rights reserved.
- Page 86 Source Disk: Illustration 73: Seed In Job - Source Disk Select the disk to seed from. Copyright © 2011-2019 by Highly Reliable Systems, Inc. All rights reserved.
- Page 87 If checked, use the the Amazon AWS Import/Export service to import or export seed data from a bucket at Amazon. Job Id AWS job id. Create Date Date and time job was created. Copyright © 2011-2019 by Highly Reliable Systems, Inc. All rights reserved.
- Page 88 Use the 'Previous' and 'Next' buttons to move backwards and forwards through the wizard sections. Use the 'Finish' button to save the Replication Seed Job and close the wizard. Use the 'Cancel' button to close the window without saving. Copyright © 2011-2019 by Highly Reliable Systems, Inc. All rights reserved.
- Page 89 Select Seed Type: Illustration 75: Seed Out Job - Seed Type Standard Seed Copy data to/from seed disk. Speed Seed Seed to/from Mirror Disk member. Copyright © 2011-2019 by Highly Reliable Systems, Inc. All rights reserved.
- Page 90 Destination Disk: Illustration 76: Seed Out Job - Destination Disk Select the disk to seed to. Copyright © 2011-2019 by Highly Reliable Systems, Inc. All rights reserved.
- Page 91 If checked, use the the Amazon AWS Import/Export service to import or export seed data from a bucket at Amazon. Job Id AWS job id. Create Date Date and time job was created. Copyright © 2011-2019 by Highly Reliable Systems, Inc. All rights reserved.
-
Page 92: Remote Locations
Link to the packing list form that must be filled out and included with the disk when shipped. 3.4.4.3 Remote Locations View/Edit the currently defined Remote Locations. A Remote Location specifies the details of a remote NetSwap device (e.g. the hostname/IP address and port). Copyright © 2011-2019 by Highly Reliable Systems, Inc. All rights reserved. - Page 93 Details of the Remote Location. Action Buttons Create a new Remote Location. Delete Delete the selected Remote Location(s). Edit Edit the selected Remote Location. Refresh Refresh the Remote Locations. Copyright © 2011-2019 by Highly Reliable Systems, Inc. All rights reserved.
- Page 94 VPN or backup or achive program, you may want to set this to 'None'. The default is 'None'. Copyright © 2011-2019 by Highly Reliable Systems, Inc. All rights reserved.
- Page 95 Clicking this button will allow authorizing the NetSwap to access a Dropbox account. This involves logging to a Dropbox account, allowing the NetSwap access, and copy and pasting the authorization key into the box providing and saving it. Copyright © 2011-2019 by Highly Reliable Systems, Inc. All rights reserved.
- Page 96 & paste the authorization code provided by Dropbox and click 'Save'. S3/S3 Compatible: Illustration 82: New/Edit Remote Location: S3/S3 Compatible Type Select the type of the remote location. Copyright © 2011-2019 by Highly Reliable Systems, Inc. All rights reserved.
- Page 97 Manage the AWS Import/Export Jobs for this account (if using Amazon AWS S3). FTP: Illustration 83: New/Edit Remote Location: FTP Type Select the type of the remote location. Name Descriptive name for the FTP server. Copyright © 2011-2019 by Highly Reliable Systems, Inc. All rights reserved.
- Page 98 If checked, SSL will be used to secure connection. SFTP: Illustration 84: New/Edit Remote Location: SFTP Type Select the type of the remote location. Name Descriptive name for the SFTP server. Copyright © 2011-2019 by Highly Reliable Systems, Inc. All rights reserved.
-
Page 99: Targets
Replication Job on a remote NetSwap device that will replicate to this device, a target must be created by selecting a disk and folder and setting a username and password. Illustration 85: Targets Name Target name. Disk Name Target disk name. Folder Target folder. Copyright © 2011-2019 by Highly Reliable Systems, Inc. All rights reserved. - Page 100 View/Edit Target. A Target defines a disk and folder on this device that will be shared with remote devices for replication. Illustration 86: New/Edit Target Name Descriptive name for this Target. Username Username for this Target. Password Password for this Target. Copyright © 2011-2019 by Highly Reliable Systems, Inc. All rights reserved.
-
Page 101: Amazon Import/Export Jobs
Replication Seed Job this import/export job is associated with. Status Status of the job. Action Buttons: Create a new Amazon Export job. Import jobs are created when creating the Replication Seed Job. Copyright © 2011-2019 by Highly Reliable Systems, Inc. All rights reserved. - Page 102 Illustration 88: New/Edit Amazon Export Job Job Id Job Id assigned by Amazon. Create Date Date job was created. Type Job type. Import or Export. Status Current status of the job. Copyright © 2011-2019 by Highly Reliable Systems, Inc. All rights reserved.
- Page 103 Disk to be prepped for shipment. File System Type File system to use when formatting the disk before data is written to the disk. Options are NTFS and EXT4. Export jobs only. Copyright © 2011-2019 by Highly Reliable Systems, Inc. All rights reserved.
-
Page 104: Virtualization Menu (Select Models Only, Experimental)
Amount of RAM currently assigned to the virtual machine. State Current state of the virtual machine: 'Running', 'Paused', 'Shutdown', 'Crashed', or 'Dying'. Action Buttons Start Start the selected virtual machine(s). Copyright © 2011-2019 by Highly Reliable Systems, Inc. All rights reserved. - Page 105 Request a shutdown of the selected virtual machine(s). Create a new virtual machine. Delete Delete the virtual machine(s). Running virtual machines cannot be deleted. Edit Edit the selected virtual machine. Refresh Refresh the virtual machines. Copyright © 2011-2019 by Highly Reliable Systems, Inc. All rights reserved.
- Page 106 Video RAM (MB) Amount of memory assigned to the virtual machine's video adapter. VNC Password Password required to access the VNC port for this virtual machine. May be blank. Copyright © 2011-2019 by Highly Reliable Systems, Inc. All rights reserved.
- Page 107 Check to attach an ISO image containing the Xen PV drivers and other tools. Network Use the button to add a new network adapter and the button to remove a network adapter. Copyright © 2011-2019 by Highly Reliable Systems, Inc. All rights reserved.
-
Page 108: Install Utility Os
This option will save all cached data and safely reboot the device. Illustration 92: Reboot Click 'Confirm' to confirm you wish to reboot the device. The device will require from 30 to 60 seconds to reboot. Copyright © 2011-2019 by Highly Reliable Systems, Inc. All rights reserved. -
Page 109: Shutdown Device
This option will check to see if there is a software update available for this device. If an update is available a screen similar to the following will be displayed: Illustration 94: Check for Updates Copyright © 2011-2019 by Highly Reliable Systems, Inc. All rights reserved. -
Page 110: Update Device
Choose the file name of the update file. Click the 'Upload' button to upload the update to the device and perform the software update. You will be informed when the update is complete. Copyright © 2011-2019 by Highly Reliable Systems, Inc. All rights reserved. -
Page 111: Disk Properties
3.4.7 Disk Properties View/edit the disk properties. Illustration 96: Disk Properties: Share Mode - None Illustration 97: Disk Properties: Share Mode - iSCSI Copyright © 2011-2019 by Highly Reliable Systems, Inc. All rights reserved. - Page 112 Target Name depending on the settings in the 'Windows Networking' screen and the 'iSCSI' screen. Disk Information Vendor Disk vendor information if supplied. Model Disk model information if supplied. Copyright © 2011-2019 by Highly Reliable Systems, Inc. All rights reserved.
- Page 113 Displays the current share name for this disk. If the disk is just being set to NAS mode this will be N/A. Only displays if Share Mode is NAS. Copyright © 2011-2019 by Highly Reliable Systems, Inc. All rights reserved.
- Page 114 Displays the current NFS exports for this disk. If the disk is just being set to NAS mode this will be N/A. Only displays if Share Mode is NAS. Copyright © 2011-2019 by Highly Reliable Systems, Inc. All rights reserved.
- Page 115 If selected, DeltaSync is disabled for this disk. DeltaSync Source Disk If selected, makes this disk a DeltaSync source disk. The data on this disk will be synced to specified destination disks. Copyright © 2011-2019 by Highly Reliable Systems, Inc. All rights reserved.
- Page 116 Access the disk tools for this disk. See below. Identify Identify disk by blinking disk light. Only displayed if disk is installed. Share Share disk if it is installed and has been safely removed. See below. Copyright © 2011-2019 by Highly Reliable Systems, Inc. All rights reserved.
-
Page 117: Format
Illustration 99: Format Disk Disk Identification Disk ID Unique ID assigned to each disk when they are formatted. Copyright © 2011-2019 by Highly Reliable Systems, Inc. All rights reserved. - Page 118 Confirm the password by reentering it. Encryption Algorithm The algorithm used to encrypt volume data. Supported options are: • • Twofish • Serpent • AES-Twofish-Serpent • Serpent-Twofish-AES • Twofish-AES • AES-Serpent Copyright © 2011-2019 by Highly Reliable Systems, Inc. All rights reserved.
- Page 119 NTFS can be read natively if the drive is connected directly to a Windows system. (We recommend using a Highly Reliable Systems eSATA or USB3 device that accepts your media.) Selecting 'None' is useful when preparing a disk for use when sharing disks iSCSI and with VMWare ESXi/vSphere.
-
Page 120: Disk Tools
The files and file system on the disk may be uncorrupted if the bad blocks are not located in any of the Copyright © 2011-2019 by Highly Reliable Systems, Inc. All rights reserved. - Page 121 Right click on the URL and select 'Copy link address' and use that to create a shortcut on your desktop or download the VBScript program to your desktop. Safely Remove URL and program download to safely remove the disk. Copyright © 2011-2019 by Highly Reliable Systems, Inc. All rights reserved.
-
Page 122: Share
User defined disk name. 3.4.7.4 Safely Remove This will flush all cached writes to the disk and disconnect it from the device so it is safe to remove without data loss. Copyright © 2011-2019 by Highly Reliable Systems, Inc. All rights reserved. - Page 123 A given disk may get a different 'Alt ID' if it is connected to a different bus (e.g. eSATA vs. USB3). Name User defined disk name. Copyright © 2011-2019 by Highly Reliable Systems, Inc. All rights reserved.
-
Page 124: Smart Info
ID' if it is connected to a different bus (e.g. eSATA vs. USB3). Name User defined disk name. SMART Information Displays the SMART information as read from the disk. Copyright © 2011-2019 by Highly Reliable Systems, Inc. All rights reserved. -
Page 125: Mirror Schedule (Plus Models Only)
Target Name depending on the settings in the 'Windows Networking' screen and the 'iSCSI' screen. Disk Information Vendor Disk vendor information if supplied. Model Disk model information if supplied. Copyright © 2011-2019 by Highly Reliable Systems, Inc. All rights reserved. - Page 126 Select to schedule the disk to be mirrored every <n> months on specific days of the month at specific times starting on a specific date. For example, every 1 month on the 1st and 15th at 06:00 starting on 07/16/12. Copyright © 2011-2019 by Highly Reliable Systems, Inc. All rights reserved.
-
Page 127: Mount Disk
Note: it does delete existing files and folders on the destination disk if they do not exist on the source disk. Copyright © 2011-2019 by Highly Reliable Systems, Inc. All rights reserved. - Page 128 ID' if it is connected to a different bus (i.e. eSATA vs. USB3). Friendly Disk Name User defined disk name. Capacity Size of the disk in GB or TB. Select Destination Disk Select the disk to sync the data to. Copyright © 2011-2019 by Highly Reliable Systems, Inc. All rights reserved.
-
Page 129: Seeding Operations (Netswap/Raidframe Plus Only)
Displays the current state of the RAID Set (e.g. if it is degraded, rebuilding, etc.). Disk Identification Disk ID Unique ID assigned to each disk when they are formatted. Copyright © 2011-2019 by Highly Reliable Systems, Inc. All rights reserved. -
Page 130: Unmark Seed Disk
Size of the RAID Set in GB's (Gigabytes) or TB's (Terabytes) as appropriate. RAID Level RAID level for this RAID set. Disk Identification Disk ID Unique ID assigned to each disk when they are formatted. Copyright © 2011-2019 by Highly Reliable Systems, Inc. All rights reserved. -
Page 131: Seed Raid Disk
Universally unique identifier assigned to this RAID Set. Array Size Size of the RAID Set in GB's (Gigabytes) or TB's (Terabytes) as appropriate. RAID Level RAID level for this RAID set. Copyright © 2011-2019 by Highly Reliable Systems, Inc. All rights reserved. -
Page 132: Create Raid Disk (Netswap/Raidframe Plus Only)
Then after the RAID Disk is created add the remaining disks to the RAID Disk using the 'Add Disk' button on the 'RAID Properties' screen as shown below. This will preserve any data that may be on the master disk. Copyright © 2011-2019 by Highly Reliable Systems, Inc. All rights reserved. - Page 133 RAID 10 (Mirror + Striped) (N / 2) * S Custom Array Size If not using the MAX Array Size, enter the number of GB (GigaBytes) to be used for the RAID Disk. Copyright © 2011-2019 by Highly Reliable Systems, Inc. All rights reserved.
-
Page 134: Raid Properties (Netswap/Raidframe Plus Only)
Status of the RAID, either 'Active' or 'Not Active'. State Displays the current state of the RAID (e.g. if it is degraded, rebuilding, etc.). Rebuild If rebuilding, this will display the status of the rebuild in percent. Copyright © 2011-2019 by Highly Reliable Systems, Inc. All rights reserved. - Page 135 Only displayed if the RAID is not paused. Advanced Options RAID Disks Number of active disks in the RAID. This can only be modified for RAID 1 (Mirror). Copyright © 2011-2019 by Highly Reliable Systems, Inc. All rights reserved.
- Page 136 RAID, but will not destroy any data on the disk. All partitions and file systems will remain intact (for RAID 1). Identify Identify disk by blinking disk light. Only displayed if disk is installed. Copyright © 2011-2019 by Highly Reliable Systems, Inc. All rights reserved.
-
Page 137: Resume Raid
Friendly Disk Name User defined disk name. UUID Universally unique identifier assigned to this RAID Set. Array Size Size of the RAID Set in GB's (Gigabytes) or TB's (Terabytes) as appropriate. Copyright © 2011-2019 by Highly Reliable Systems, Inc. All rights reserved. -
Page 138: Break Raid
RAID level for this RAID set. Status Status of the RAID Set, either 'Active' or 'Not Active'. State Displays the current state of the RAID Set (i.e. if it is degraded, rebuilding, etc.). Copyright © 2011-2019 by Highly Reliable Systems, Inc. All rights reserved. -
Page 139: Add Disk
Buttons showing the actions that can be taken with the disk by clicking the button. Possiblities are: Identify Identify disk by blinking disk light. Only displayed if disk is installed Available Disks Select the disk to be added to the RAID. Copyright © 2011-2019 by Highly Reliable Systems, Inc. All rights reserved. -
Page 140: Remove Disk
Buttons showing the actions that can be taken with the disk by clicking the button. Possiblities are: Identify Identify disk by blinking disk light. Only displayed if disk is installed Copyright © 2011-2019 by Highly Reliable Systems, Inc. All rights reserved. -
Page 141: High-Rely Iscsi Connector Software
Note that you must have administrator privileges to install and run this program. Installation The software is available on the network share HR-INFO on the NetSwap/RAIDFrame Plus or can be downloaded from our website at: http://high-rely.com Click on the installation executable. Copyright © 2011-2019 by Highly Reliable Systems, Inc. All rights reserved. - Page 142 Illustration 116: High-Rely iSCSI Connector Setup Wizard Click 'Next' to begin the installation. Illustration 117: High-Rely iSCSI Connector Setup Wizard License Accept the license agreement and click 'Next'. Copyright © 2011-2019 by Highly Reliable Systems, Inc. All rights reserved.
- Page 143 Select a location on your hard disk to install the software or use the default. Click 'Next' to continue. Illustration 119: High-Rely iSCSI Connector Setup Wizard Shortcuts Enter the name of the Start menu folder or use the default. Click 'Next' to continue. Copyright © 2011-2019 by Highly Reliable Systems, Inc. All rights reserved.
- Page 144 Verify the destination and Start menu folders. Click 'Install' to begin the installation. The software will be installed. Several windows may pop up during the installation, this is normal. Illustration 121: High-Rely iSCSI Connector Setup Wizard Complete Click 'Finish' to complete the installation. Copyright © 2011-2019 by Highly Reliable Systems, Inc. All rights reserved.
-
Page 145: Operation
Illustration 122: iSCSI Targets From this tab you may 'Connect' to a NetSwap/RAIDFrame Plus iSCSI hard drive, 'Safely Remove' a NetSwap/RAIDFrame Plus iSCSI hard drive, and refresh the list of iSCSI targets. Copyright © 2011-2019 by Highly Reliable Systems, Inc. All rights reserved. -
Page 146: Connect
NetSwap/RAIDFrame Plus hard drive whenever it is available and will add the target to the list of persistent/favorite targets. Illustration 123: iSCSI Target Connect Copyright © 2011-2019 by Highly Reliable Systems, Inc. All rights reserved. -
Page 147: Safely Remove
'Discovery'. You should remove any devices from Discovery that are no longer connected to the network as this can slow the refresh process down significantly. Copyright © 2011-2019 by Highly Reliable Systems, Inc. All rights reserved. -
Page 148: Persistent/Favorite Targets
Illustration 126: Edit Persistent Target Edit the information as desired and click 'Ok' to save the changes or 'Cancel' to exit without saving. Copyright © 2011-2019 by Highly Reliable Systems, Inc. All rights reserved. -
Page 149: Remove
Windows machine to establish the iSCSI connection using the iSCSI target software. Note that screen shots below are from Windows 7 and the actual screens on other versions of Windows may be slightly different. Copyright © 2011-2019 by Highly Reliable Systems, Inc. All rights reserved. - Page 150 Disk Properties Button Illustration 128: Disk Properties Button From the Disk Properties screen optionally enter a name for disk and select 'iSCSI' from the 'Share Mode' drop down box. Copyright © 2011-2019 by Highly Reliable Systems, Inc. All rights reserved.
- Page 151 Then click the 'Save' button. The NetSwap/RAIDFrame Plus will save the changes and begin sharing the disk in iSCSI mode. The 'Disks' screen will now show the disk as being shared iSCSI as shown below: Illustration 130: Disks Copyright © 2011-2019 by Highly Reliable Systems, Inc. All rights reserved.
- Page 152 Now if we look at the Disk Properties we can see the share mode set to iSCSI and see the iSCSI Target Name that the disk will be shared under, in this case 'HR-NETSWAP:DISK-2442': Illustration 131: Disk Properties: iSCSI Copyright © 2011-2019 by Highly Reliable Systems, Inc. All rights reserved.
- Page 153 Initiator software from the Microsoft website. If you are using Windows 2003 or XP make sure you have installed the latest service pack. Illustration 132: Control Panel: iSCSI Initiator Copyright © 2011-2019 by Highly Reliable Systems, Inc. All rights reserved.
- Page 154 Double click 'iSCSI Initiator' and select the “Discovery” tab, then 'Discover Portal...', put in the Hostname or IP address of your, accept the default port of 3260 and select OK: Illustration 133: iSCSI Initiator: Discovery Copyright © 2011-2019 by Highly Reliable Systems, Inc. All rights reserved.
- Page 155 Select your target server and click 'Connect'. Check to add this connection to the list of Favorite Targets so this connection will automatically be restored when the computer starts and click OK. Illustration 135: iSCSI Initiator: Connect to Target Copyright © 2011-2019 by Highly Reliable Systems, Inc. All rights reserved.
- Page 156 If you have set the CHAP username/password on the from the iSCSI menu option you will need to click the 'Advanced' button and enter the username and password as shown below: Illustration 136: iSCSI Initiator: Advanced Settings Copyright © 2011-2019 by Highly Reliable Systems, Inc. All rights reserved.
- Page 157 If the connection is successful, the status should change to Connected: Illustration 137: iSCSI Initiator: Connected Copyright © 2011-2019 by Highly Reliable Systems, Inc. All rights reserved.
- Page 158 Now right click 'Computer' on the 'Start Menu' and select Manage and Select Disk Management. (Alternatively you can issue a Start, Run and type diskmgmt.msc): Illustration 138: Manage Computer Copyright © 2011-2019 by Highly Reliable Systems, Inc. All rights reserved.
-
Page 159: More Examples
1. Power-off the unit by pressing and releasing the power button on the front of the device. If the device does not automatically power down within 20 seconds, press and hold the power button Copyright © 2011-2019 by Highly Reliable Systems, Inc. All rights reserved. -
Page 160: Netswap/Raidframe Plus Console
The NetSwap/RAIDFrame Plus Console is a simple program that allows simple configuration of the device and reboot and shutdown options. It is based around a simple menu system to as shown below: Illustration 140: NetSwap/RAIDFrame Plus Console Copyright © 2011-2019 by Highly Reliable Systems, Inc. All rights reserved. -
Page 161: Configure Network
This option allows setting the device host name. Illustration 142: Set Hostname Enter the desired hostname and press <F8> to save. Only letters, numbers, '-' and '.' are allowed. Copyright © 2011-2019 by Highly Reliable Systems, Inc. All rights reserved. -
Page 162: Ethernet X
Press <F6> to select a mode as shown below: Illustration 144: Configure NIC 0 IP Address. In DHCP mode, this will display the current IP. Netmask Network netmask. In DHCP mode this will display the current Netmask. Copyright © 2011-2019 by Highly Reliable Systems, Inc. All rights reserved. -
Page 163: Configure Date/Time
Enter the desired values and press <F8> to save or <Esc> to exit. Press <F3> to blink the led's on the port if supported by the NIC. Configure Date/Time This option allows setting the timezone, date/time update method, and the options required for each method. Illustration 145: Date/Time Settings Copyright © 2011-2019 by Highly Reliable Systems, Inc. All rights reserved. - Page 164 The method used to keep the date and time current. Options are Ntp, Windows Server, and Manual. Depending on which method is selected, different fields are displayed for the options for the selected method. Illustration 147: Select Method Copyright © 2011-2019 by Highly Reliable Systems, Inc. All rights reserved.
-
Page 165: Ntp
Secondary NTP server. Can be an IP or hostname. 7.2.2 Windows Server The Windows Server method updates the date and time by periodically querying a Windows Server. Illustration 149: Date/Time Settings - Windows Server Copyright © 2011-2019 by Highly Reliable Systems, Inc. All rights reserved. -
Page 166: Manual
Illustration 150: Date/Time Settings - Manual Date Date in MM/DD/YY format. Time Time in HH:MM format. Enter the desired values and press <F8> to save or <Esc> to exit. Copyright © 2011-2019 by Highly Reliable Systems, Inc. All rights reserved. -
Page 167: Restore Default Settings
Use the <Left> and <Right> arrow keys to select 'Yes' and press <Enter> to reboot the device or select 'No' and press <Enter> or press <Esc> to cancel and exit. Copyright © 2011-2019 by Highly Reliable Systems, Inc. All rights reserved. -
Page 168: Shutdown
Use the <Left> and <Right> arrow keys to select 'Yes' and press <Enter> to reboot the device or select 'No' and press <Enter> or press <Esc> to cancel and exit. Copyright © 2011-2019 by Highly Reliable Systems, Inc. All rights reserved. -
Page 169: Remote Monitoring And Management (Rmm) Support
The status files can be accessed through the HTTP protocol using the GET method using a URL of the form: http://<NetSwap/RAIDFrame Plus ip>/status/disks/<file name> So to get the raid status file for MIRROR-DISK-0 on a NetSwap/RAIDFrame Plus on ip 192.168.1.50 one would use the following URL: Copyright © 2011-2019 by Highly Reliable Systems, Inc. All rights reserved. -
Page 170: Replication Status Files
Replication Job status files are named <job name>.jobstatus where <job name> is the name defined in the web interface. For example the Replication Job status file for the job named Job1 would be Job1.jobstatus. Copyright © 2011-2019 by Highly Reliable Systems, Inc. All rights reserved. -
Page 171: Disk Flag Files
– indicates the RAID is syncing and is between 50% and 75% complete. • sync75 – indicates the RAIDis syncing and is between 75% and 100% complete. • synced – indicates the RAID is synced. • Copyright © 2011-2019 by Highly Reliable Systems, Inc. All rights reserved. -
Page 172: Replication Job Flag Files
– indicates if the job has been canceled or not. • neverrun/notneverrun – indicates if the job has never been run or not. • success/notsuccess – indicates if the job was run successfully nor not. • Copyright © 2011-2019 by Highly Reliable Systems, Inc. All rights reserved. -
Page 173: File Based Monitoring
There are two folders, 'disks' and 'logs', and a special text file called 'mdstat'. The 'disks' folder contains the Status and Flag files as described in the section above on network monitoring. The 'log' Copyright © 2011-2019 by Highly Reliable Systems, Inc. All rights reserved. -
Page 174: Labtech Rmm
To setup a network monitor to monitor the existence of a flag file on a NetSwap/RAIDFrame Plus use the Monitor Wizard to create a new monitor. Select 'Monitor the Network' as shown below: Illustration 154: LabTech Monitor Wizard: Select the Type of Monitor Copyright © 2011-2019 by Highly Reliable Systems, Inc. All rights reserved. - Page 175 Illustration 155: LabTech Monitor Wizard: Select the Protocol Enter the IP address of the NetSwap/RAIDFrame Plus (in this case we enter 10.1.2.104): Illustration 156: LabTech Monitor Wizard: Select host to Check... Copyright © 2011-2019 by Highly Reliable Systems, Inc. All rights reserved.
- Page 176 Compare using 'Equals' and enter 'HTTP/1.1 200 OK' as the Text to Compare with. 'HTTP/1.1 200 OK' will be returned by the NetSwap/RAIDFrame Plus as the standard response for HTTP indicating the file exists: Illustration 158: LabTech Monitor Wizard: Select How to Compare Copyright © 2011-2019 by Highly Reliable Systems, Inc. All rights reserved.
- Page 177 Illustration 159: LabTech Monitor Wizard: Select Where you Would Like to Run This... Select how often to run the monitor: Illustration 160: LabTech Monitor Wizard: Select How Often You Would Like This to Run Copyright © 2011-2019 by Highly Reliable Systems, Inc. All rights reserved.
- Page 178 Select the alert template, defaults shown: Illustration 161: LabTech Monitor Wizard: Select an Alert Template... Define the Alert Message, defaults shown: Illustration 162: LabTech Monitor Wizard: Create you Alert Message Copyright © 2011-2019 by Highly Reliable Systems, Inc. All rights reserved.
- Page 179 Enter the name for the monitor, we use 'NetSwap RAID-DISK-0 Synced'. Review the monitor setup and click 'Finish' if everything is set correctly: Illustration 163: LabTech Monitor Wizard: Finish New Monitor Copyright © 2011-2019 by Highly Reliable Systems, Inc. All rights reserved.
- Page 180 Test the monitor by clicking the 'Test' button and you should see something similar to the following: Illustration 165: LabTech Network Montor Test Success We can see that the test was successful. Copyright © 2011-2019 by Highly Reliable Systems, Inc. All rights reserved.
-
Page 181: File Based Monitor
UNC path here with either the IP address or hostname of the NetSwap/RAIDFrame Plus as mapped network drives cannot be seen by the LabTech monitoring service: Illustration 167: LabTech Monitor Wizard: Choose File or Directory to Monitor... Copyright © 2011-2019 by Highly Reliable Systems, Inc. All rights reserved. - Page 182 Illustration 168: LabTech Monitor Wizard: Select where you would like to run this... Select how often to run the monitor: Illustration 169: LabTech Monitor Wizard: Select how often you would like this to run... Copyright © 2011-2019 by Highly Reliable Systems, Inc. All rights reserved.
- Page 183 Select the alert template, defaults shown: Illustration 170: LabTech Monitor Wizard: Select an Alert Template... Define the Alert Message, defaults shown: Illustration 171: LabTech Monitor Wizard: Create your Alert Message Copyright © 2011-2019 by Highly Reliable Systems, Inc. All rights reserved.
- Page 184 Enter the name for the monitor, we use 'NetSwap RAID-DISK-0 Synced'. Review the monitor setup and click 'Finish' if everything is set correctly: Illustration 172: LabTech Monitor Wizard: Finish New Monitor Copyright © 2011-2019 by Highly Reliable Systems, Inc. All rights reserved.
- Page 185 Test the monitor by clicking the 'Test' button and you should see something similar to the following: Illustration 174: LabTech File Monitor Success We can see that the test was successful. Copyright © 2011-2019 by Highly Reliable Systems, Inc. All rights reserved.
-
Page 186: Level Platforms Managed Workplace 2012
Before setting up the Device Availability Monitor the NetSwap device must be added to the site. Select the desired site from 'Site Management' screen (Configuration->Site Management) and click on the 'Network Discovery' tab and then click on 'Modify' Copyright © 2011-2019 by Highly Reliable Systems, Inc. All rights reserved. - Page 187 < > 2013 LevelPlatforms and Anchor Simplify Management of Cloud Storage for MSPs Site Management Site: highly Reliable Systems, Inc. Modify Network Scan Settings Intel® vProt<Credentials: Change Password User name: Password SNMP Vl/V2 Community Strings: Add Delete Scan Settin Delete Total IP Addresses: Copy>igi1l@ 2011-JJI?by Highly ReUle s>'..""•...
- Page 188 To create the monitor, go to the 'Monitoring and Alerting Rules Configuration' screen (Configuration- >Monitor and Alert Rules) and select the correct site and device and click on 'Add Monitor'. Copyright © 2011-2017 by Highly Reliable Systems, Inc. All rights reserved.
- Page 189 ( > S/ 14/2013 Level Platforms and Anchor Simplify Management of Cloud Storage for MSPs Monitoring And Alerting Rules Configuratio rJil Device Policy Module Cloud Service •1 Site: @ghly able Systems Inc. Device: 110.1.1. 2 07 Choose monitor type Add Monitor Cancel Device Availability...
- Page 190 Service Center. This monitor type is not a pplica ble to1obile Devices which use the 1obile Device Availa bility monitor to determine availa bility. Save Cancel Copyright© 20 II· 2 017 by Highly Reliable Systems, Inc. All rights reserved.
- Page 191 Click on the 'Alerts' tab and then click the 'Add Alert Configuration' button. Enter a Title and Description for the alert and click the 'Add Alert Rule' button. Copyright © 2011-2017 by Highly Reliable Systems, Inc. All rights reserved.
- Page 192 Select the amount of time the NetSwap/RAIDFrame Plus is offline to trigger the alert and click the 'Save' button. Check desired options under 'Alert Categories, Actions, and Notifications' and click the 'Save' button. Copyright © 2011-2017 by Highly Reliable Systems, Inc. All rights reserved.
- Page 193 Click 'Save' to save the new monitor. Add Device Availability Monitor Device: 10.1.1.207 Save Cancel wsetved. Copy>igi1l@ 2011-JJI?by Highly ReUle S}'.. In:. All >ighb...
-
Page 194: Custom Log File Monitor
HR-STATUS share on the NetSwap/RAIDFrame Plus. A good choice is the computer on which Onsite Manager is installed. Once the Site and Device are selected, click on 'Add Monitor'. Copyright © 2011-2017 by Highly Reliable Systems, Inc. All rights reserved. - Page 195 Select the 'Custom Logs' monitor type and click on the 'Add Monitor' button. Monitoring And Alerting Rules Configu Device Policy Module Cloud 5.ervice Site: highly Reliable Systems Inc. l•lDevice: IHR-SVR2008-TEST Monitor Cancel Enabled Performance CoJnters LogicaiDisk % Free Space- _Total LoaicaiDisk % Free Enabled...
- Page 196 Enter a Tide and Description for the monitor. For the UNC File Path we will use the RAID status file for the first Mirror disk, MIRROR-DISK-0, which for a device on IP10.1.1.207 is '\\10.1.1.207\hr- status\d isks\MIR.ROR-DISK-O.raidstatus'. User Name and Password are not required. For Search down String enter 'degraded'.
- Page 197 Select the 'Alert' tab and click the 'Add Alert Configuration' button. Monitoring And Alerting Rules Configurat Add Custom Logs Monitor Device: HR-SVR2008-TEST Add Alert Confi Alert Configuration Description Copy>igi1l@ 2011-JJI?by Highly ReUle s>'..""• In:. All >ighb wsetved.
- Page 198 Enter a Title and Description for the alert and click the 'Add Alert Rule' button. Click the 'Save' button to save the Alert Rule. Copyright © 2011-2017 by Highly Reliable Systems, Inc. All rights reserved.
- Page 199 Check desired options under 'Alert Categories, Actions, and Notifications' and click the 'Save' button. Alert Configuration Alert M!RROR-D !SK-0 degraded. Description:. Alert Rules Rule Description Modification Date alert will triggered when specified 6/12/2013 1:03:47 search conditi on i matched. Alert Rule Alert when...
- Page 200 Click the 'Save' button to save the new monitor. Monitoring And Alerting Rules Configuration Add Custom Logs Monitor Device: HR-SVR2008-TEST Save Cancel Copyright © 2011-2019 by Highly Reliable Systems, Inc. All rights reserved.
-
Page 201: Performance Counters Monitor
>Monitor and Alert Rules) and select the correct Site and for the Device select the computer to which the NetSwap/RAIDFrame Plus disk is attached via iSCSI. Once the Site and Device are selected, click on 'Add Monitor'. Copyright © 2011-2019 by Highly Reliable Systems, Inc. All rights reserved. - Page 202 Free Space Counter Help: Free Space the percentage total usable space selected logical disk rive ree. Scheduling •1 Polli Interval: minutes Schedule: Run Al red Field Save Cancel Copyright © 2011-2019 by Highly Reliable Systems, Inc. All rights reserved.
- Page 203 Select the 'Alert' tab and click the 'Add Alert Configuration' button. Monitoring And Alerting Rules Configurat Add Custom Logs Monitor Device: HR-SVR2008-TEST Add Alert Confi Alert Configuration Description Copyright © 2011-2019 by Highly Reliable Systems, Inc. All rights reserved.
- Page 204 Enter a Title and Description for the alert and click the 'Add Alert Rule' button. Enter the desired threshold percentage and data points and click the 'Save' button to save the Alert Rule. Copyright © 2011-2019 by Highly Reliable Systems, Inc. All rights reserved.
- Page 205 Alert Categories, Actions Notifications • Alert Categories: Categorize Alert... Uncategorized Create Trouble Ticket Self-Heal Script Alert Actions: Send Email Alert Notifications: Escalation Notification: Escalate Alert Save Cancel Copyright © 2011-2019 by Highly Reliable Systems, Inc. All rights reserved.
- Page 206 Click the 'Save' button to save the new monitor. Monitoring And Alerting Rules Configuration Add Performance Counters Monitor Device: HR-SVR2008-TEST Save Cancel Copyright © 2011-2019 by Highly Reliable Systems, Inc. All rights reserved.
-
Page 207: Gpl Code Statement
GNU General Public License ("GPL") or GNU Lesser General Public License ("LGPL"). The GPL and LGPL software included in this product were obtained from the Ubuntu 14.04 Server software release and source is available at http://ubuntu.com. Copyright © 2011-2019 by Highly Reliable Systems, Inc. All rights reserved. - Page 208 Contact Information Highly Reliable Systems 1900 Vassar Street Reno Nevada 89502-2109 TEL: 775-329-5139 FAX: 775-322-5397 www.high-rely.com Copyright © 2011-2019 by Highly Reliable Systems, Inc. All rights reserved.
Need help?
Do you have a question about the High-Rely NetSwap and is the answer not in the manual?
Questions and answers