Table of Contents
Advertisement
Car Audio
TABLE OF CONTENTS
Technical Specificatio ns ............. .................. .................. ...1-2
Measurem ent setup . .................. .................. ..
Service A ids, Safety I nstruction, et c .......
Preparati ons & Controls ............. ..........
Maintena nce & Troubleshooting .................
Disassem bly Instructi ons & Servic e positions . ....
Set Block diagram .... .................. ................
Set Wirin g diagram ... .................. .......
Key Board ................ ..........................
Servo Board ............. ...........................
Main Boa rd .............. .................. .........
Set Mech anical Explo ded view & p arts list ....
Page
......
.......... ...1-3
......
.. ........... 1-4 to 1-5
......
.. .......... 1-6 to 1-10
......
................ 1-11
......
........ ..... 2
.. ....
.............. ..... 3
......
..... .................. ..... 4
......
........................... 5
......
.......................... 6
......
... .................. ..... 7
.. ....
.............. ...... 8
CMD-150
Advertisement
Chapters
Table of Contents

Related Manuals for Prology CMD-150


Summary of Contents for Prology CMD-150
- Page 1 Car Audio CMD-150 TABLE OF CONTENTS Page Technical Specificatio ns ............1-2 Measurem ent setup ............1-3 Service A ids, Safety I nstruction, et c ......1-4 to 1-5 Preparati ons & Controls .......
-
Page 2: Specifications
SPECIFICATIONS Components General Power supply: Mounting collar 12V DC(11V-16V) Test voltage 14.4V, negative ground Machine screws M5x6mm Maximum power output: 50Wx4 channels Mounting bolt (50mm) Continuous power output: 25Wx4 channels (4 ,10% T.H.D.) Wire connector Ω Suitable speaker impedance: 4-8 ohm Removable face plate case Pre-Amp output voltage: 2.0V ( CD play mode: 1KHz, 0 dB, 10 K... - Page 3 MEASUREMENT SETUP Tuner FM Band pass 250Hz-15kHz LF Voltmeter e.g. PM2534 e.g. 7122 707 4 8001 RF G enerator e.g. PM5 326 S/N and distortion meter e.g . Sound Tech nology ST1700B U se a bandpass filter to el iminate hum(50Hz,100Hz) and disturbance from the pilottone( 19kHz,38kH z). Tuner AM (MW,LW ) Bandpass 250H z-15kHz...
- Page 4 HANDLING CHIP COMPONENTS GENERAL DISMOUNTING MOUNTING e.g. A PAIR OF TWEEZERS VACUUM PISTON 4822 395 10082 SOLDERING IRON e.g.WELLER Solder tip PT-H7 SLODER Φ0.5-0.8mm SOLDERING SLODERING PRESSURE IRON IRON SOLDER WICK 4822 321 40042 SLODERING TIME SOLDER e.g. A PAIR OF TWEEZERS Φ0.5-0.8mm <...
- Page 5 WAARSCHU WING WARNING Alle IC's en vele andere halfgeleiders zijn All ICs and many other semi-conductors are gevoelig voor electrostatische ontladingen susceptible to electrostatic discharges (ESD). (ESD). Careless handling during repair can reduce life Onzorgvuldig behandelen tijdens reparatie kan drastically. de levensduur drastisch doen verminderen.
- Page 6 PREPARATIONS Wiring Diagram Antenna Fuse 15A Connector R(Red) Rear Line-out (Gray) L(White) ISO connector ACC+/red Auto Antenna/blue Battery 12V(+)/yellow Ground/black...
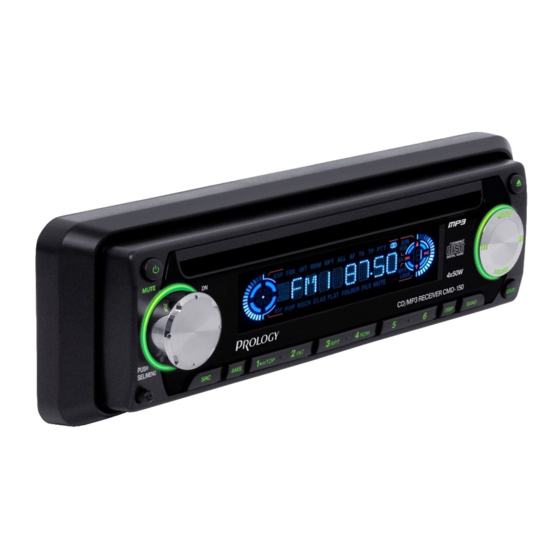
- Page 7 CONTROLS Power on : press any button on the panel except to turn on the unit.
- Page 8 CONTROLS AMS : Auto Memory Store Press briefly to scan the preset station for 5 seconds each. Hold more than 2 seconds, the 6 strongest available station will be automatically saved in the memory of preset button Radio : Press briefly either side of the button to tune in the station that you have known its frequency. Hold it more than 2 seconds, tuning will automatically activate and stop when signals of the next station are received.
-
Page 9: Mp3 Playback
MP3 PLAYBACK While playing M 3 disc, the folder/file name and ID3 TAG (Song title, Album and Artist) can scroll entirely across the LCD. Elapsed playing time & Track number Folder name & number File name & number Song title Album title Artist name M 3 Track search... -
Page 10: Remote Controls
1-10 REMOTE CONTROLS Power On : Press any button on the remote control to turn on the unit. Volume Radio Tune Power on/off Track Seek Aux in(optional) Mute Radio Disc Play (when disc is in) Push to select VOL/BAS/ Radio Preset scan TRE/BAL/FAD , use Volume MUTE button to adjust level... -
Page 11: Troubleshooting
1-11 MAINTENANCE AND TROUBLESHOOTING Maintenance Clea ring d isc When a dis c beco mes d irty cle an it with a c leanin g cloth . Wipe the di sc from the c enter out. Clea ning t he dis c lens After prolon ged u se, dir t or du st may accum ulate at the lens. - Page 12 DISMANTLING INSTRUCTIONS 4 Remove CD loader 1 Pull out the short sheet from main set. emove top and bottom covers. Remove 2 pcs screw from metal side. Remove 1 pcs screw from metal side. Loosen 8 pcs screw to remove heatsink & Top Cover &...
- Page 13 2 -2 DISMANTLING INSTRUCTIONS Service PositionA Service Position C Service Position D Service Position B...
-
Page 14: Lcd Display
SET BLOCK DIAGRAM Tuner L Tuner R Pick Up Tuner Module OPTIMA-725 C2 CET-7001 Tuner Power Tra c king Output Focus O u tput Key Matrix LCD Display P1.0-P1.7/ RESET INT0-INT7 P0.0 P0.1/T0CLK P0.2/T0CAP P0.3/T0OUT/T0PWM Port 0 P0.2/T0CAP P0.4/T1CLK 8-Bit Timer/ P0.1/T0CLK P0.5/T1OUT Counter0... - Page 15 WIRING DIAGRAM...
- Page 16 LCD PIN CONNECTION KEY BOARD TABLE OF CONTENTS PIN SEGMENT DISPLAY LCD Display............5-1 Key Board Circuit Diagram........5-2 Key Board Layout Diagram........5-3 Elect rical Parts List..........5-4...
-
Page 17: Key Board Circuit Diagram
KEY BOARD - CIRCUIT DIAGRAM... -
Page 18: Key Board Layout Diagram
KEY BOARD - LAYOUT DIAGRAM TOP VIEW KEY BOARD - LAYOUT DIAGRAM BOTTOM VIEW... -
Page 19: Elect Rical Parts List
ELECTRICAL PARTS LIST - KEY BOARD Loc ation Part N O. Desc ription 82-CM 122-KB00-A CM1 22 SM T KB 11-1821-052 0-B PCB CM12 2 KB D/S 1.2 MM 11-0102-102 2-0 Ω ± R10 8,R11 7 RMF 1K 1 /16W 5% SMT 0 603 11-0102-152 1-0 Ω... - Page 20 SERVO BOARD TABLE OF CONTENTS Circuit Diagram..............6-2 PCB Layout Top View............6-3 PCB Layout Bottom View............6-3 Electrical Parts List .............6-4...
- Page 21 SERVO BOARD - CIRCUIT DIAGRAM...
- Page 22 SERVO BOARD - LAYOUT DIAGRAM SERVO BOARD - LAYOUT DIAGRAM TOP VIEW BOTTOM VIEW...
- Page 23 ELECTRICAL PARTS LIST - SERVO BOARD L ocatio n Location Part N O. D escrip tion Q TY Part NO. Descri ption μ ± ° 82-CM 110-S B01-A C M110 SMT S B 11-02 24-47 52-0 CE 4.7 F/50 V 20% 4X5 105 C C505,C506,C 211 11-0102-100 2-0...
- Page 24 MAIN BOARD TABLE OF CONTENTS Circuit Diagram ..............7-2 PCB Layout Top View ............7-3 PCB Layout Bottom V iew ..........7-4 Electrical Parts List ........7-5 to 7-6...
-
Page 25: Circuit Diagram
CIRCUIT DIAGRAM... -
Page 26: Pcb Layout Top View
PCB LAYOUT TOP VIEW... -
Page 27: Pcb Layout Bottom View
PCB LAYOUT BOTTOM VIEW... -
Page 28: Electrical Parts List
ELECTRICAL PARTS LIST - MAIN BOARD De scription Loca tion Part N O. Loca tion Part N O. De scription 82-CD 300-M B25-D 11-0901-0011-A CD300 4 X2V O IRT/F M SMT MB IC .PT23 13L SO -28 IC50 1 11-0102-153 2-0 Ω... - Page 29 ELECTRICAL PARTS LIST - MAIN BOARD Loca tion Part N O. De scription 11-0411-000 8-A DI ODE I N4148 SMT 1/2W D804 ± 11-0202-4711-0 CC470P F/50V 10% 0603 (X7R) C805-C808 14-09 22-000 1-0 HE ATSINK IC 7809 FOR C M226 14-03 00-001 4-A BR ACKE T OF AMP IC FOR CMV1 00 IC80 1...
- Page 30 EXPLODED VIEW - MAIN UNIT...
- Page 31 MECHANICAL PARTS LIST Assembly Part N O Desc ription QT Y Assembly Part N O Desc rip tion QT Y I tem Item 84-C M122 -KB19 -A PA NEL A SSEM BLY 14- 1055-2005-0 M2 X5 SE LF TA PPING SCREW 13-0 700-0 001-A RIM CMV 100 PAINTE D IN S ILVER AS-1200- 0001- 0...
Need help?
Do you have a question about the CMD-150 and is the answer not in the manual?
Questions and answers