
Summary of Contents for Reka 20710
- Page 1 Full Motion TV Wall Bracket MODEL NUMBER: 20710 USER GUIDE After Sales Support UK/N.IRELAND HELPLINE N 01270 508538 REP.IRELAND HELPLINE N 1800 995 036 WEBSITE: www.quesh.co.uk EMAIL: enquiries@quesh.co.uk...
-
Page 2: Table Of Contents
Contents Welcome Section Information & Safety Instructions Contents & Features Pouch Part List 5-11. Installation • Placing The Bracket • Drilling (Brick Wall) • Fitting The Plate • Fitting The TV Mount • Completing The Mount Adjustments • Adjusting The Viewing Angle 13-14. -
Page 3: Welcome Section
Welcome Section Congratulations! You have made an excellent choice with the purchase of this quality REKA product. ® By doing so you now have the assurance and peace of mind which comes from purchasing a product that has been manufactured to the highest standards of performance and safety, supported by the high quality standards of Quesh Ltd. -
Page 4: Information & Safety Instructions
Information & Safety Instructions Additional Equipment Required (brick): • Safety goggles • Paper dust mask • Safety step/work platform • Masking or electrician tape • Pencil • 4mm or 5mm Masonry drill bit (Brick mounting only) • 4mm or 5mm Twist drill bit (Stud mounting only) •... -
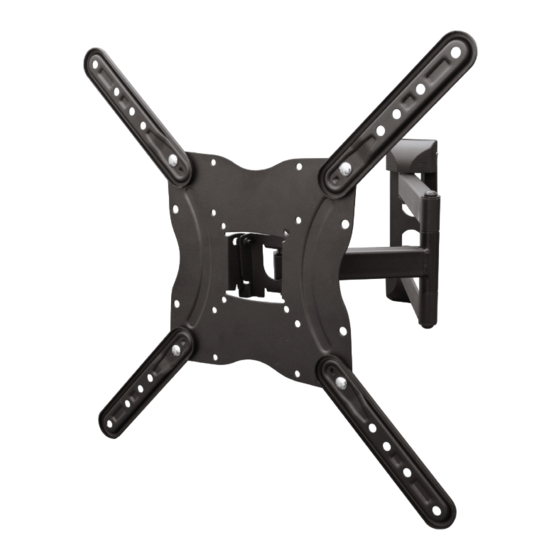
Page 5: Contents & Features
Contents & Features Contents 1 x Hinged Wall Mount 1 x Rear Plate 4 x VESA Mount Arms 4 x M6 x 55mm Coach Screw 4 x 10mmØ x 50mm Wall Plug 4 x 5mmØ Washer 8 x 6mmØ Washer 4 x 8mmØ... -
Page 6: Pouch Part List
Pouch Parts List WALL FITTINGS 10mmØ x 50mm Wall Plug M6 x 55mm Coach Screw 6mmØ Washer VESA MOUNT FITTINGS M4 x 14mm Screw 5mmØ x 14mm Washer M5 x 14mm Screw 6mmØ x 14mm Washer M6 x 14mm Screw 8mmØ... -
Page 7: Installation
Installation Placing The Bracket Test place the wall bracket around the room until you find the best suitable location for it, then draw a rough centre line on your chosen location. Please take into consideration the size of the TV/monitor for clearance as well as plug and aerial socket placements. -
Page 8: Drilling (Brick Wall)
Installation Drilling (Brick Wall) After the drill hole placements have been marked, clear the work area so it is safe to work in. Place dust sheets if required. If the placement is above chest height you will need to use a safety step or work platform to minimise risk of injury whilst using power tools. -
Page 9: Fitting The Plate
Installation Fitting The Plate First, place the wall plugs into the drilled holes and tap in gently with a hammer to seat them flush to the wall. Next insert the M6 x 55mm coach screws (pouch ‘A’) through the 6mmØ washers (pouch ‘C’) ready for use. Line the holes of the plate to the drilled holes on the wall and insert the screws. - Page 10 Installation Once the plate has been securely fitted, place the cover cap to hide the bolts and neaten up the fitting. Safely secure power tools after you have finished drilling. Brush and wipe down surfaces free of brick dust and hoover the work area clean..
-
Page 11: Fitting The Tv Mount
Installation Fitting The TV Mount Check the TV/monitors mount placement holes. Once checked place the arms in the correct orientation on the rear plate. Secure the arm in place by inserting the M6 x12mm bolt (pouch ‘K’) through the arm’s square hole making sure the arm notch lines up with the rear plate. - Page 12 Installation With the TV facing down, being careful not to damage or scratch the screen, place the rear mount into position, lining up with the VESA mounting holes. Check your TV instructions to find out the correct size screws to use to secure the rear plate in place.
-
Page 13: Completing The Mount
Installation Completing The Mount Remove the screws and washers from the rear plate bracket. Lift the TV/monitor into place making sure the ‘V’ cut out on the base of the rear plate bracket is resting on the side stanchions of the wall arm. -
Page 14: Adjustments
Adjustments Adjusting The Viewing Angle Loosen the screws at where the rear mount attaches to the wall arm. Tilt the screen in to the preferred position and tight the screws again. Choose between the limits of +5° through to -15° Move the three 180°... -
Page 15: Alternative Installation
Alternate Installation Stud Wall Using a stud detector find out where the wall studs are. Newer UK builds typically have the studs placed 406mm (16”) approximately apart, but they can be spaced up 609mm (24”) with an approximate thickness of 36mm (1½”). If you have a double stud you will be able to mount the bracket on this without a bracket mount board. - Page 16 Alternate Installation If you don’t have a double stud you will need to make a mounting board using marine ply or suitable material. Use the supplied wall plugs and coach screws to hang the board. To fix the bracket to the plate you will need to use 4 x M6 nut and bolts with 8x washers.
-
Page 17: Specifications
Specification Full Motion TV Wall Bracket General Approx Weight: 2.4Kg Approx Mounting Plate Dimensions: 70mm x 222mm Approx Arm Reach: 65mm to 420mm Max Supported Weight: 30Kg Max VESA Size: 400mm x 400mm After Sales Support Hereby, Quesh Ltd declares that this product is in compliance with UK/N.IRELAND HELPLINE N 01270 508538 Directive 2014/53/EU. - Page 18 Warranty Certificate Warranty This product is warranted to be free from defects in workmanship and parts for a period of 36 months from the date of purchase. Defects that occur within this warranty period, under normal use and care, will be repaired, replaced or refunded at our discretion, solely at our option with no charge for parts and labour.
- Page 19 Warranty Card Full Motion TV Wall Bracket Model Number: 20710 Please keep your purchase receipt together with your warranty card Name: Address: Date of purchase: Location of purchase: Fault Description: Office Use: Repaired Replaced Other We recommend that you attach a photocopy of your receipt, showing the date of purchase, to this warranty card and keep it for your reference.
Need help?
Do you have a question about the 20710 and is the answer not in the manual?
Questions and answers