Table of Contents
Advertisement
Advertisement
Table of Contents
Troubleshooting

Related Manuals for SEWOO NBP-60

Summary of Contents for SEWOO NBP-60
- Page 1 NBP-60 USERS MANUAL J STEPHEN CO.,LTD...
-
Page 2: Table Of Contents
4.2 Wi-Fi Network Connection ........................17 4.3 Bluetooth..............................17 4.4 GPS ................................19 4.5 Connecting the NBP-60 to a PC ......................19 4.6 Synchronization ............................20 5 Enabling the Scan Function ....................21 5.1 To start the iScan program and enable scanning, do as follows: ........... 21 6 Enabling the NFC Function ..................... -
Page 3: Introduction
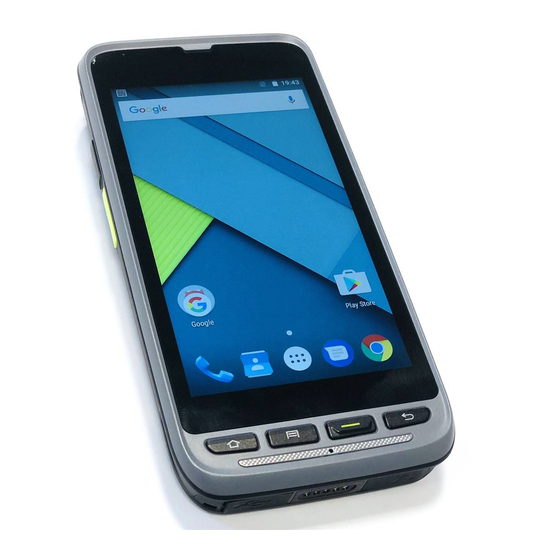
NBP-60 Users Manua 1 Introduction 1.1 Appearance of NBP-60 Figure 1-1 Front view of NBP-60 Figure 1-2 Rear view of NBP-60 - 1 -... -
Page 4: Installing The Battery
(Note: The NBP-60 adapts integrated design for the battery and battery cover.) 1.4 Inserting a SIM Card 1. Insert a SIM card by following the direction in the figure below. (Note: Micro SIM cards are applicable to the NBP-60. After replacing a SIM card, restart the NBP-60.) - 2 -... -
Page 5: Inserting A Tf Card
3. Close the card cover, as shown in the figure below. 4. Pull back the card cover by following the LOCK direction marked on the card cover. (Note: TF cads, namely Micro SD cards, are applicable to the NBP-60. After replacing a TF card, restart the NBP-60.) -
Page 6: Charging
(2) the NBP-60 gives out a low battery prompt tone. (3) the charging indicator blinks in red. ★ Tips The following operations help obtain a longer standby duration of the NBP-60. Shorten the time to sleep by selecting Settings > Display > Sleep. ... -
Page 7: Powering On/Off The Nbp-60
NBP-60 Users Manua 2 Using the NBP-60 2.1 Powering On/Off the NBP-60 After installing a SIM card and a battery and charging the NBP-60 completely, you can use the NBP-60. 1. To power on the NBP-60, press the On/Off key on the right for some time. -
Page 8: Home Screen
Home key 2.4 Home Screen By default, the NBP-60 has one home screen. You can add home screens by placing applications to the home screen and slide to the left or right to switch to another home screen. On the home screen, click the icon of any application to open the application. -
Page 9: Basic Settings
As software is upgraded continuously, status indicators may be different from those displayed on the NBP-60. The actual status indicators prevail. 2.6 Basic Settings 2.6.1 Date and Time Settings To change the date and time in the NBP-60, do as follows: 1. Find the following icon. - 7 -... - Page 10 NBP-60 Users Manua 2. Select Settings > Date & time > Set date or Set time. 2.6.2 Display Setting 1. Find the following icon. 2. Select Settings > Display > Lock screen notification/Wallpaper/Brightness/Auto-rotate screen/Sleep/Interactive screensaver/Font size/Cast screen. - 8 -...
- Page 11 2. Select Settings > Audio profiles > General/Silent/Meeting/Outdoor. Click different modes and set the ringtone in the modes. 2.6.4 Security Setting 1. Find the following icon. 2. Select Settings > Backup & reset > Factory data reset. The NBP-60 starts to restore factory settings. - 9 -...
- Page 12 NBP-60 Users Manua ★ Caution If you perform the preceding operation, the following data will be cleared: Account Data and settings of the system and applications Downloaded applications The following data will not be cleared: Current system software and bound applications ...
- Page 13 NBP-60 Users Manua 2.6.6 Shortcuts You can add shortcut icons on the home screen of the NBP-60. On the home screen, click the icon of application tray, press and hold an icon and drag it to the home screen. 2.6.7 Widgets You can add widgets such as clock, music player and calendar on the home screen of the NBP-60.
-
Page 14: Call Function
NBP-60 Users Manua 3 Call Function 3.1 Making a Call 1. Find the following icon. 2. Enter a phone number. 3. Click to make a call. 4. Click to terminate the call. Call records Keypad for dialing Voice call Contacts 3.2 Contacts... -
Page 15: Sms And Mms
NBP-60 Users Manua 3.3 SMS and MMS 1. Find the following icon. 2. Click enter a receiver and text to be sent. 3. Click to send the message. 4. On the message editing page, press the menu key, click Add subject to convert the message into a multimedia message. -
Page 16: Email
You can send or receive emails. ★ Note To create an email account on the NBP-60, first set the account on a PC. Take a QQ email account as an example. Log in to the QQ email account, click Settings in the upper right corner of the email account page, find and select the server option and inbox option and then save. - Page 17 NBP-60 Users Manua To synchronize or delete an account, do as follows: 1. On the home screen, click Settings. 2. Under the ACCOUNTS option, click POP3 to open added accounts and click the name of an account to be synchronized or deleted. On the Sync page, click in the upper right corner and select Sync now or Remove account.
-
Page 18: Network Connection And Connection Synchronization
After a GPRS data connection is established, you can access the Internet. To establish a GPRS data connection, ensure that a SIM card is installed in the NBP-60. In general, the Internet access configuration is set on the NBP-60. If you delete the default configuration by... -
Page 19: Wi-Fi Network Connection
1. Find the following icon. 2. Select Settings > WIRELESS & NETWORKS > WLAN. 3. Click Enable/disable WLAN. The NBP-60 starts to search for networks. If WLAN is enabled, click Scan. The NBP-60 lists networks in the range of search. - Page 20 NBP-60 Users Manua 5. In the dialog box that is displayed, confirm the PIN and click Pair to connect the device. Click to make other devices able to detect the device Click to enable Bluetooth and search for Bluetooth devices 6.
-
Page 21: Gps
4.5 Connecting the NBP-60 to a PC Connect the NBP-60 to a PC by using a USB data cable so that you can transmit and process files such as photo, video and music files between the memory card of the NBP-60 and the PC. -
Page 22: Synchronization
NBP-60 Users Manua Click the option to open the USB storage device and copy files between the PC and the device 4.6 Synchronization 1. Find the following icon. 2. Select Settings > Accounts & sync. 3. Click Add account to set a new account. -
Page 23: Enabling The Scan Function
NBP-60 Users Manua 5 Enabling the Scan Function 5.1 To start the iScan program and enable scanning, do as follows: 1. Click the iScan icon on the menu page. 2. Click the blue slider on the right of Enable Barcode Scanning to enable the scanning function (if you click the slider again, the scanning function is disabled). -
Page 24: Enabling The Nfc Function
3. Click the blue slider on the right to enable NFC (if you click the blue slider again, NFC is disabled). 4. Put an NFC card close to the back of the NBP-60. After a beep is heard, the card is read successfully. -
Page 25: Managing The Nbp-60
2. Download software installation packages, store them on the SD cad and install the software through file manager. 3. Connect the NBP-60 to a PC by using a USB data cable and install software for the NBP-60 on the PC. However, first of all, you need to install phone assistant software such as APK install, pea pod and phone assistant 91. -
Page 26: Managing Applications
NBP-60 Users Manua 7.3 Managing Applications Select Settings > App. On the application management screen, you can view application status in the options such as Downloaded, SD Card and Running, click an application, access the application information screen, and perform operations such as forcibly stopping, uninstalling and stopping an application. -
Page 27: Precautions And Troubleshooting
Do not try to disassemble the NBP-60. Otherwise, the NBP-60 may be damaged. Do not touch the screen surface of the NBP-60 by using a pen, a pencil or other sharp articles in case the screen may be scratched. -
Page 28: Troubleshooting
After being inactive for a period of time, the inactive state. NBP-60 is locked. The NBP-60 is closed. The battery is used up. Replace the battery. The SEWOO responds Too many files are stored in Remove unused memos and records. If - 26 -... - Page 29 Too many applications are Remove applications installed installed on the NBP-60. NBP-60. The scan application is not Load the scan application in the NBP-60. loaded. NBP-60 cannot Reading a barcode fails. Check that the barcode is indefective. decode a barcode while If the scanner stops sending out a light reading it.
- Page 30 NBP-60 Users Manua Table 8-2 Bluetooth troubleshooting Fault Cause Solution The NBP-60 system is too Move the NBP-60 close to other Bluetooth away from other devices, making the distance between them Bluetooth devices. within 10 meters. NBP-60 cannot Bluetooth devices...
-
Page 31: Appendix
Hand strap Hybrid cradle Optional 12v single cradle Optional Pistol grip Optional Protective case Optional Table 2 Technical specifications of the NBP-60 Item NBP-60 System configuration High-performance quad-core 1.3 GHz processor Operating System Android 6.0 Memory 16 GB ROM+2 GB RAM... - Page 32 Item NBP-60 AMERICA: LTE Bands 2/4/5/17 Wireless WAN GPRS/ EVDO /WCDMA/ TD-LTE/LTE FDD/CDMA 1X (Data service) Wireless LAN Wi-Fi 802.11a/b/g/n(Dual-band Wi-Fi: 2.4G+5G) Bluetooth Bluetooth 4.0 GPS (optional) Supporting GPS/ AGPS /Glonass Operating environment Development tool Android SDK+JDK+Eclipse Supported language Java Operating Temp.
- Page 33 Power Adapter: Model: FJ-SW1260502000UE Input: AC 100-240V; 50/60Hz;0.4Amax Output: DC5.0V;2000mA Battery: Model: 1ICP9/65/85 Capacity:3300 mAh 12.2Wh Nominal Voltage: DC 3.7V Maximum Charge Voltage: DC 2.4V CAUTION RISK OF EXPLOSION IF BATTERY IS REPLACED BY AN INCORRECT TYPE. DISPOSE OF USED BATTERIES ACCORDING TO THE INSTRUCTIONS. To prevent possible hearing damage, do not listen at high volume levels for long periods.
- Page 34 -- Increase the separation between the equipment and receiver. -- Connect the equipment into an outlet on a circuit different from that to which the receiver is connected. -- Consult the dealer or an experienced radio/TV technician for help. This equipment complies with FCC radiation exposure limits set forth for an uncontrolled environment.
Need help?
Do you have a question about the NBP-60 and is the answer not in the manual?
Questions and answers