
Related Manuals for MGP DMC 2000 S

Summary of Contents for MGP DMC 2000 S
- Page 1 DMC‐2000 Series Electronic Dosimeter User’s Manual Stand‐Alone/Autonomous Operation 5000 Highlands Pkwy Suite 150 Smyrna, GA. 30082 770‐432‐2744 www.mirion.com Document # 15‐00079, Revision 0...
- Page 2 Table of Contents • Introduction • Basics ‐ Parts of the Dosimeter ‐ Changing the Battery ‐ Pause Display Information • Operation ‐ Activation/Deactivation ‐ Changing Alarm Set Points • Troubleshooting • Glossary of Terms • RMA/Service Form ...
- Page 3 WARNING: DO NOT LET THE DMC BATTERY COMPLETELY DISCHARGE. THE DMC WILL NOTIFY YOU WHEN THE BATTERY NEEDS CHANGING. LETTING THE BATTERY COMPLETELY DISCHARGE CAN POTENTIALLY RESULT IN FAULT ERRORS REQUIRING ADDITONAL HARDWARE (READER) TO RESET. ATTENTION: USE ONLY APPROVED BATTERIES IN THE DMC 2000 (see page 6). OTHER BATTERIES MAY RESULT IN DAMAGE TO THE DEVICE. ...
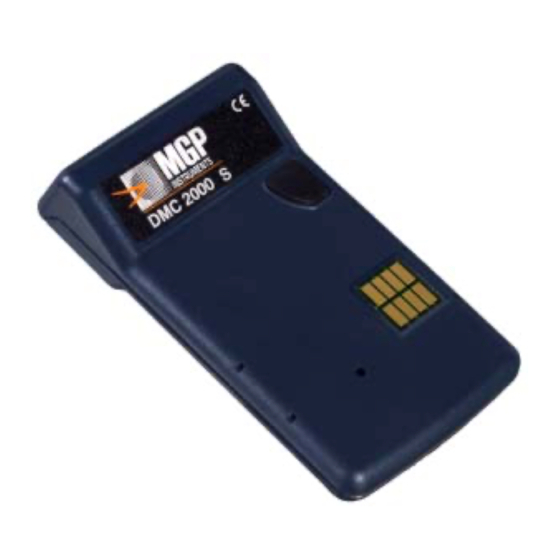
- Page 4 Parts of the Dosimeter (for hands-free communication) * Not a Reset button. Do not insert pointed objects (pen tip, screwdriver) as damage may occur. ...
- Page 5 (for communication) Do not remove any of the four case screws. There are no serviceable parts inside the dosimeter. Removal will compromise waterproof and EMI resistant characteristics and void any warranty. ...
- Page 6 Changing the Battery NOTE: the battery on the DMC 2000S should be changed when the ‘BA LO’ or ‘DF BAT’ warnings are displayed. Waiting until the dosimeter is completely dead can result in fault errors requiring reader hardware to clear. 1. Remove the clip. Using a small flat head screwdriver or similar tool, gently lift up the tab at the top of the clip and slide the whole clip off the back of the dosimeter. Only a slight amount of pressure is needed. 2. Remove the battery cover. Using either a provided battery tool or a watch case wrench or similar tool, unscrew the battery cover. 3. Insert a Renata CR2450N or Toshiba 2450 battery (other brands have incorrect physical profiles and will cause shorts and/or potential damage to the device, see image A for example) in the battery compartment, with the positive plate down (flush against the speaker. See image A for example.) 4. Replace the battery cover, tightening it to hand‐tight plus an additional ¼ turn with the battery tool. 5. Replace the clip, sliding it in the rails on the back of the dosimeter until it clicks and locks into place. ...
- Page 7 Display Indications in Pause* Mode Presses of Display Indication Description the Button 0 Pause: Dosimeter is effectively ‘off,’ awaiting further action. E X T 1 Change: Start point for putting the DMC in “Run” mode. 2 Modif: Start point for modifying setpoints and parameters. 3 Serial Number of the DMC 4 Reset: Indicates whether dose is reset between uses. 5 Cumulative Dose received on last use. 6 Highest Dose Rate received on last use. 7 Amount of time the DMC was last in run mode. 8 Dose alarm threshold setting. 9 Rate alarm threshold setting. 10 ...
- Page 8 Activating the DMC2000 (From Pause to Run Mode) Step Action 1 Press Button Once. Display changes from to o E X T 2 Wait for the display to change to . 3 Quickly press button once. 4 Display changes to speaker beeps, LED flashes. 5 Dosimeter is active, accumulating dose. Display shows measurement s . Display Indications in Run Mode Presses of the Display Indication Description Button 0 Display of Dose (default display) 1 Changes to Dose/Rate Display 2 Returns to Dose Display Deactivating the DMC‐2000 (from Run to Pause Mode) Step Action 1 Display reads Press and hold button 8‐10 seconds. 2 ...
- Page 9 Parameter Modification NOTE: Modifying parameters and set points takes practice and patience. You may encounter the display returning to PAUSE during a moment of inactivity. Follow the steps in this section to return to modifying the parameters. Step Action 1 Start from . E X T 2 Press button twice passing to get to wait a moment. 3 When display changes to press button once 4 Modification mode accessed. Press button once for serial number . 5 Press button once more, display is with a flashing “P.” The flashing “P” indicates that the dosimeter parameters are ready to be altered. There are three steps to this process, each represented by a different letter: ‐ A flashing P : the parameter to modify can be selected. ‐ A flashing d : which digit of the parameter to change can be selected. ‐ And a flashing I : the value, or increment, of the selected digit can now be changed. The steps for modifying alarm set points are as follows: Step Action 1 Complete the steps in the previous section until the display reads . 2 Press the button repeatedly until you reach the parameter to be adjusted . 3 Hold down the button until the ‘P’ changes to a ‘d’ . 4 Press the button repeatedly until the correct digit to be changed is selected. 5 Hold down the button until the ‘d’ changed to an ‘I’ . 6 ...
- Page 10 8 Wait 10 seconds for the changes to be saved, DMC returns to PAUSE. Troubleshooting and Maintenance Fault Messages: Display Cause Corrective Action • Change the battery before the Dosimeter is in run mode and the battery is near dead. The “BA LO 0X” DMC loses power completely. • Verify that protective insulator is display indicates that there are “X” hours of operational use remaining, installed under the battery. Low Battery (On) (between 1 and 9 hours. ) • Change the battery within 72 The dosimeter is in the OFF or PAUSE mode, and the battery is near dead. The hours if possible battery will die completely within 72 ...
- Page 11 Display Cause Corrective Action • Contact MGPI for verification of Loss of calibration factor data stored in e2prom. device parameters. • Requires additional hardware (Reader) to clear. Defective Calibration • Contact MGPI for verification of Physical, internal problem related to the dosimeter’s detection circuit; or device parameters. • Requires additional hardware missing/incorrect parameters related to the detection algorithm. (Reader) to clear. Defective Detector ...
- Page 12 Dosimeter Reset Tool Operation If the battery is not changed while in the “Lo Bat” mode before it is completely discharged, the DMC might retain a slight charge in the supercapacitor and be non‐responsive to a new battery. If this is the case, you can use the DMC reset tool provided with your purchase. If you do not have the reset tool handy, leaving the battery out of the DMC for 3‐4 days will also sufficiently discharge the capacitor to accept a new battery. First, open battery compartment (as indicated on page 6) and remove the battery. Then, remove the orange insulator. Insert the reset tool with the ‘tongue’ pointing into the cavity underneath the top‐left quadrant of the threaded battery ring, between the soldered connection and the threaded ring. Lever the reset tool down. This should cause the tool to make contact with the appropriate part of the internal board, discharging the capacitor and resetting the dosimeter. ...
- Page 13 Remove the reset tool. Replace the insulator , insert a new battery and attempt to power up the device. There may be error messages that require additional hardware to clear. ...
- Page 14 Golossary of Terms Autonomous Mode – The DMC is capable of being turned on and off through the use of a pushbutton, also called ‘Stand Alone Mode.’ Battery Tool – Stainless steel tool available from Mirion Technologies for removing the battery cover on the DMC 2000. Mirion part number D20‐2005. Pictured: Chirp Rate – Setting that causes the speaker on the DMC to occasionally “chirp” every time it reads a set amount of radiation. Default turned off, can be adjusted with software and reader. Dose – The total amount of radiation measured by the DMC while in Run Mode. Displayed in mrem or mSv. Dose Alarm Threshold – The dose setpoint at which the DMC will begin to alarm. The dose alarm will continue past this until the DMC is reset. Dose Rate – A measure of the intensity of radiation being measured by the DMC in run mode, in relation to time. Displayed in mrem/hr or mSv/hr, configured at purchase or with software and reader. E2prom – The internal memory of the Dosimeter. Histogram – A history file created by the DMC during each use, noting information such as dose received, alarms triggered, and any faults. Saved to the e2prom. Readable with software and reader. ISO Connector – The gold panel on the front of the DMC, used as a connector for such peripherals ranging from a earphone to a transmitter. Pause Mode – A DMC in Pause Mode is effectively off, as the DMC is not currently measuring or tracking dose. Unless a custom display is selected, the display in this mode will read: PAUSE. E X T...
- Page 15 Rate Alarm Threshold – The dose rate setpoint at which the DMC will begin to alarm. The rate alarm will last until the dose rate falls below the threshold, at which point it will cease. Reader – Refers to any hardware reader (LDM 220, LDM 210, LDM 101, LDM 2000) available from Mirion Technologies that are used to communicate with the DMC 2000 and alter settings and/or retrieve a histogram. Run Mode – Also ‘Active’ mode, the DMC in Run mode is actively measuring and tracking dose and dose rate. The display in this mode should read: Satellite Mode – The DMC requires software and a reader to be turned on and off, and to access or change parameters. ...
- Page 16 Notes...
- Page 17 Customer Service Request Form For Problems with your DMC 2000, please contact Mirion Technologies for a Return Materials Authorization (RMA) form at 770‐432‐2744. Please fill out and attach the following information to the form before shipping any DMCs back for evaluation or repair. Name: Email: Phone: Company: Address: ...
Need help?
Do you have a question about the DMC 2000 S and is the answer not in the manual?
Questions and answers