Table of Contents
Advertisement
4
USER MANUAL
Model No: EQ30FA (UK)
Contents
INSTRUCTIONS FOR USE. ............................................. 3
1.
INTRODUCTION. .............................................................. 4
2.
GENERAL SAFETY INFORMATION. ........................... 5
3.
GETTING TO KNOW YOUR SCOOTER. .............................. 19
4.
PRODUCT SPECIFICATIONS. ................................................ 22
5.
PUSHING AND TRANSPORTING THE SCOOTER. ........... 23
6.
ADJUSTING THE SCOOTER .................................................. 25
7.
7.1 ADJUSTING SEAT POSITION. .................................................. 25
7.2 SWIVELING THE SEAT TO GET ON AND OFF .................... 26
7.3 ADJUSTING THE BACKREST ANGLE. ................................. 26
7.4 ADJUSTING THE HEADREST HEIGHT ................................ 27
7.5 ADJUSTING THE TILLER ANGLE. ......................................... 28
7.6 ADJUSTING THE SEAT BELT LENGTH AND FITTING
............................................................................................................28
7.7 TURNING THE SEAT.................................................................28
OPERATING THE SCOOTER .................................................. 29
8.
8.1 POWERING ON/OFF ................................................................. 30
8.2
DISPLAY PANEL. .................................................................. 31
8.3 ADJUSTING THE SPEED. .................................................. 31-32
8.4 DRIVING FORWARDS AND BACKWARDS. ........................... 33
8.5 USING THE BRAKES. ..............................................................34
8.6 OVERLOAD PROTECTION. .................................................... 34
8.7 SWITCHING ON THE HEADLIGHTS. .................................... 35
8.8 SWITCHING ON THE HORN. .................................................. 35
8.9 SWITCHING ON THE HAZARD Lights. ................................ 35
8.10 SWITCHING ON THE TURN SIGNAL. ................................. 36
8.11 POWERING OFF/PARKING THE SCOOTER ...................... 36
8.12 12V POWER SOCKET ............................................................ 37
1
Advertisement
Table of Contents

Related Manuals for First Choice Mobility Komfy 4 EQ30FA

Summary of Contents for First Choice Mobility Komfy 4 EQ30FA
-
Page 1: Table Of Contents
Contents INSTRUCTIONS FOR USE..........3 INTRODUCTION............... 4 GENERAL SAFETY INFORMATION......5 Komfy GETTING TO KNOW YOUR SCOOTER....... 19 PRODUCT SPECIFICATIONS..........22 PUSHING AND TRANSPORTING THE SCOOTER.... 23 ADJUSTING THE SCOOTER ..........25 USER MANUAL 7.1 ADJUSTING SEAT POSITION. -
Page 2: Instructions For Use
BEFORE DRIVING 1.INSTRUCTIONS FOR USE BATTERY AND CHARGING ............38 9.1 BATTERY STATUS DISPLAY ............39 KOMFY scooter is a motorised electric scooter for use primarily 9.2 CHARGING THE BATTERIES..........40-42 outdoors on flat surfaces such as pavements, roads, parking lots and 9.3 AFTER CHARGING. -
Page 3: Introduction
GENERAL SAFETY INFORMATION 2. INTRODUCTION KOMFY With your you have now purchased a product that has WARNING! Before you operate your scooter, please read and understand all information provided with your scooter been manufactured in accordance with the newest technical for your safety. - Page 4 WARNING! Anti-tippers substantially reduce your risk of WARNING! We strongly recommend that you do not tipping over backwards, which can cause you smoke cigarettes while seated on your scooter. You must serious injury. adhere to the following safety guidelines if you decide to smoke cigarettes while seated in your scooter: Do not WARNING! Have someone to help you practice bending leave lit cigarettes unattended.
- Page 5 WARNING! Do not use your scooter in “freewheel” WARNING! Keep yourself, your clothing, and all other mode without an attendant present. objects away from the tires while driving. Do not allow any objects to drag behind the scooter when driving. Loose-fitting clothing or other objects can get caught in WARNING! Do not place the scooter in “freewheel”...
- Page 6 WARNING! Do not mix old and new batteries. Always WARNING! Check electrical components frequently for replace both batteries at the same time. signs of corrosion and have them replaced as WARNING! Only sealed batteries that meet DOT CFR necessary. 173.159 should be used in the scooter. Replacement batteries should be obtained directly from an authorized WARNING! Always secure the scooter and its batteries provider to ensure conformity, fit, and function.
- Page 7 WARNING! Avoid any change of position or movement WARNING! Do not travel up or down potentially that may change your center of gravity while sitting on hazardous surfaces and/or inclines, including but not the scooter. This may cause your scooter to tip. limited to areas covered with snow, ice, cut grass, or wet leaves.
- Page 8 WARNING! Even though your scooter may be WARNING! If you feel unsure about a driving surface, capable of handling greater obstacles, we avoid that surface. recommend that you do not attempt to negotiate a curb that has a height greater than 2” / 5 cm. WARNING! Do not expose your scooter to open Doing so could cause instability in your scooter.
- Page 9 WARNING! When your scooter is used with any type of WARNING! Never transport the scooter in the front seat lift/elevation devices, always turn off the power of the of a vehicle. It may shift and interfere with the driver. scooter; make sure the scooter is not in “freewheel” mode and do NOT sit on your scooter.
-
Page 10: Getting To Know Your Scooter
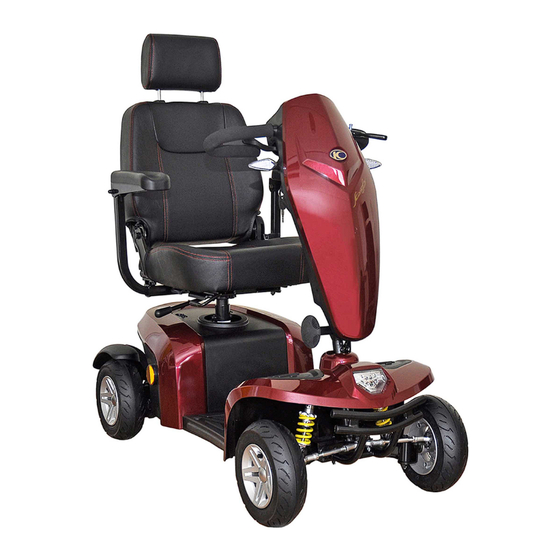
WARNING! Radio wave sources, such as radio stations, GETTING TO KNOW YOUR SCOOTER TV stations, amateur radio (HAM) transmitters, two-way radios, and cellular phones, can affect motorised Seat assembly, with backrest, headrest scooter control. Following the warnings listed below and handle should reduce the chance of unintended brake release Control panel or motorised scooter movement, which could result in... - Page 11 12 digits LED energy meter 38.5in 15.35in Turn signal 45.7in Hazard indicator switch button 39.3in Front LED light 18.1in Horn button 3.81in Throttle lever Turn indicator Speed control dial 50in 61.4in 61.4in 23.6in...
-
Page 12: Product Specifications
PUSHING AND TRANSPORTING THE SCOOTER PRODUCT SPECIFICATIONS · Please carefully read the safety information in section 3 related to transportation first. · Pushing the scooter: Model Name KOMFY 4 Model In order to push the scooter, you must place the scooter in Maximum weight capacity 25stone (160kg) “freewheel”... -
Page 13: Adjusting The Scooter
ADJUSTING THE SCOOTER The following describes how to set up and adjust your Scooter in = Driving Mode (B):(Motor is engaged.) order to have a comfortable and safe drive. 7.1 ADJUSTING SEAT POSITION Pull the seat 1.Always switch the scooter off to push it. locking lever 2.Do not push the scooter too fast. -
Page 14: Swiveling The Seat To Get On And Off
Accident hazard if backrest is not properly locked! SWIVELING THE SEAT TO GET ON AND OFF Ensure that the backrest is properly locked after adjustment by seeing Lift the seat lever, rotate the seat to the side (left or right) to get on. that it doesn’t move when you try pushing it slightly forwards and Sit on the seat and turn the seat back to the direction of travel. -
Page 15: Turning The Seat
Accident hazard due to incorrect seat position: Accident hazard due to non-engaged tiller: Always turn the seat to face forward and lock it before Ensure that the locking lever knob is properly locked after driving. If the seat has been turned, the possibility of adjustment by seeing that it doesn’t move when you try pushing tipping is increased. -
Page 16: Powering On/Off
8.2 LED DISPLAY PANEL 4).Always steer the scooter with both hands on the handlebars. LED panel “On”: 5).Always keep your feet within the foot area while driving the The scooter is switched on and ready for driving. scooter. If the status indicator is blinking: 6).Check before you switch on the scooter: There may be a faulty situation. -
Page 17: Driving Forwards And Backwards
Speed Control Dial: DRIVING FORWARDS AND Located in the centre of the BACKWARDS dashboard. Turning to rabbit means Hold the tiller handles fast, to turtle means slow. firmly with both hands. backwards Use your right index and middle fingers to pull the right side of the lever to move forward. -
Page 18: Using The Brakes
USING THE BRAKES 1.Using the motor electromagnetic brake: When the throttle control lever is released and returns to the center position, the brake is engaged to stop the scooter. SWITCHING ON THE HEADLIGHTS Headlight button: Emergency braking = let Switch on = press button once go of the drive lever: Switch off = press button again The throttle control lever... -
Page 19: Switching On The Turn Signal
SWITCHING ON THE TURN SIGNAL 8.10 8.12 12V USB POWER SOCKET Turn signal indicating a right hand turn = Press the right arrow switch. The power socket provides 24V / 5A / 120W Turn signal indicating a left hand turn = Press the left arrow switch. Voltage - 24V When turning is completed, push the switch again to turn the Ampere - 5A... -
Page 20: Battery And Charging
BATTERY AND CHARGING BATTERY STATUS DISPLAY The battery status display Corrosive chemicals contained in battery. on the dashboard shows the current level of decrease driving range, charge batteries as soon as possible. Explosive conditions exist! battery power. Do not use batteries with different amp- hour (Ah) If the scooter is at a capacities. -
Page 21: Charging The Batteries
When less than 5 LED battery status display left, the status CAUTION Do not share the outlet with any other display flicker, indicating to charge. appliance. CAUTION To avoid the risk of electric shock, this equipment must only be connected to a grounded supply main. -
Page 22: After Charging
Step 5. Plug the battery charging power cord into the jack AFTER CHARGING socket on the battery charger. (1.) Remove the battery charger plug from the electric outlet. (2.) Remove the battery charger jack plug from the scooter jack Step 6. Connect the battery charger power plug into an electrical socket. - Page 23 By KWANG YANG Motor Co., Ltd. First Edition, May. 2019 All rights reserved. Any reproduction or unauthorized use without the written permission of KWANG YANG Motor Co., Ltd.is strictly prohibited. T300-EQ30FA-A1 KWANG YANG MOTOR CO., LTD NO.35 Wansing St.,Sanmin District, Kaohsiung City, 80794 Taiwan, (R.O.C.) Telephone:886-7-3822526 FAX: 886-7-3950021...
Need help?
Do you have a question about the Komfy 4 EQ30FA and is the answer not in the manual?
Questions and answers
HOW DO I NO WHEN BATTERY IS FULLY CHARGED I HAVE TWO RED BARS HOW DO I NO IF ITS FULLY CHARGED
@Sheila Obrien
If there are two red bars on the battery indicator of the Komfy 4 EQ30FA, the battery is not fully charged. This indicates a low battery level, and the battery should be charged immediately to avoid damage. A fully charged battery will show more bars and the LED on the charger will turn green.
This answer is automatically generated
HOW DO I NO IF MY SCOOTER IS FULLY CHARGED I HAVE TWO RED BARS AND FOUR ORANGE ONES AND THERE ARE STILL BARS WITH NO CHARGESHEILA
If the battery indicator shows two red bars and four orange bars, the Komfy 4 EQ30FA scooter is not fully charged. A fully charged battery would show the indicator closer to the full zone, not with red or orange bars. Red and orange bars indicate lower battery levels, and the scooter should be charged immediately to avoid battery damage.
This answer is automatically generated