Table of Contents
Advertisement
Available languages
Available languages
Quick Links
Advertisement
Table of Contents

Summary of Contents for Brecom VR-200
- Page 1 Bruksanvisning VR-200 PRO...
- Page 2 Sikkerhet For din egen sikkerhet, kan du følge disse forholdsreglene når du bruker en vakuum- pakker: ▪ Les bruksanvisningen nøye før du bruker maskinen for første gang. ▪ Ikke bruk denne vakuumpakkeren på våte eller varme overflater, eller nær en varmekilde. ▪...
- Page 3 det ble vakuumpakket. MERK: vakuumpakking er ikke en erstatning for kjøling eller frysing. Eventuelle bedervelige matvarer som krever kjøling må fremdeles oppbevares i kjøleskap eller fryses etter vakuumpakking. Forberedelse Retningslinjer Grønnsaker må forvelles før vakuum pakking. Denne prosessen stopper enzym påvirkning, noe som kan føre til tap av smak, farge og tekstur.
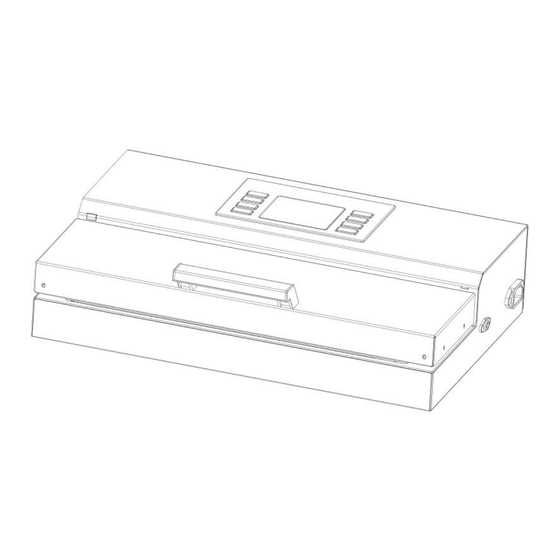
- Page 4 Oversikt over VR-200 PRO Kontroll panel Tilkobling via vakuumslange for vakkumering av mat i vakuumbeholder Stikkkontakt Strønledning Lokk Silikon forsegling presslist Lås for lokk – holder lokket lukket under vakuumering Varmelist Dryppe brett Vakuumpakninger i lokket og undersiden av apparatet som omgir og tetter...
- Page 5 Seal time (+): Knappen for å øke sveisetiden Seal time(-): Knappen for å redusere sveisetid Knappen for å velge funksjon oppover Knappen for å velge funksjon nedover Vac time (+): Knappen for å øke vakuumerings tiden Vac time (–): Knappen for å redusere vakuumerings tiden Cancel / Off: Knappen for å...
- Page 6 Gjentagende vakuumeringer Anbefalt forseglingstid 5 ganger 6 sekunder 10 ganger 5 sekunder 15 ganger 4 sekunder 20 ganger 3 sekunder Mer enn 20 ganger 3 sekunder Hvordan lage en passe stor pose 1. Velg stor nok pose/rull for det du skal vakuumpakke, legg til ekstra 5 cm. Med en saks eller skarp kniv, kutt ønsket lengde fra rull.
- Page 7 Velg “Canister” funksjon og trykk “start” knappen. 5. Enheten vil fortsette vakuumerings prosessen til luften er fjernet. 6. Maskinen stopper automatisk når den er ferdig. Hvordan Marinere Mat I marinerings modus, VR-200 kjører to runder med vakuum og slipper luft til beholderen,...
- Page 8 4. Steng lokket på maskinen og velg “Marinate” funksjon. 5. Trykk “Start” knappen. Når VR-200 når vakuumtrykket, vil maskinen stoppe vakuumering automatisk og slippe luft inn i beholderen, gjentar denne arbeidssyklusen kontinuerlig i 30 minutter og stopper deretter automatisk.
- Page 9 Ingenting hender når jeg trykker ’’VACUUM’’ knappen: Kontroller at strømkabelen er riktig koblet til Sjekk at strømkabelen ikke er skadet. Påse at posen er korrekt plassert i vakuum kammeret. Vent 25 minutter, slik at apparatet rekker å kjøle seg ned, deretter prøve på nytt.
- Page 10 Kontroller at forseglingens tiden er lang nok til å gjøre en god forsegling. Kontroller at du har plassert posen riktig. Kontroller at du har gitt apparatet tid til å kjøle seg ned. Vent 20 sekunder mellom hver forsegling.
- Page 11 Du er juridisk bundet til å avhende gamle apparater separat fra husholdningsavfallet. Informasjon om innsamlingspunkter hvor gamle apparater kan kastes gratis er tilgjengelig hos lokale myndigheter Distributør Breens Jaktutstyr AS Drognestoppen 2 2150 Aarnes Norway Tel. +47 63 90 95 85 Epost: post@brecom.no...
- Page 12 User Manual Vacuum Sealer VR-200...
- Page 13 Safety For your safety, follow these precautions when using your Vacuum Sealer: Read the manual carefully before using the appliance for the first time. Do not use the Vacuum Sealer on wet or hot surfaces, or near a heat source. ...
- Page 14 To preserve foods safely, it is important to maintain low temperatures. You can significantly reduce the growth of microorganisms at temperatures of 4ºC or below. Freezing at -17ºC does not kill microorganisms, but stops them from growing. For long-term storage, always freeze perishable foods that have been vacuum packaged.
- Page 15 The Vacuum Sealer Features A. Control panel B. Vacuum outlet - to vac and seal a vacuum canister by connecting a vacuum hose C. Power socket D. Power cord Silicon sealing bar G. Lock catch – keeps the lid closed during operation H.
- Page 16 Control Panel Seal time + : Button to increase the sealing time Seal time - : Button to decrease the sealing time Button to choose the function upwards Button to choose the function downwards Vac time + : Button to increase the vacuum time Vac time - : Button to decrease the vacuum time Cancel / Off: Button to cancel the on-going working process, press and hold it for 2 seconds to turn off the appliance.
- Page 17 MARINATE: This function is used when you want to marinate food packed in a vacuum canister. Quick Reference For Setting Seal Time Cumulative Usage Count Suggested Seal Time 5 times 6 seconds 10 times 5 seconds 15 times 4 seconds 20 times 3 seconds ﹥20 times...
- Page 18 Place the item(s) to be sealed into the pre-cut or custom sized bag. Leave at least 2 inches between the contents and the top of the bag to allow for bag contraction. Open the lid and place the open end of the bag down into the sealing gasket area. Close the lid and turn on the appliance.
- Page 19 button, and press it again to vacuum again. When the pressure reaches what it needs, press ’’Start’’ button to start sealing. The indicator number of SEAL TIME counts down to 0 and the working process is done. How to Use the Vacuum Sealer with a Canister NOTE : Canister and hose are not included in the package.
- Page 20 Connect the hose to the port on the appliance and the port on the canister lid. Close the lid of the appliance and choose “Marinate” function. Press “Start” button. When it reaches the vacuum pressure, the appliance will stop vacuumizing automatically and then release air into the canister.
- Page 21 Trouble Shooting The vacuum pump is working but the bag is not vacuumed, or air flows back into the vacuumed bag, or the bag is not sealed. Possible Reasons The Easy Solution The bag is not positi- The open end of the bag must reach into the vacuum oned correctly.
- Page 22 contents prevent the bag the bag. Perhaps, remove some material from the bag to from being sealed properly, leave some more free space on the top of the bag. because high amounts of Partially freeze foods with excess liquids prior to vacuum sealing.
- Page 23 The canister is not vacuumed (function Vacuum Canister). Possible Reasons The Easy Solution The vacuum hose is not connected Ensure that the correct end of the vacuum properly. hose is inserted properly into the vacuum outlet of the appliance. Ensure that the connection of the vacuum hose on the vacuum port of the canister lid is airtight.
- Page 24 ! You are legally bound to dispose of old appliances separately from household waste. Information about collection points where old appliances can be disposed of free of charge is available from your local authorities. Distributør Breens Jaktutstyr AS Drognestoppen 2 2150 Aarnes Norway Tel. +47 63 90 95 85 Epost: post@brecom.no...
Need help?
Do you have a question about the VR-200 and is the answer not in the manual?
Questions and answers