Table of Contents
Advertisement
Advertisement
Table of Contents

Related Manuals for Philips CRD50


Summary of Contents for Philips CRD50
- Page 1 CRD50 V2.00 www.philips.com/welcome User Manual (English)
-
Page 2: Safety Instructions
Read and follow these instructions when connecting and using your OPS Module: Operation: • Keep the OPS Module out of direct sunlight and away from stoves or any other heat sources. • Remove any object that could fall into ventilation holes or prevent proper cooling of the OPS Module’s electronics. • Do not block the ventilation holes on the cabinet. • When positioning the OPS Module, make sure the power plug and outlet are easily accessible. • When turning off the OPS Module by detaching the power cord, wait 6 seconds before re-attaching the power cord for normal operation. • Ensure the use of an approved power cord provided by Philips at all times. If your power cord is missing, please contact your local service center. • Do not subject the OPS Module to severe vibration or high impact conditions during operation. • Do not knock or drop the OPS Module during operation or transportation. • For doors or covers intended to be removed by operator for installation of accessory devices. Instructions shall be provided for the correct removal and reinstallation of the door. Maintenance: • Unplug the OPS Module if you are not going to use it for an extensive period of time. - Page 3 Read and follow these instructions when connecting and using your OPS Module: • Unplug the OPS Module if you are not going to use it for an extensive period of time. • Unplug the OPS Module if you need to clean it with a slightly damp cloth. The screen many be wiped with a dry cloth when the power is off. However, never use alcohol, solvents or ammonia-based liquids. • Consult a service technician if the OPS Module does not operate normally when you have followed the instructions in this manual. • The casing cover should be opened only by qualified service personnel. • Keep the OPS Module out of direct sunlight and away from stoves or any other heat sources. • Remove any object that could fall into the vents or prevent proper cooling of the OPS Module’s electronics. • Do not block the ventilation holes on the cabinet. • Keep the OPS Module dry. To avoid electric shock, do not expose it to rain or excessive moisture. • When turning off the OPS Module by detaching the power cable or DC power cord, wait for 6 seconds before re-attaching the power cable or DC power cord for normal operation.
- Page 4 Polish Center for Testing and Certification Notice The equipment should draw power from a socket with an attached protection circuit (a three-prong socket). All equipment that works together (computer, display, printer, and so on) should have the same power supply source. The phasing conductor of the room’s electrical installation should have a reserve short-circuit protection device in the form of a fuse with a nominal value no larger than 16 amperes (A). To completely switch off the equipment, the power supply cable must be removed from the power supply socket, which should be located near the equipment and easily accessible. A protection mark “B” confirms that the equipment is in compliance with the protection usage requirements of standards PN-93/T-42107 and PN-89/ E-06251. Electric, Magnetic and Electromagnetic Fields (“EMF”) 1. We manufacture and sell many products targeted at consumers, which, like any electronic apparatus, in general have the ability to emit and receive electromagnetic signals.
- Page 5 North Europe (Nordic Countries) Information Placering/Ventilation VARNING: FÖRSÄKRA DIG OM ATT HUVUDBRYTARE OCH UTTAG ÄR LÄTÅTKOMLIGA, NÄR DU STÄLLER DIN UTRUSTNING PÅPLATS. Placering/Ventilation ADVARSEL: SØRG VED PLACERINGEN FOR, AT NETLEDNINGENS STIK OG STIKKONTAKT ER NEMT TILGÆNGELIGE. Paikka/Ilmankierto VAROITUS: SIJOITA LAITE SITEN, ETTÄ VERKKOJOHTO VOIDAAN TARVITTAESSA HELPOSTI IRROTTAA PISTORASIASTA. Plassering/Ventilasjon ADVARSEL: NÅR DETTE UTSTYRET PLASSERES, MÅ DU PASSE PÅ AT KONTAKTENE FOR STØMTILFØRSEL ER LETTE Å NÅ. China RoHS 电子电气产品有害物质限制使用标识要求 (中国RoHS法规标识要求) 产品中有害物质的名称及含量。 有害物质 零部件名称 铅 汞 镉 六价铬 多溴联苯 多溴二苯醚 (Pb) (Hg) (Cd) (Cr (VI)) (PBB) (PBDE) 塑料外框...
- Page 6 環保使用期限 此標識指期限(十年),電子电气產品中含有的有害物質在正常使用的條件下不會發生外泄或突變, 電子电气產品用戶使用該電子电气產品不會對環境造成嚴重污染或對其人身、財產造成嚴重損害的期限。 《废弃电器电子产品回收处理管理条例》提示性说明 为了更好地关爱及保护地球,当用户不再需要此产品或产品寿命终止时,请遵守国家废弃电器电子产品 回收处理相关法律法规,将其交给当地具有国家认可的回收处理资质的厂商进行回收处理。 限用物質及其化學符號 單元 鉛 汞 鎘 六價鉻 多溴聯苯 多溴二苯醚 (Pb) (Hg) (Cd) (PBB) (PBDE) 塑料外框 ○ ○ ○ ○ ○ ○ 後殼 ○ ○ ○ ○ ○ ○ 電路板組件 - ○ ○ ○ ○ ○ 其他線材...
- Page 7 Ukraine RoHS: Обладнання відповідає вимогам Технічного регламенту щодо обмеження використання деяких небезпечних речовин в електричному та електронному обладнанні, затвердженого постановою Кабінету Міністрів України від 3 грудня 2008 № 1057 End-of-Life Disposal Your new Public Information Display contains materials that can be recycled and reused. Specialized companies can recycle your product to increase the amount of reusable materials and to minimize the amount to be disposed of. Please find out about the local regulations on how to dispose of your old OPS Module from your local Philips dealer. (For customers in Canada and U.S.A.) This product may contain lead and/or mercury. Dispose of in accordance to local-state and federal regulations. For additional information on recycling contact www.eia.org (Consumer Education Initiative) Waste Electrical and Electronic Equipment-WEEE Attention users in European Union private households This marking on the product or on its packaging illustrates that, under European Directive 2012/19/EU governing used electrical and electronic appliances, this product may not be disposed of with normal household waste.
- Page 8 Information for EAC Month and year of manufacturing please refer information in Rating label. Name and location of manufacturer ООО “Профтехника” Адрес: 3-й Проезд Марьиной рощи, 40/1 офис 1. Москва, 127018, Россия Importer and information Наименование организации: ООО “Профтехника” Адрес: 3-й Проезд Марьиной рощи, 40/1 офис 1. Москва, 127018, Россия Контактное...
-
Page 9: Table Of Contents
Table Of Contents Unpacking and Installation ............1 1.1. Unpacking ..................1 1.2. Package Contents ................1 1.3. Installation Notes .................1 1.4. Installing in Display ..............2 1.5. Input/Output Terminals .............3 Operation ..................4 2.1. Watch the Connected Video Source .......4 2.2. Change Picture Format ............4 2.3. Overview..................4 Signage display ................6 3.1. Setting ....................6 3.2. -
Page 10: Unpacking And Installation
Unpacking and Installation 1.1. Unpacking • This product is packed in a carton, together with the standard accessories. • Any other optional accessories will be packed separately. • After opening the carton, ensure that the contents are complete and in good condition. 1.2. Package Contents Please verify that you received the following items with your package content: • CRD50 • Quick start guide • Antenna cable x2 • M2 screw x3 CRD50 Quick start guide Antenna cable x 2 * Differences according to regions Display design and accessories may differ from those illustrated above. NOTES: • For all other regions, apply a power cord that conforms to the AC voltage of the power socket and has been approved by and complies with the safety regulations of the particular country (Type H05W-F, 2G or 3G, 0.75 or 1 mm... -
Page 11: Installing In Display
1.4. Installing in Display To install CRD50: 1. Ensure your display is powered off. 2. Remove the screws of OPS cover from the display . 3. After inserting the CRD50 in the display, tighten the screws. -
Page 12: Input/Output Terminals
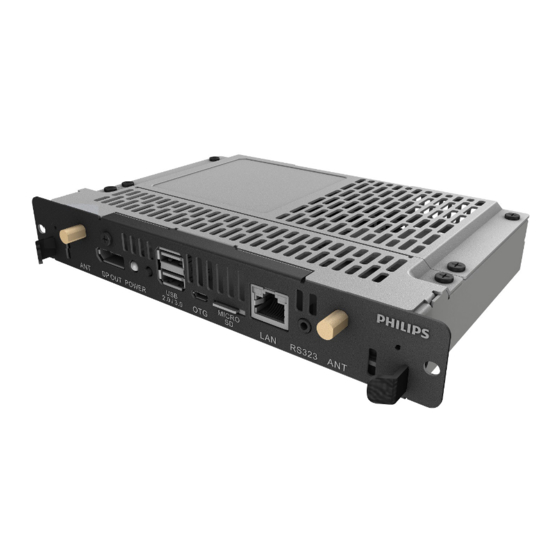
1.5. Input/Output Terminals DisplayPort OUT DisplayPort video output. Power Indicator Show the power indicator. Power Button Press this button to turn the CRD50 on/off. USB 2.0 / 3.0 PORT USB 2.0 Insert your USB storage device USB 3.0 For service (update FW or debug). MICRO SD CARD Insert your MICRO SD CARD. LAN control function for the use of remote control signal from control center. RS232C RS232C network input / output for the loop-through function. SIM CARD Insert your SIM CARD. -
Page 13: Operation
Operation 2. Admin mode: • You can press “WIN, 1,8,8,8” to startup admin mode. (Or by up/down dragging, vertical distance> screen height/4 to NOTE: T he control button described in this section is mainly on the startup admin PIN query for touch host PD.) You have to input remote control unless specified otherwise. password before Admin mode. 2.1. Watch the Connected Video Source Note : Default password is 0000 Input correct password for validation, then you can Select 1. Press [ ] SOURCE button. Settings >> Signage Display >> System tools >> Password 2. - Page 14 3.) Application page: 4.3) Cellular Network (Optional, if device has GSM/LTE module) 4 ) Network page 5) Help page: Display QRcode page. 4.1) Wi-Fi page 4.2) Ethernet page...
-
Page 15: Signage Display
Signage display 3.3. Ethernet Enable/Disable to turn on/off Ethernet 3.1. Setting After enable Ethernet, the settings will show: (1) Connection Type (Available connection type: DHCP/Static IP) Main items: A. DHCP (1) Wi-Fi (Show up when plug in Wi-Fi dongle) B. Static IP (2) Ethernet C. IP Address (3) Signage Display D. Netmask (4) Display E. DNS Address (5) Apps F. Gateway (6) Storage (2) Mac Address (7) Security (8) Language & input (9) Date & time (10) Developer options... -
Page 16: Signage Display
3.3.2. Static IP In Static IP mode, user can input IP Address, Netmask, DNS address and Gateway Note: IP address, netmask, DNS address and gateway address input limitation (1)Format: I. number 0-9 II. decimal point “. ” 3.4.1. General Settings 1. Signage Display Name Set up PD name “PD_” + Ethernet Mac Address. Note: Input limitation: (1) length: Max 36 characters (2) format: no limit 3.4. - Page 17 2) When boot logo is selected, PD will check if there is Case 2 bootanimzation.zip in the USB and SD card. The user put customized bootanimzation.zip file in the SD and USB. The default priority is SD card , so the PD will automatically select the file in the SD card only. The file in the USB drive will be ignored. In case the bootanimzation.zip is only in the USB drive, then the PD will select the file in the USB drive (as the SD card has no file). Function introduction: a. Option description Use customized boot animation file which is copied from SD card or USB Case 3 The user selects customized boot logo, the screen will show /data/ Use boot animations file under SD card local/bootanimzation.zip. Use boot animations file under USB b. Save If the option focus on or , press Save key to save the bootanimzation.zip file from the SD card or USB to /data/local and set it as boot logo. c. Forget Press Forget key to delete /data/local/bootanimzation.zip and not show boot logo.
- Page 18 Set up interval timeframe. 30 mins or 60 mins. Note: (1) If no End time, the screen will show current time automatically (2) Start time cannot be newer than End time. It will show error toast. 4)Repeat Set screenshot repeat cycle. User can choose screenshot time frame. (Multiple selection) 2) Start Time Set up screenshot start time. Note: (1) If no start time, the screen will show current time automatically (2) Just press Back key to exit dialog for Set up (3) Start time cannot be newer than End time. It will show Error toast. 5)Save to Set up screenshot save path. Internal storage, SD card or USB storage.) Note: Picture storage path (1) In root of internal storage/usb storage/sd card, PD will create folder automatically. (2) The picture will save to philips/Screenshot/.
- Page 19 6)Purge Screenshots Set up purge timeframe. One day or One week. (7) Send screenshots via email After check this item, it will send screenshot to email of administrator Please refer to Email notification Note: Please confirm Email setting is done. Each screenshot will be sent immediately. 3.4.2. Server Settings 1. Email Notification Via Enable/Disable to control Email On/Off. After Enable, user can set up Email notification configuration. The following events are automatically sent mail to manager. (1) Critical : Some android system warning message (2) Mediaplayer: Playlist is empty, or media file not support… (3) Browser: Playlist is empty.. (4) CMND & Play: No content (5) Pdfplayer: Playlist is empty (6) Ftp: someone login to system Gmail safety setting If Gmail is not working when setting is complete, please test Gmail account via PC and link below URL...
- Page 20 Yahoo Email Security Setting If Yahoo Email is not working when setting complete, please confirm “Allow apps that use less secure sign in” item is enabled. 2) Password Set up FTP password. 2)Manager Email Note: Set up Receiver mail account Input limitation (1) Length: 6-20 characters (2) Format: I. English a-z and A-Z II. Number 0-9 FTP password display (1) Will show “*” symbol to instead password if set up password via remote control. (2) After set up, the password text will show as “*” symbol. 3)Test Send Test Mail To test Gmail account receive/send function. Note (1) When Email is Disable, “Send Test Mail Button” button will gray 2. FTP Via Enable/Disable to control FTP On/Off. After set up, PD can share 3)Storage Path FTP files.
- Page 21 4) Port (2) Open Media Player slideshow effect edit page. Set up FTP port number. Default: 2121 Note: Input limitation (1) Length: Max 5 characters (2) Range: 1024 ~ 65535 (3) Format: Number 0-9 (4) Unavailable port: 5000 (5) The port number must more than 1024 2. Browser Can edit Bookmark configuration. 3.4.3. Source Settings 1. Media Player Can Edit Media Player play list and effect settings. (1) Open Browser setting page. (1) Open Media Player Player List edit page. 3. CMND & Play 1) Server Setup CMND & Play server address 2) Account Setup CMND & Play account 3) PIN Code...
- Page 22 When Ver.2, Server/Account/PIN code will be gray and unavailable . (2) Open PDF Player effect edit page. 5. Custom App When Ver.3, Server/Account/PIN code is available. User can set up the application for Customer Source. Note Display pre-installed app. and user installed app.. OSD menu operation: RCU: Source -> Custom If set up customer APK, PD will open customer app when switch source to Customer mode. If no set up customer APK, PD will open default app Signage Display, when switch source to Customer mode. 4. PDF Player Can edit PDF Player Play List and Effect Settings. Function introduction (1) Open PDF Player Player List edit page. (1) Save Select App and press Save key to save it. (2) Forget Press Forget key to clean previous stored data (3) Cancel No change, close window directly If no customer installed apk, the list will be blank.
- Page 23 settings_secure.xml c. settings_system.xml d. signage_settings.db e. AndroidPDMediaPlayerData.db f. AndroidPDPdfData.db g. AndroidPDUrlListData.db h. smartcms.db 2). Will save to Philips folder in storage. 3). I f no Philips folder exists in USB or SD card, it will be created automatically. (4) Clone Media Files Clone media file from internal, SD or USB Philips folder. (5) External Storage Lock/Unlock external storage.
-
Page 24: Display
(6) Password This is to allow user to change admin mode password (pin code) 3.5. Display User can modify the font size, can choose: Small/Normal/Large/Huge 3.4.6. Misc. 1. TeamViewer Support Enable / Disable TeamViewer support. 3.6. Storage Display current OPS Android storage information. 3.4.7. System update Note 1. Local update (1) User option key on RCU to show setting option (1) Will automatically search update.zip in USB or SD card. If found will be shown up in list for user selection. Note a. Only support Android Full image. b. File name should be update.zip c. The file should be located in root of storage. (2) After selecting update.zip file, system will restart and start updating. -
Page 25: Security
SD CARD and USB STORAGE : 1. SIM card lock Need to insert SD card or USB, the information will show up total Setup/Disable SIM PIN code. space and available of SD card or USB storage. Note: (1) Only show up when 4G module is connected Apps Display applications information. 2. Credential storage (1) Storage type (2) Trusted credentials (3) Install from SD card (4) Clear credentials 3.8. Languages & input Setup system language. 3.7. Security Add language in setup screen. -
Page 26: Date & Time
3.9. Date & time 3.10. Developer options Set up date, time and time zone. Setup time zone first and then go Android developer options. setup date & time. After time zone setup, then go setup date & time. 3.11. About Note: 1. If “Automatic date & time” is enabled, the setup of date and time will Main info in About: be disabled and will use NTP server time. (1) System updates (2) Legal information (3) Android version (4) Kernel version (5) Build number 2. Disable “Automatic date & time”, to setup the date and time. Android’s date can be set from 2017/1/1 to 2037/12/31. 3.11.1. System updates 1. -
Page 27: Legal Information
3.12. Legal Information Show the open source licenses. (1) The image folder These contain PNG images named in numbers, starting from something like 0000.png or 0001.png and proceeding with increments of 1. There has to be at least one folder and there is no known upper limit to the number of folders. (2) The desc.txt file 3.13. Supplementary This file defines how the images in the folder(s) are displayed during the boot animation, in the following format: 3.13.1. Quick Info - Width Height Frame-rate You can press keyboard “Win + 7,7” to startup quick info. (Or by left/ - mode Loop delay-time Folder1 right dragging, horizontal distance> screen width/5 to startup quick info - mode Loop delay-time Folder2 when in Launcher for Touch host PD) Quick info will show “Network” and “Monitor Information”, as below: An example of a desc.txt file is: Note: - 1920 1080 30 Operation hours : It is updated every minute. - Page 28 1.2 Go to Admin Mode > Apps > File Manager 1.3 Using File Manager and find out your apk and then you can install. Just press “ok” on the selected apk. 2. Download apk by Chromium browser, and then go to <internal storage path>/Download/ by File Manager. 2.1 The rest of steps is the same as above. Please note, each model may have different <internal storage path>. (b) Via Adb Shell 1. Make sure that your PC can connect to Philips Android Signage Display using adb. 2. Prepare your apk in a folder (for example, C:\apkfolder) on PC. 3. Execute the following instruction by command line tool. C:\apkfolder> adb install -r apk_name.apk If using WinRAR, set “Compression method” to “Store” (c) Via Customized Intent 1. If you develop an apk which can download any android app, then your apk can issue a customized intent.
- Page 29 3.13.4. How to connect with platform Web API? status: "success", PD has a local web server to provide Web API for customer getting PD information in JSON format. code: 0, 1. APIs specifications decsription: "success", - Protocol: HTTP result: { - Method: GET "version": "1.0", - Domain: localhost "currentip": "172.17.3.4", - Port: 9988 "sn": "123456", - URI: /platform/getinfo...
-
Page 30: Usb Device Compatibility
USB device compatibility USB Multimedia Codec Formats Video Decode Type Video Codec Container Decode Encode Channel Remark Supported Image Size:48x48pixels to 1920x1088pixels Maximum Frame Rate:30fps MPEG1/2 MPEG1/2 File Format: DAT, MPG, VOB, TS Maximum Bit Rate:80Mbps Audio Codec: MP2, MP3 Supported Image Size:48x48pixels to 1920x1088pixels Maximum Frame Rate:30fps Maximum Bit Rate:38.4Mbps File Format: AVI, MKV, MP4, MOV, MPEG-4 MPEG4 Audio Codec: MP2, MP3, AAC,PCM,... - Page 31 Image Decode Type Image Codec Photo Decode Encode Channel Remark JPEG JFIF file format 1.02 File Format: JPG, JPEG Decode: Resolution 48X48 to 8176X8176 (1) Not Support Non-interleaved Scan (2) Software support SRGB JPEG (3) Software support Adobe RGB JPEG File Format: BMP MaximumSupported Image Size:4096x4096 pixels File Format: GIF Resolution No Restriction File Format: PNG Resolution No Restriction NOTES: • Sound or video may not work if the contents have a standard bit rate/frame rate above the compatible Frame/sec listed in the table above. • Video content with a Bit rate or Frame rate larger than the rate specified in the table above can cause choppy video during playback.
-
Page 32: Cleaning
Cleaning Cabinet Cleaning Instructions Before cleaning, please unplug from power source! • If the cabinet becomes dirty, wipe the cabinet with a soft, dry cloth. • If the cabinet is extremely dirty, soak a lint-free cloth in a mild detergent solution. Wring the cloth to remove as much moisture as possible. Wipe the cabinet. Use another dry cloth to wipe over until the surface is dry. • Do not allow any water or detergent to come into contact with the surface of the OPS Module. If water or moisture gets inside the unit, operating problems, electrical and shock hazards may result. • Do not scratch or hit the cabinet with fingers or hard objects of any kind. • Do not use volatile substances such as insert sprays, solvents and thinners on the cabinet. • Do not place anything made from rubber or PVC near the cabinet for any extended periods of time. -
Page 33: Technical Specifications
Technical Specifications In/Out Terminals: Item Specifications RS232C 2.5mm Phone jack x 1 RS232C In/Out RJ-45 RJ-45 Jack x 1 (8 pin) 10/100/1000 LAN Port Displayport out Displayport Jack x 1 Digital RGB: TMDS (Video + Audio) (20 pin) MAX: Video - 720p, 1080p, 1920 x 1080/60 Hz (WUXGA) Audio - 48 KHz/ 2 Channel (L+R) Supports LPCM only USB Input USB2.0 TypeA x1 USB2.0 USB3.0 TypeA x1 USB3.0 General: Item Specifications Power Input DC 12V - 19V (From OPS Slot) Power Consumption (Max) 20 W When USB maximum loading Power Consumption (typ.) <10 W Power Consumption (Off) <0.5 W Dimensions [W x H x D]... - Page 34 2018 © Koninklijke Philips N.V. All rights reserved. Philips and the Philips Shield Emblem are registered trademarks of Koninklijke Philips N.V. and are used under license from Koninklijke Philips N.V. Specifications are subject to change without notice.
Need help?
Do you have a question about the CRD50 and is the answer not in the manual?
Questions and answers