Table of Contents
Advertisement
Advertisement
Chapters
Table of Contents

Related Manuals for Kantech Telephone Entry System


Summary of Contents for Kantech Telephone Entry System
- Page 1 Kantech Telephone Entry System Installation Manual DN1769-1809...
-
Page 3: Table Of Contents
6 - Troubleshooting ............................27 7 - Heartbeat Patterns ............................28 8 - Hardware Default initialization ........................29 8.1 How to reset the Kantech Telephone Entry System for Factory Default ..............29 9 - Maintenance Recommendations ........................30 Appendix A - Installation Checklist ....................31... - Page 4 DN1769-1809...
-
Page 5: Kantech Warranty Terms
Sensomatic Electronics, LLC (“Kantech”) warrants the original purchaser that for a period of 2 years from the date of purchase, the product shall be free of defects in materials and workmanship under normal use. During the warranty period, Kantech shall, at its option, repair or replace any defective product upon return of the product to its factory, at no charge for labour and materials. - Page 6 Products which Kantech determines to be repairable will be repaired and returned. A set fee which Kantech has predetermined and which may be revised from time to time will be charged for each unit repaired. Products which Kantech determines not to be repairable will be replaced by the nearest equivalent product available at that time.
-
Page 7: General Description
Copyright © 2018 Tyco International Ltd. and its Respective Companies. All Rights Reserved. All specifications were current as of publication date and are subject to change without notice. Kantech and the Kantech logo are trademarks of Tyco International Ltd. and its Respective Companies. -
Page 8: Technical Support
Technical Support For technical assistance with the Kantech Telephone Entry System and other Kantech products, contact technical support, Monday to Friday. To contact technical support, you can follow this link: http://www.kantech.com/Support/Contact_Technical_Support_Advanced.aspx See the following table for the technical support phone numbers and email address. - Page 9 Kantech Telephone Entry System Installation Manual Country/Region Phone Numbers Support Hours Email Nordic countries Direct +45 4494 9001 8:00 to 18:00 access-support@jci.com Russia Direct +81 0800 2052 1031 South Africa Direct +2721 100 3882 Spain Direct +900 99 31 61...
-
Page 10: Compliance Specifications
-CAUTION: Users should not attempt to make such connections themselves, but should contact the appropriate electric inspection authority, or electrician, as appropriate. -In addition, the Kantech Telephone Entry System complies with the CS-03 (Direct Connection to the Public Switched Telephone Network, Canada). - Page 11 UL Compliance for the KTES-US and the KTES-CDN Models only The Kantech Telephone Entry System (KTES) complies with the UL 294 which is described by the following: UL Standard for Access Control Equipment, USA. The KTES enables users to grant access to the building, to their visitors, via their own telephone line or cellular telephone.
- Page 12 WEEE (Waste Electrical and Electronic Equipment) This regulation is used for Waste Electrical and Electronic Equipment, and addresses the disposal and the environmental handling of these products. DN1769-1809...
-
Page 13: Overview
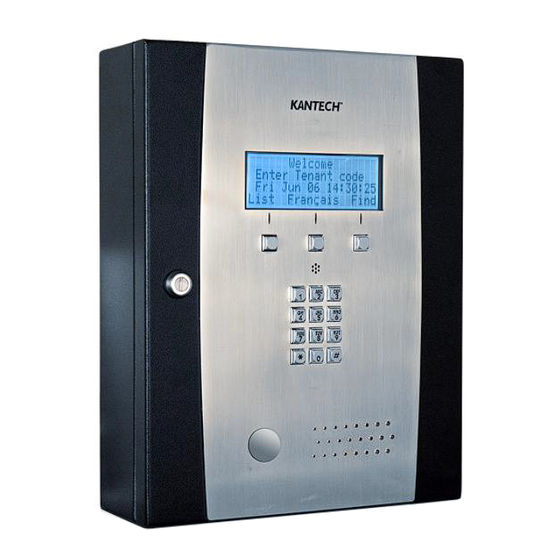
The KTES is designed to be a stand-alone unit as well as a part of a complete access control system such as EntraPass from Kantech. The KTES can be connected to a PC via IP or RS-485 or internal PSTN to the phone line. -
Page 14: Features
This means the door locking device will be connected to the access controller and not the KTES. Compatible with all EntraPass Special, Corporate and Global Editions The Kantech Telephone Entry System is compatible with all EntraPass Editions v4.02 and higher: • EntraPass Special Edition •... -
Page 15: Optional Accessories
Kantech Telephone Entry System Installation Manual Trouble and Reporting The KTES constantly supervises ac power and battery condition and reports “AC Lost”, “Normal Battery”, “Low Battery”, or “No Battery”, status to the EntraPass system. Power outputs are supervised and electronically protected against circuits surges. - Page 16 Figure 2: KTES Flush Mounted with Box and Trim Ring Matching Paper Directory The KTES itself does not support a paper directory but has an optional matching enclosure designed just for that purpose. This illuminated enclosure supports the letter format 216 x 279 mm (8.5 x 11 in) and A4 format 210 x 297 mm (8.3 x 11.7 in).
- Page 17 Kantech Telephone Entry System Installation Manual Figure 3: Paper Index Flush Mounted Camera The KTES offers the possibility to install a color camera in the back of the front door. Figure 4: Camera Position in Back of Front Door DN1769-1809...
- Page 18 Postal Lock This option fits in the product enclosure. Its role is to allow postal service personnel access to the building. For added security purpose its usage may be limited by a schedule. Figure 5: Postal Lock Mounting Location DN1769-1809...
- Page 19 Kantech Telephone Entry System Installation Manual Goose Neck The KTES can be mounted on a goose neck stand. Figure 6: Goose Neck Mounting Plate with Gaskets (Goose Neck not Included) DN1769-1809...
-
Page 20: System Architecture
Remotely with EntraPass over the telephone line with a dialup modem. The KTES is compatible with the US Robotics V.92 external modem. Figure 7: KTES Configurations with EntraPass EntraPass Software Kantech Telephone (Special, Corporate & Global Editions Dial-up Entry System (KTES) - Page 21 Kantech Telephone Entry System Installation Manual Figure 8: PCB view of main board DN1769-1809...
- Page 22 Figure 9: KTES Wiring Example with an External Controller - UL Compliant (North America) DN1769-1809...
- Page 23 Kantech Telephone Entry System Installation Manual Figure 10: KTES Wiring Example with Reader (Stand Alone Application) - North America DN1769-1809...
-
Page 24: Technical Specifications
2 - Technical Specifications Table 1: Technical Specifications Specification Description AC Power Input (UL) 16.5 VAC, 40 VA, 1.9 Amps class 2 transformer, see Table 3 on page 28 for the part numbers DC Power Input (CE) 19 VDC, 3.15 Amps, see Table 3 on page 28 for the part numbers DC Auxiliary Output 11.2 to 13.75 VDC, 450 mA Lock Output... -
Page 25: Electrical Specifications
Kantech Telephone Entry System Installation Manual Table 1: Technical Specifications Specification Description Paper Index Surface Mount 29.21 cm (11 1/2 in.) Wide, 37.46 cm (14 3/4 in.) High, 9.93 cm (4 in.) Deep Paper Index Black Trim 35.72 cm (14 in.) Wide, 44.13 cm (17 3/8 in.) High, 0.92 cm (3/8 in.) Deep... -
Page 26: Installing The Ktes
4.2 Installation STEP 1: Unpacking the KTES Check that the following parts are in your KTES package when you unpack it: • Kantech Telephone Entry System (KTES) EntraPass software CD-ROM, version 4.02 or higher • • Installation Manual, English and French version Programming Manual, English and French version •... -
Page 27: Step 3: Mounting
Kantech Telephone Entry System Installation Manual Figure 11: Surface Mount Installation STEP 3: Mounting It is recommended that you mount the KTES so that the bottom of the enclosure is not higher than 117 cm (46 in.) from the floor. If you install it in a location where there are... -
Page 28: Step 4: Connecting The Door Locking Device (Dc Powered)
STEP 4: Connecting the Door Locking Device (DC Powered) Connecting the Door Lock Device to LK+ and Check for Local “magnetic lock” Regulations The door locking device output is controlled according to the end-user programmed parameters for allowing access to or unlocking doors according to schedules and access levels. -
Page 29: Step 7: Connecting An External Controller
Kantech Telephone Entry System Installation Manual Resistors for all Inputs 5.6K Ohms (EOL or DEOL) (Optional) The KTES has an on-board capability of monitoring 4 input points. Each onboard input is supervised with or without end-of-line resistors (5.6K ohm). The maximum distance of one line is 600 m (2,000 ft) with AWG #22. -
Page 30: Step 8: Connecting A 3Rd Party Controller
STEP 8: Connecting a 3rd Party Controller The +V terminal voltage level is set by jumper JP9 (5V, 12V or EXT). STEP 9: Connecting the Telephone Line Connect the TIP (green) and RING (red) from the Phone Line to the TIP and RING terminals. Note: The (T-1 and R-1) terminals can be connected to the local telephone. -
Page 31: Step 12: Connecting Multiple Ktes On The Same Telephone Line (Optional)
Kantech Telephone Entry System Installation Manual STEP 12: Connecting Multiple KTES on the Same Telephone Line (optional) It is very important to take into consideration that a maximum of 305 m (1000 ft) should be used between the first KTES and the last KTES, or in total. -
Page 32: Step 15: Connect Dc Power (Emea Only)
STEP 15: Connect DC Power (EMEA only) Power should only be applied to the unit when all connections are completed. Connect the +19VDC- terminals to the power supply 19 VDC, 3.15 Amps. STEP 16: Connecting the Backup Battery The 12 VDC, 7 A/h backup battery provides operation of up to 12 hours. ... -
Page 33: Step 18: Connecting The Ethernet Cable (Optional)
Kantech Telephone Entry System Installation Manual STEP 18: Connecting the Ethernet Cable (Optional) Connect the Ethernet cable to the RJ-45 port. The TXRX (YELLOW) LED is OFF when there is no Ethernet network or the cable is disconnected; • FLASHING when there is network activity; and ON when the network is present •... -
Page 34: Ktes Models, Options, Related Documentation And Miscellaneous Items
Kantech Telephone Entry System, plug-in AC transformer 16 VAC, 40 VA (TR1640P/UL), KTES EntraPass software (E-KTES-CD1) and accessory kit (KTES-ACC-KIT) KTES-EU Kantech Telephone Entry System, switching power supply, AC cord for Europe and UK, KTES EntraPass software (E-KTES-CD1) and accessory kit (KTES-ACC-KIT) KTES-AUS... - Page 35 Kantech Telephone Entry System Installation Manual Part number Description KTES-PS-AUS Power Supply 100V - 240VAC IN / 19 VDC, 3.15 Amps OUT and AC power cord, for KTES-AUS only TR1640P/UL 16.5 VAC, 40 VA, class 2 transformer for installation in the USA...
-
Page 36: Troubleshooting
6 - Troubleshooting Table 4: Reset Types and Descriptions Jumpers Heartbeat Patterns Resets Soft Reset: When JP1 and JP2 are ON, the KTES will reset on a) power up, b) pushbutton, or c) EntraPass software 'Manual operator soft reset': • All KTES memory definitions and parameters are verified and kept intact if still valid. -
Page 37: Heartbeat Patterns
Kantech Telephone Entry System Installation Manual 7 - Heartbeat Patterns The KTES status can be obtained from the HEARTBEAT blue LED patterns. It is located near the ribbon cable connected to the door PCB, see Figure 8: PCB view of main board. This information is particularly useful when connecting the KTES to the EntraPass system. -
Page 38: Hardware Default Initialization
Note: The Soft Reset and the Hard Reset can be performed directly from the VUI, without having to open the KTES, refer to the KTES Programming Manual, DN1770. 8.1 How to reset the Kantech Telephone Entry System for Factory Default Before you start, you must be able to: Open the KTES with the key. -
Page 39: Maintenance Recommendations
Important: Only a technician should perform the following maintenance recommendations. The KTES includes a lithium battery (see Figure 8 Kantech Telephone Entry System PCB View on page 15). This battery cannot be replaced in the field. If the lithium battery stops working, return the circuit board to Kantech. Do not crush, puncture, open, disassemble or otherwise mechanically interfere with the battery. - Page 40 DN1769-1809...
-
Page 41: Appendix A - Installation Checklist
Kantech Telephone Entry System Installation Manual Appendix A - Installation Checklist The following checklist enumerates the steps to install the system. Installation Steps Pages STEP 1: Unpacking the KTES see page 20 STEP 2: Applying Sealant on the Back of the KTES... - Page 42 Copyright © 2018 Tyco International Ltd. and its Respective Companies. All rights reserved. www.kantech.com DN1769-1809...
Need help?
Do you have a question about the Telephone Entry System and is the answer not in the manual?
Questions and answers