Table of Contents
Advertisement
Quick Links
Advertisement
Table of Contents

Summary of Contents for TriBrer Lemon 3
- Page 1 USER'S GUIDE Fusion Splicer...
- Page 3 Warning Warning Any undefined change or modification of this manual will deprive you of the right to operate the equipment. To reduce the risk of fire or electric shock, do not expose the equipment to rain or humidity. To prevent electric shock, please do not open the shell, and it must be repaired by qualified personnel. This product is designed for splicing the glass fiber of optical communications and cannot be used to splice other materials.
- Page 4 Cautions Cautions Do not use and store the fusion splicer in a high temperature and humidity environment . Otherwise, it may cause damage to the equipment. Do not touch the heat-shrinkable tube during the heating or just ending, because the heat shrink is hot and may cause burns. Do not touch the fusion splicer, AC power cord and AC plug when wet hand, otherwise it may cause electric shock.
-
Page 5: Standard Package
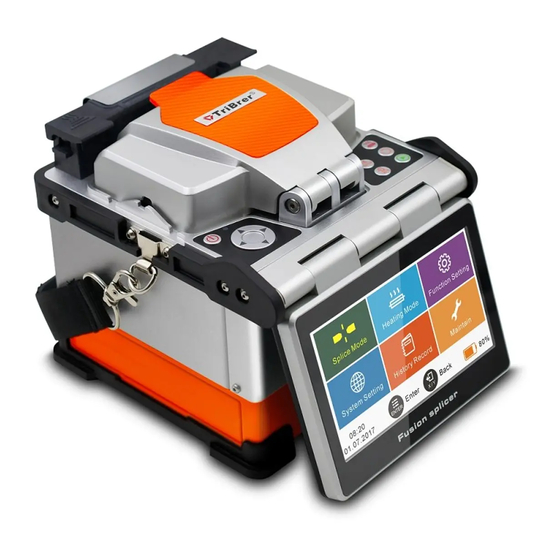
Standard Package AC/DC adaptor Fiber stripper Carrying case Spare electrode Fiber cleaver User manual... - Page 6 Host Electrode Objective lens Clamp slot V-groove Cooling tray Multi-functional clamp Heater V-groove Heat shrinker cover Electrode cover USB connector Power supply socket Windshield cover Optical fiber presser Battery Anti-collision batten...
-
Page 7: How To Use Keyboard
How to Use Keyboard ENTER Key HEAT Key ON/OFF Key Enter into the menu Save settings Start heating Power on/off RESET Key LEFT/RIGHT Key Motor reset Modify settings UP/DOWN Key START Key Move the cursor Start splicing X/Y Key Back to previous menu Switch X/Y images... -
Page 8: Splicing Operation
Splicing Operation Turn on Confirming Splicing & Heating Mode Placing protection sleeve over fiber Stripping, Cleaning, Cleaving fiber Loading fiber onto splicer Note: Place fiber between electrodes tip and V-groove end. Start splicing Visual inspection on LCD during splice Hold Pull Taking out spliced fiber Centering sleeve to spliced point... - Page 9 Main Menu Press key to open the menu, then using navigation key to choose the different sub-menu, then press key again to enter into the sub-menu. Splice Mode Heating Mode Function Setting System Setting History Record Maintain 08:20 Enter Back 01.07.2017...
-
Page 10: Splice Mode
Splice Mode Press key to choose the line, and use key to set the detailed configuration. Splice Mode SM, MM, DS, NZDS... Fiber type Manual, Auto, Half-auto Splice operate mode Manual Enter Set current splicing program number Splice program No. SM-1 Edit splicing parameters under current program No. -
Page 11: Heating Mode
Heating Mode Heating Mode Heating program No . Select the protection sleeve type Casing type 40mm Diameter of fiber protection sleeve Casing diameter Heating Mode Heating temperature Heating time Auto heating 08:20 Enter Back 01.07.2017... -
Page 12: Function Setting
Function Setting Function Setting Only valid when "Tension test" is "Off" Reset waiting time Fast arc test mode If "On , splicer will auto adjust the discharge current " Tension test If "On , it will execute tension test automatically "... -
Page 13: System Setting
System Setting Time setup Year 2017 Month System Setting Date Help information Enter Hour Brightness adjustment 100% Minute Language selection English Screen flip Flip System Setting 08:20 Enter Back 01.07.2017 Time setup Enter Restore factory settings Enter 08:20 Power saving mode Back Enter 01.07.2017... -
Page 14: History Record
History Record Press key to enter into the detailed interface, while key to back to previous menu View records Date Angle Fiber type Loss 0001 01.07.2017 0.00 History Record 0.00 0002 01.07.2017 Total arc number 0003 01.07.2017 0.00 0.00 0004 01.07.2017 Clear arc count Enter... - Page 15 Maintain Arc correction Help 1st: Place fiber and covering the wind cover. 2nd: Press 'ENTER' key and follow the prompts. NOTE: Several times is needed. Please wait patiently. Maintain Arc correction Enter 08:20 Clean electrodes Enter Enter Back 01.07.2017 Replace electrodes Enter Detect system parameters Enter...
- Page 16 Maintain-Clean Electrodes Clean electrodes Help 1st: Ensure that no fiber exist in the vision. 2nd: Press 'ENTER' key and follow the prompts. 08:20 Enter Back 01.07.2017 Note: To get the best splicing result, please don't touch the electrode tip with hard objects while cleaning.
- Page 17 Maintain-Replace Electrodes Replace electrodes Help 1st: Turn off and replace the old electrodes. 2nd: Ensure that no fiber exist in the vision. 3rd: Press 'ENTER' key and follow the prompts. NOTE: After the operation is completed, the number of discharge will be set to 0. 08:20 Enter Back...
- Page 18 Maintain-Detect System Parameters To get better splicing result, we suggest you detect system parameter under following situations: System upgrade eplace or move electrodes; 3.Long-distance transportation and strong vibration; Continuous splicing failure or high loss; Detect system parameters Continuous overshoot during alignment. Help 1st: Clean the V-grove, place fiber and covering the wind cover.
- Page 19 Fusion Splicer Cleaning V-groove Objective Lens Fiber Presser The Heater When cleaning, keep the device Off Do not touch the electrode tips Use cotton swab moistened with purity alcohol Use dry swab to clean the excess alcohol...
-
Page 20: Battery Information
Battery Information In lower right of the interface is the battery state and battery indicator. The battery will display different colors and shapes in various states. Here are some examples of icons . Battery information can also be viewed in the system menu. AutoMode SM-1 60-6mm... -
Page 21: Warning Information
Warning Information Warning English hints Reason Treatment method Fiber cutting length is too short Cut the fiber again and ensure the cutting length The fiber placed in the V-groove has been broken Left / right / left and right fiber placement error Fiber is not placed in the middle of the V-groove Replace the fiber (LFPC / RFPC / LRFPC) - Page 22 Warning Information Warning Reason Treatment method Timeout abnormal Long time during align splicing Restart align splicing Improper installation position of electrode Detect system parameters first, if continue to Field abnormal prompt abnormal, please re-install the electrode The mechanical structure was destroyed Data abnormal The fusion splicer is working in the abnormal state Continue to align splicing, and it have no affect...
- Page 23 Specifications Applicable fibers SM, MM, DS, NZDS, EDF Average splice loss 0.02dB(SM), 0.01dB(MM), 0.04dB(NZDS), 0.04dB(EDF) Fiber aligning method Core alignment Typical 8s with standard SM fiber Splicing time Heating time Electrode life 2500 Battery capacity Typical 200 cycles (splicing and heating) 5.0 inches colorful LCD display Monitor Storage of splice result...
Need help?
Do you have a question about the Lemon 3 and is the answer not in the manual?
Questions and answers