Advertisement
Quick Links
Advertisement

Summary of Contents for Yeti SMARTBENCH
- Page 1 Quick Start Guide v1.2...
-
Page 2: What's In The Box
Please let us know how you get on - we are always keen to receive feedback, and follow what SmartBench creates! What’s in the box Start by getting familiar with SmartBench’s key components. Check the contents. If any of the above items are damaged or missing, please contact your point of purchase immediately. -
Page 3: Key Components
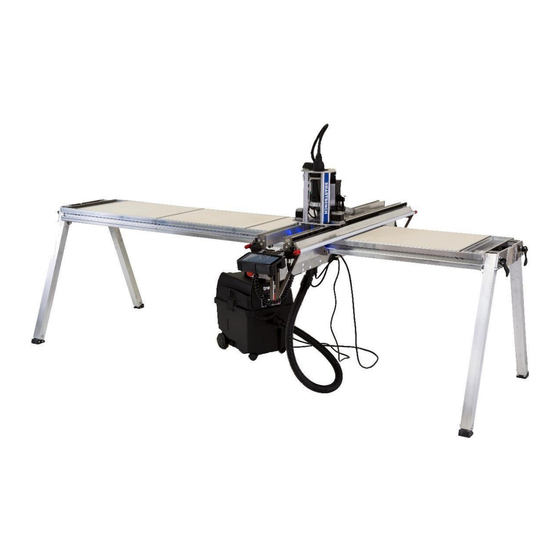
SMARTBENCH V1.0 Key components Figure 1: Y Bench Figure 4: Console Figure 2: Z Head Figure 3: Leg Set (x2) Figure 5: X Beam Upper Figure 6: X Beam Lower MULTISTATION SAS Tel No: +33299163535 | Email: multistation@multistation.com... - Page 4 SMARTBENCH V1.0 Fit the X Beam Lower Identify the home end of the Y Bench Elevate the home end of the Y Bench. , page 2) by looking for the Home Icon. Figure 1 Identify the home face of the X Beam Lower...
- Page 5 Bench to accept the location pins of the Leg Set. Bench end plate. Push the clamp handles down flat to the Y Bench At this stage your SmartBench should look end plate to tighten. something like this. The Y Bench and X Beam Lower assembly should Lift the remaining end and repeat the process.
- Page 6 SMARTBENCH V1.0 Fit the X Beam Upper The X Beam Upper can now be mounted onto the Identify on the Home Icon on the inside rail of the X Beam Lower. Again, ensure all 3 Home Icons are X Beam Upper ( , page 2).
- Page 7 SMARTBENCH V1.0 Attach the Z Head Slide the Z Head ( , page 2) onto the X the cable connector latch plate to the Z Head Figure 1 Beam Upper ensuring the orientation as shown. carriage plate as shown. nect the Z Head signal cable and secure using Secure in place using the thumbscrew.
- Page 8 SMARTBENCH V1.0 Fit the Console Plug the Console cable into the connector on Place the Console into the locating slots in the the right-hand side of the X Beam Upper. E Stop end of the X Beam Upper. Fit the power cable...
- Page 9 SMARTBENCH V1.0 Fit the extractor SmartBench has a dedicated power outlet for extractors, to enable auto-extraction, but the extractor must not draw more than 10 amps. If the extractor draws more than 10 amps, the extractor must be powered from a separate power outlet and operated manually.
-
Page 10: Check Cable Connections
SMARTBENCH V1.0 Check cable connections Check that all cables are connected correctly: 1. Z Head Signal 2. Z Head Power 3. X Beam 4. Extraction power (if using the auto-extraction system) 5. Console 6. Mains Power Figure 7: Z Head Signal... - Page 11 SMARTBENCH V1.0 Turning on SmartBench Assuming the above instructions have been followed correctly, SmartBench can now be powered on by releasing the Emergency stop button. To release the button, it must be twisted clockwise. Figure 13: E-Stop Button Unit 1 Westfield Court | Barns Ground | Clevedon | Bristol | BS21 6FQ | UK...
- Page 12 SMARTBENCH V1.0 Connecting to Wifi Connecting SmartBench your local network gives the following functionality: • Software updates • File transfer via your WiFi network 1. Location – Important! Leave location set as GB 2. Insert your Network name: Touch on the network name box...
- Page 13 SMARTBENCH V1.0 Close the keyboard using the button in the lower right corner Press the connect button. Please note the system will then automatically reboot. The console screen will go black as the console restarts – this is normal. Unit 1 Westfield Court | Barns Ground | Clevedon | Bristol | BS21 6FQ | UK...
- Page 14 SMARTBENCH V1.0 Update EasyCut software To complete the EasyCut setup, update the software. In doing this you’ll get the benefit of the following updates: Additional functionality to improve our customers user experience Virtual jig (from Q3 2019) Cutting apps (from Q4 2019)...
- Page 15 From the Lobby screen press to go to CAD/CAM operation Press the home button. The home button will appear on all screens Wait for SmartBench to home. Unit 1 Westfield Court | Barns Ground | Clevedon | Bristol | BS21 6FQ | UK...
-
Page 16: Step 12 - Open A File
SMARTBENCH V1.0 Step 12 – Open a file Go to Job screen (1) Press the file explorer (2) Choose your file (1) Accept your file choice (2) For full details on file transfer/loading go to the EasyCut user manual Unit 1 Westfield Court | Barns Ground | Clevedon | Bristol | BS21 6FQ | UK... - Page 17 SMARTBENCH V1.0 Set X/Y datum (start point for the job) The X/Y datum refers to the point at which the job will start. This is set by moving the cutter to the intended point, and telling EasyCut when you are happy with the position.
- Page 18 SMARTBENCH V1.0 Now check that your job location fits within SmartBench’s bounds: Go to Map screen (1) Make sure the X/Y Datum (2) is in the right position and your job does not reach beyond the extents of the X/Y space....
- Page 19 SMARTBENCH V1.0 Set Z datum (start point for the job) Once the X/Y datum is defined, the tip of the router cutter needs to be registered relative to the material. This is referred to as setting the Z datum, and should be done near the X/Y datum.
- Page 20 SMARTBENCH V1.0 Now you need to place the cutter at the height you want your Z datum (typically either the top or bottom surface of the material, depending on the job). To set the Z height with the Z probe: •...
- Page 21 SMARTBENCH V1.0 Run job To run your job, press the play button (1) • Confirm you wish to run your file by pressing the ‘GO’ button (1) For more details on EasyCut, please download the full EasyCut user manual www.yetitool.com/support/downloads Unit 1 Westfield Court | Barns Ground | Clevedon | Bristol | BS21 6FQ | UK Tel No: +44 1275 390721 | Email: support@yetitool.com...
- Page 22 SMARTBENCH V1.0 Support If you require any support, please visit our website and raise a support ticket. www.yetitool.com/support/submit-a-ticket Unit 1 Westfield Court | Barns Ground | Clevedon | Bristol | BS21 6FQ | UK Tel No: +44 1275 390721 | Email: support@yetitool.com...
Need help?
Do you have a question about the SMARTBENCH and is the answer not in the manual?
Questions and answers