Table of Contents
Advertisement
Quick Links
Advertisement
Chapters
Table of Contents

Summary of Contents for EZDigiMagic DM220-D08E
- Page 1 Portable Photo & Video Backup DVD Burner User’s Manual For Model: DM220-D08E...
-
Page 3: Table Of Contents
Table of Contents 1. Introduction .............. P.2 1-1.Basic Configuration..........P.2 1-2.Product Features............. P.2 2. Product Tour ............. P.3 2-1.Front Bezel............. P.3 2-2.Top Beze..............P.4 2-3.Rear Panel............... P.5 2-4.Battery Compartment..........P.6 2-5.Car Power Adapter Kit (Optional)......P.7 3. Menu Instruction ............P.8 3-1.LCD Display............. -
Page 4: Introduction
There’s now no need to worry about your camera’s memory media not having enough capacity when you’re on the go. Additionally, your unit can be connected to a PC and be used as an external DVD/CD burner. EZDigiMagic makes digital photography EZ! -
Page 5: Product Tour
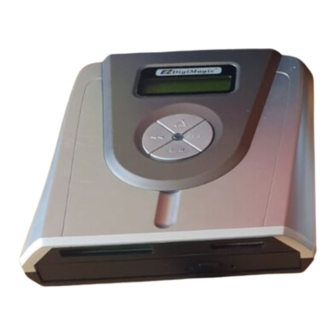
2. Product Tour 2-1. Front Bezel Figure 1 (1) DVD Burner: Press top Eject button in order to release DVD tray. Place blank DVD or CD disc in tray and close tray by sliding it back into operating position. (2) CF Card Slot: CF Type I/II slot, you may insert CF card or MD 1”HDD directly into slot. - Page 6 2-2. Top Bezel Figure 2 (1) LCD display screen : Displays the operating menu & working status (2) Control Keypad: One-touch operations to control EZDigiMagic functions. Description Function Eject Eject key Disc ejects from unit Allows special selections and setting of items,...
-
Page 7: 2-3.Rear Panel
(3) LED Indicator: The green / red LED will light up as listed in table: Item Operation Setting Light Power off None System initial stage G / R Ready to Copy None / G Copy / Busy G / F Copy Error None Battery Low... -
Page 8: 2-4.Battery Compartment
Figure 4 * Important Notes Regarding Rechargeable NI-MH AA Batteries: (1) EZDigiMagic DM220 requires (4) AA Ni-MH batteries with a minimum curent of 1800 mAh. Dry cell or alkaline batteries do not meet this requirement. Typical estimated usage times for fully charged recharge able batteries with... -
Page 9: 2-5.Car Power Adapter Kit (Optional)
(6) For safety, batteries should be removed when discharged or when the EZDigiMagic is not being used. (7) NOTE: Batteries are not charged by the DM220-D08E. When powering the unit using NiMH rechargeable batteries only, the user must consider the added power drain associated with some memory cards and USB devices. -
Page 10: Menu Instruction
3. Menu Instructions 3-1 LCD Display 1. Line 1: Title or Main Menu Selection 2. Line 2 & 3: Menu Selection List (use key to navigate up/down) 3. Line 4: 4-way navigation button menu Figure 6 3-2 Icon List Description Icons Arrow Key AC Power... -
Page 11: 3-3.Menu List
3-3 Menu List Main Menu Sub-Function Function Description CF to Disc Quick copy CF Card data to disc M-Card to Disc Quick copy M-Card data to disc Copy Can select Copy All or Copy Photo, Copy Video, Copy Music, Copy Selected Folder/File Display CF Card total capacity and used CF Card capacity... -
Page 12: Operating Instructions
RIGHT arrow key ( ► ) . Figure 7 (6) Source Selection: If only one flash slot is occupied, DM220-D08E will automatic-ally detect and show the source card type in the dark background bar. If all three sources are occupied, then the source type will default to the 6-in-1 card slot. - Page 13 (7) Once the copy source is selected, press the RIGHT arrow key (►) to activate the “Copy” command and move to any of the sub-option selections: “Copy All”, “Copy Photo”, “Copy Video”, “Copy Music”, “Copy Selected Folder/Files”. (8) For most common applications, press the RIGHT arrow key (►) to execute “Copy All”...
- Page 14 (13) Once the selection process is completed, press the RIGHT arrow key (► ), the display will show the check-marked item (only one of the multiple- selected file will be shown). Press the RIGHT arrow key (►) again, the copying process will start and then the display will show <Copy Done> after completion.
-
Page 15: 4-2.File Manager
Manager”. Figure 17 (2) Source Selection: If only one slot is occupied, DM220-D08E will detect and show the source card type with a dark background bar. If all three slots are occupied, the device will default to the 5-in-1 card slot as the source. If 2 slots are occupied, the user must select the desired source for the “Copy”... -
Page 16: 4-3.Verify Session
4-3 Verify Session To verify whether the last burned session on the disc is readable or not. (1) If you need to verify the result after Copy is completed, place the disc you just burned into the disc tray and execute the menu item “3. Verify Session”. Figure 19 (2) Press the RIGHT arrow key (►) to execute the function.The display will show the status of verif cation. - Page 17 4-5 Setup Setup can display the current status of the device and allows for changes of de- faults and advanced operations that require more technical knowledge. For all Setup options listed below, use the UP/DOWN ( ) arrows to scroll through the setup options;...
- Page 18 4-5.4 Disc Burn Method: Press the RIGHT arrow key (►) to enter this function. The options “Multi Ses- sion” and “Single Session“ will appear. Select the desired option and press the RIGHT arrow key (►) again to confirm. (NOTE: if “Single Session” is selected, each blank disc can only be burned once and no additional files can be added later.) 4-5.5 Folder Name:...
- Page 19 (Memory Card, Disc or USB drive) and loaded into the EZDigiMagic by pressing the RIGHT arrow key (►) again to install the firmware update. (NOTE: This operation should be performed only if there is a need to update the firmware.)
-
Page 20: Product Application Scope
EZDigiMagic is a trademark of EZPnP Technologies Corp. All other trademarks mentioned herein are properties of their respective owners. The specifications of... -
Page 21: Fcc & Safety
(12) DO NOT use if the power cord is damaged or frayed. (13) All Cautions and Warnings on the equipment should be noted. (14) If the EZDigiMagic will not be in use for several days, disconnect the unit from the power outlets, to avoid damage by transient power surges. Remove... -
Page 22: Warranty & Technical Support
(15) Never pour any liquids into the openings; this could cause fire or electrical shock. (16) Never open the equipment. For safety reasons, the equipment should only be opened by qualifi ed service personnel. (17) If one of the following situations arises, have the equipment checked by a qualifi... - Page 24 For Technical Support Please Contact: EZPnP USA E-Mail: tech@ezpnp-usa.com (888)393-9960 EZPnP Taiwan E-Mail: service@ezpnp.com...
- Page 25 Portable Photo / Video / Music Backup DVD or Blu-ray Burner with Viewer User’s Manual For Models: DM220-P08 & DM220-BD...
- Page 27 Table of Contents 1. Introduction .............. P.2 1-1.Basic Configuration..........P.2 1-2.Product Features............. P.2 2. Product Tour ............. P.4 2-1.Front Bezel............. P.4 2-2.Top Beze..............P.5 2-3.Rear Panel............... P.6 2-4.Battery Compartment..........P.7 2-5.Car Power Adapter Kit (Optional)......P.8 3. Menu Instruction ............P.9 3-1.LCD Display.............
-
Page 28: Introduction
USB storage device directly onto a blank CD, DVD or Blu-ray (Model DM220- BD only) disc. Features like one-touch operation and stand-alone burning make using EZDigiMagic a snap. EZDigiMagic’s compact size and portability make it the perfect travel companion. There’s now no need to worry about your camera’s memory media not having enough capacity when you’re on the go. - Page 29 ● Selectable copy modes: Copy by file type [Photo/Video/Music] are supported ● Supports most major memory card formats, including high-speed and high- capacity memory cards (CF High-Speed, UDMA, SDHC, & SDXC). ● Advanced professional features including Disc Spanning and Time/Date Stamping ●...
-
Page 30: Product Tour
2. Product Tour 2-1. Front Bezel Figure 1 (1) DVD or Blu-ray (if applicable) Burner: Press top Eject button in order to release disc tray. Place blank Blu-ray, DVD or CD disc in tray and close tray by sliding it back into operating position. (2) CF Card Slot: CF Type I/II slot, you may insert CF card or MD 1”HDD directly into slot. - Page 31 2-2. Top Bezel Figure 2 (1) Color TFT Screen: Displays photo images; the operating menu; & working status (2) Control Keypad: One-touch operations to control EZDigiMagic functions. Description Function Eject Eject key Disc ejects from unit Allows special selections and setting of items,...
-
Page 32: 2-3.Rear Panel
(3) LED Indicator: The green / red LED will light up as listed in table: Item Operation Setting Light Power off None System initial stage G / R Ready to Copy None / G Copy / Busy G / F Copy Error None Battery Low... -
Page 33: 2-4.Battery Compartment
Figure 4 * Important Notes Regarding Rechargeable NI-MH AA Batteries: (1) EZDigiMagic DM220 requires (4) AA Ni-MH batteries with a minimum curent of 1800 mAh. Dry cell or alkaline batteries do not meet this requirement. Typical estimated usage times for fully charged recharge able batteries with... -
Page 34: 2-5.Car Power Adapter Kit (Optional)
(4) Batteries will discharge if they are not used for a period of time. Make sure batteries are all fully-charged before major usage. (NOTE: The amount of discharge is dependent upon make and model of the batteries; please consult battery manufacturer’s specification data). -
Page 35: Menu Instruction
3. Menu Instructions 3-1 LCD Display 1. Section 1: Title or Main Menu Selection 2. Section 2: Menu Selection List (use key to navigate up/down) 3. Section 3: 4-way navigation button menu Figure 6 3-2 Icon List Description Icons Setup Mode Battery High, Battery Low Volume 0~10 CF, M-Card, DISC, USB... -
Page 36: 3-3.Menu List
3-3 Menu List Main Menu Sub-Function Function Description CF to Disc Quick copy CF Card data to disc M-Card to Disc Quick copy M-Card data to disc USB to Disc Quick copy USB device data to disc Copy Can select Copy All or Copy Photo, Copy Video, Copy Music, Copy Selected Folder/File Copy to USB Quick copy ALL data to USB... - Page 37 Display default disc label string on the copied Disc Label disc Currently supports only English; other Language languages may be supported in special versions Auto Tray Out Set disc auto tray out when burning is finished Show Display backup counter information Backup Count Show Burner Info.
-
Page 38: Operating Instructions
4. Operating Instructions To ensure maximum usage satisfaction and extend product life, please follow the operating instructions listed below: 4-1. Stand-Alone Copy This function can quickly copy data from USB/CF/6-IN-1 slot and burn to Blu-ray/DVD/CD disc; the operating procedures are listed below: (1) Make sure the power source is connected correctly (or the batteries are fully charged). - Page 39 (7) Once the copy source is selected, press the RIGHT arrow key (►) to activate the “Copy” command and move to any of the sub-option selections: “Copy All”, “Copy Photo”, “Copy Video”, “Copy Music”, “Copy Selected Folder/Files”. (8) For most common applications, press the RIGHT arrow key (►) to execute “Copy All”...
- Page 40 (12) Compare after Burn Once “After Success” appears on the screen in setup menu 4-5, the option “Compare After Burn” can be selected by using the right arrow key (►). In this mode, the DM220-P08/BD will automatically compare data between the source and target after the burning is completed.
- Page 41 4-1-1 Copy to USB: This Function can quickly copy ALL data from CF/M-Card/ Disc to USB storage device. (1) When “Copy to USB” is selected, the copy options (“CF to USB”, “M-Card to USB”, “Disc to USB”) will be displayed.Press the RIGHT arrow key (►) for “CF to USB”...
- Page 42 4-1-2 Copy Selected: If the Copy Select sub-option is selected, then the user must use the SET key to select the files or folders for copying. (1) Use the UP/DOWN arrow key ( ) to move to the item selected, press the SET key to confirm selection, the selected file or folder will have a check mark.
- Page 43 (2) Source Selection: If only one flash slot is occupied, DM220-P08/BD will automatically detect and highlight the source card type with white text. If all three slots are occupied, then the source type will be default to the M-Card card slot. If two slots are inserted, then user must choose the desired source card type for the “View”...
- Page 44 4-2-1 Copy & Delete In viewing the file list of the media device, use the up/down arrow key ( ) to select the file, press the (Set/Copy) key to select and perform “copy” , “delete”, or ‘‘print’’ functions for the selected file. Figure 28 ~ 29 4-2-2 Print Before using the Print function, please make sure the USB cable is connected...
-
Page 45: 4-3.File Manager
4-3 File Manager File Manager enables the user to browse the media currently available on DM220-P. The user may check file sizes, delete, or copy files. 4-3.1 Operating Instructions (1) From the main menu, use the UP/DOWN arrow keys ( ) to select “3. File Manager”. - Page 46 (2) Once the desired item is selected, press the SET button. The menu will show choices for “Copy” and “Delete”. Use the UP/DOWN ( ) arrow key to make the selection. (3) If “Copy” is selected, the copy options (“Copy to USB”, “Copy to CF”, “Copy to disc”, “Copy to M-Card”) will be displayed.
- Page 47 4-4 Compare Compare data of the latest backup on the disc with the original data on the flash card or the USB device. Figure 40 ~ 41 4-5 Setup Setup can display the current status of the device and allows for changes of de- faults and advanced operations that require more technical knowledge.
- Page 48 Figure 43 4-5.2 Daylight Saving Time: This function enables the setup of the start and end dates of daylight saving time. After entering this function, select “ Enable ” and “ On “, then use up/down arrow key ( ) to change the dates in mm/dd format. Figure 44 (1) Select (“Enable“) to enter the setup.
- Page 49 (2) After the DST is enabled, the start time of the daylight saving time can be entered by selecting Start Time from the DST setup menu and pressing the right arrow key (►). The date can be changed by using the up/down arrow key ( ).
- Page 50 4-5.4 TV Out NTSC/PAL: Press the RIGHT arrow key (►) to enter this function. The display will show choices for NTSC or PAL format. Use the UP/DOWN key ( ) to move to the desired choice and press the RIGHT arrow key (►) to confi rm the selection. Figure 52 4-5.5 Slide Show Timing: Press the RIGHT arrow key (►) to enter this function.
- Page 51 4-5.8 Folder Name: Press the RIGHT arrow key (►) to enter this function. The display will show the folder name used when the folder is created. 4-5.9 Disc Label: Press the RIGHT arrow key (►) to enter this function. The display will show the name label of the disc when it was created.
- Page 52 firmware version number. If needed, the new firmware can be saved onto any media (Memory Card, CD or USB drive) and loaded into the EZDigiMagic by pressing the RIGHT arrow key (►) again to install the firmware update.
-
Page 53: 4-6.1.Tv-Out
* PERFORMANCE NOTE: To optimize the copy performance of your flash memory card with the EZDigiMagic DM220-P08/BD unit, it is recommended that users backup their photos, and then re-format the flash memory cards, in the camera, on a regular basis. Please refer to your camera user’s manual for re-formatting instructions. - Page 54 (2) After the TV is connected, the TV's video source should be switched to select the ”Video-in port”, or be placed in ”A/V mode”. Then, the DM220-P08/ BD unit should be turn on. The DM220-P08/BD operating menu should now appear the TV screen. Operating the DM220-P08/BD in this mode is identical to the stand-alone operation method, and can be navigated using the keypad or the remote control.
- Page 55 4-6.2 Illustration of the key functions on remote control Figure 64 Keys: Line (1) 1.1 Eject: Disc ejects from unit 1.2 Source: Select play source 1.3 「+」 : Increase audio volume 1.4 Zoom In: Zoom in picture; shows more detail (TFT only) Line (2) 2.1 Set/Copy: Allows special selections and setting of items, also works as Quick Copy...
- Page 56 Line (3) 3.1 Delete File: The selected item will be deleted from the folder (applicable only for files in USB, CF, and M-Card media.) 3.2 Up Key (▲): Navigate up a menu or increase a value when setting a selection. 3.3 Mute: When playing video files, this button can mute the sound (if L &...
-
Page 57: Product Application Scope
EZDigiMagic is a trademark of EZPnP Technologies Corp. All other trademarks mentioned herein are properties of their respective owners. The specifications of the product are subject to change without any prior notice. -
Page 58: 6-2.Fcc Warning
(12) DO NOT use if the power cord is damaged or frayed. (13) All Cautions and Warnings on the equipment should be noted. (14) If the EZDigiMagic will not be in use for several days, disconnect the unit from the power outlets, to avoid damage by transient power surges. Remove batteries from compartment. -
Page 59: Warranty & Technical Support
(d) The equipment has not worked well or you can not get it to work according to the user’s manual. (e) The equipment was dropped and damaged. (f) If the equipment has obvious signs of damage. (18) DO NOT store the product in environments where the temperature can reach above 60°C (140°F);... - Page 61 For Technical Support Please Contact: EZPnP USA E-Mail: tech@ezpnp-usa.com (888)393-9960 EZPnP Taiwan E-Mail: service@ezpnp.com...
- Page 62 Portable Photo & Video Backup DVD Burner User’s Manual For Models: DM220-U Series...
- Page 64 Table of Contents 1. Introduction .............. P.2 1-1.Basic Configuration..........P.2 1-2.Product Features............. P.2 2. Product Tour ............. P.4 2-1.Front Bezel............. P.4 2-2.Top Beze..............P.5 2-3.Rear Panel............... P.6 2-4.Battery Compartment..........P.7 2-5.Car Power Adapter Kit (Optional)......P.8 3. Menu Instruction ............P.9 3-1.LCD Display.............
-
Page 65: Introduction
There’s now no need to worry about your camera’s memory media not having enough capacity when you’re on the go. Additionally, your unit can be connected to a PC and be used as an external DVD/CD burner. EZDigiMagic makes digital photography EZ! - Page 66 ● Selectable copy modes: Copy by file type [Photo/Video/Music] are supported ● Advanced professional features including Disc Spanning and Time/Date Stamping ● Back-lit LCD display allows function settings to be read easily...
-
Page 67: Product Tour
2. Product Tour 2-1. Front Bezel Figure 1 (1) DVD Burner: Press top Eject button in order to release DVD tray. Place blank DVD or CD disc in tray and close tray by sliding it back into operating position. (2) CF Card Slot: CF Type I/II slot, you may insert CF card or MD 1”HDD directly into slot. - Page 68 2-2. Top Bezel Figure 2 (1) LCD display screen : Displays the operating menu & working status (2) Control Keypad: One-touch operations to control EZDigiMagic functions. Description Function Eject Eject key Disc ejects from unit Allows special selections and setting of items,...
-
Page 69: 2-3.Rear Panel
(3) LED Indicator: The green / red LED will light up as listed in table: Item Operation Setting Light Power off None System initial stage G / R Ready to Copy None / G Copy / Busy G / F Copy Error None Battery Low... -
Page 70: 2-4.Battery Compartment
Figure 4 * Important Notes Regarding Rechargeable NI-MH AA Batteries: (1) EZDigiMagic DM220 requires (4) AA Ni-MH batteries with a minimum current of 1800 mAh. Dry cell or alkaline batteries do not meet this requirement. Typical estimated usage times for fully charged recharge able batteries with... -
Page 71: 2-5.Car Power Adapter Kit (Optional)
NOT recommended.) (6) For safety, batteries should be removed when discharged or when the EZDigiMagic is not being used. (7) NOTE: Batteries are not charged by the DM220-U. When powering the unit using NiMH rechargeable batteries only, the user must consider the added power drain associated with some memory cards and USB devices. -
Page 72: Menu Instruction
3. Menu Instructions 3-1 LCD Display 1. Line 1: Title or Main Menu Selection 2. Line 2 & 3: Menu Selection List (use key to navigate up/down) 3. Line 4: 4-way navigation button menu Figure 6 3-2 Icon List Description Icons Arrow Key AC Power... -
Page 73: 3-3.Menu List
3-3 Menu List Main Menu Sub-Function Function Description CF to Disc Quick copy CF Card data to disc M-Card to Disc Quick copy M-Card data to disc USB to Disc Quick copy USB device data to disc Copy Can select Copy All or Copy Photo, Copy Video, Copy Music, Copy Selected Folder/File Copy to USB Quick copy ALL data to USB... - Page 74 Show Burner Info. Show burner model version Show system model Firmware & Hardware Show System Info. versions Format CF,SD,MMC,XD,MS cards & USB Format storage device Setup Erase Disc Erase CD-RW,DVD+RW,DVD-RW disc Update Firmware Update system firmware Compare after Set compare after burn to “After Success or Burn Never“...
-
Page 75: Operating Instructions
4. Operating Instructions To ensure maximum usage satisfaction and extend product life, please follow the operating instructions listed below: 4-1. Stand-Alone Copy This function can quickly copy data from USB/CF/6-IN-1 slot and burn to DVD/CD disc; the operating procedures are listed below: (1) Make sure the power source is connected correctly (or the batteries are fully charged). - Page 76 (7) Once the copy source is selected, press the RIGHT arrow key (►) to activate the “Copy” command and move to any of the sub-option selections: “Copy All”, “Copy Photo”, “Copy Video”, “Copy Music”, “Copy Selected Folder/Files”. (8) For most common applications, press the RIGHT arrow key (►) to execute “Copy All”...
- Page 77 (13) Once the selection process is completed, press the RIGHT arrow key (► ), the display will show the check-marked item (only one of the multiple- selected file will be shown). Press the RIGHT arrow key (►) again, the copying process will start and then the display will show <Copy Done> after completion.
-
Page 78: 4-2.File Manager
4-2 File Manager File Manager enables the user to browse the media currently available on DM220-U. The user may check file sizes, delete, or copy files. 4-2.1 Operating Instructions (1) From the main menu, use the UP/DOWN arrow keys ( ) to select “2. File Manager”. - Page 79 (2) Once the desired item is selected, press the SET button. The menu will show choices for “Copy” and “Delete”. Use the UP/DOWN ( ) arrow key to make the selection. (3) If “Copy” is selected, the copy options (“Copy to USB”, “Copy to CF”, “Copy to disc”, “Copy to M-Card”) will be displayed.
-
Page 80: 4-3.Verify Session
4-3 Verify Session To verify whether the last burned session on the disc is readable or not. (1) If you need to verify the result after Copy is completed, place the disc you just burned into the disc tray and execute the menu item “3. Verify Session”. Figure 22 (2) Press the RIGHT arrow key (►) to execute the function.The display will show the status of verification. - Page 81 4-5 Setup Setup can display the current status of the device and allows for changes of de- faults and advanced operations that require more technical knowledge. For all Setup options listed below, use the UP/DOWN ( ) arrows to scroll through the setup options;...
- Page 82 4-5.2 D.S.T: This function enables the setup of the start and end dates of daylight saving time. After entering this function, select Enable and On, then use UP/DOWN arrow key ( ) to change the dates in mm/dd format. Figure 28 (1) Select Enable to enter the setup.
- Page 83 4-5.3 Date / Time: Press the RIGHT arrow key (►) to enter this function. The display will show the current date and time. If changing the date/time is desired, press the SET key. The field to be changed will be shown as a darkened block. Use the RIGHT arrow key (►) to move to the desired selection and use the UP/DOWN arrow key ( ) to adjust values.
- Page 84 (Memory Card, Disc or USB drive) and loaded into the EZDigiMagic by pressing the RIGHT arrow key (►) again to install the firmware update. (NOTE: This operation should be performed only if there is a need to...
- Page 85 Figure 39 * PERFORMANCE NOTE: To optimize the copy performance of your flash memory card with the EZDigiMagic DM220-U unit, it is recommended that users backup their photos, and then re- format the flash memory cards, in the camera, on a regular basis. Please refer to your camera user’s manual for re-formatting instructions.
-
Page 86: Product Application Scope
EZDigiMagic is a trademark of EZPnP Technologies Corp. All other trademarks mentioned herein are properties of their respective owners. The specifications of the product are subject to change without any prior notice. -
Page 87: 6-2.Fcc Warning
(12) DO NOT use if the power cord is damaged or frayed. (13) All Cautions and Warnings on the equipment should be noted. (14) If the EZDigiMagic will not be in use for several days, disconnect the unit from the power outlets, to avoid damage by transient power surges. Remove batteries from compartment. -
Page 88: Warranty & Technical Support
(d) The equipment has not worked well or you can not get it to work according to the user’s manual. (e) The equipment was dropped and damaged. (f) If the equipment has obvious signs of damage. (18) DO NOT store the product in environments where the temperature can reach above 60°C (140°F);... - Page 90 For Technical Support Please Contact: EZPnP USA E-Mail: tech@ezpnp-usa.com (888)393-9960 EZPnP Taiwan E-Mail: service@ezpnp.com...
Need help?
Do you have a question about the DM220-D08E and is the answer not in the manual?
Questions and answers