Table of Contents
Advertisement
Quick Links
Hyris Ltd
_________________________________________
Hyris Headquarters
Lower Ground Floor, One George Yard,
EC3V 9DF, London UK
Phone:
+44.2036082968
Mail:
office.uk@hyris.net
_________________________________________
Hyris Research Center
Corso Garibaldi, 60
20121 Milano, Italy
Phone:
+39.02.82951302
Mail:
office@hyris.net
_________________________________________
Hyris Asia Pac
38 Ang Mo Kio Industrial Park 2 #02-07A
569511 Singapore
Phone:
+65.8160.7207
Mail:
office.uk@hyris.net
_________________________________________
www.hyris.net
bCUBE® 2.0 Quick Start Guide
London, September 2019
Hyris Platform guide
Version 1.2.5
Advertisement
Table of Contents

Related Manuals for HYRIS bCUBE 2.0


Summary of Contents for HYRIS bCUBE 2.0
- Page 1 London, September 2019 bCUBE® 2.0 Quick Start Guide Hyris Platform guide Version 1.2.5 Hyris Ltd _________________________________________ Hyris Headquarters Lower Ground Floor, One George Yard, EC3V 9DF, London UK Phone: +44.2036082968 Mail: office.uk@hyris.net _________________________________________ Hyris Research Center Corso Garibaldi, 60 20121 Milano, Italy Phone: +39.02.82951302...
- Page 2 Reproduction of this document, either in printed or electronics form, is prohibited without the permission of Hyris Ltd. Information in this document is subject to change without notice. Hyris Ltd assumes no responsibility for any incorrect information that may appear in this document.
-
Page 3: Table Of Contents
September 2019 bCUBE® 2.0 Quick Start Guide - Hyris Platform guide - Version 1.2.5 Index Hyris bCUBE® 2.0 ............................ 4 Box Opening ............................4 Device Overview ..........................5 Status LEDs ............................6 First set up .............................. 8 PC settings ............................8 bCUBE®... -
Page 4: Hyris Bcube® 2.0
Output: 12V DC 5A Power: 60W o USB stick with Hyris bPANEL software installer and User Manuals (Figure 1d) Note: Please check the presence of all these items. Remove the items carefully from the shipping box and inspect them for any external damage. If any of the parts is missing or... -
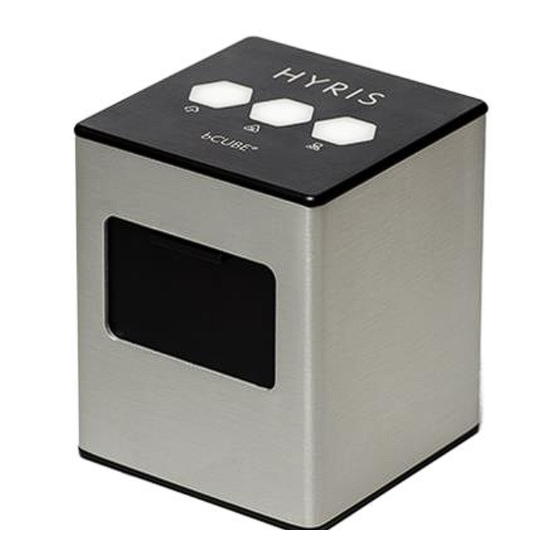
Page 5: Device Overview
September 2019 bCUBE® 2.0 Quick Start Guide - Hyris Platform guide - Version 1.2.5 Device Overview... -
Page 6: Status Leds
September 2019 bCUBE® 2.0 Quick Start Guide - Hyris Platform guide - Version 1.2.5 Description of the features highlighted in the pictures above: o Access Port Slider: opened to insert/remove the cartridge inside bCUBE® 2.0. To be kept closed during operations. - Page 7 September 2019 bCUBE® 2.0 Quick Start Guide - Hyris Platform guide - Version 1.2.5 cartridge is inserted, it can be safely handled o Connection LED: corresponding to the symbol, it indicates the internet connection state of the bCUBE® 2.0 Ready colour: blue When ready colour is on, bCUBE®...
-
Page 8: First Set Up
September 2019 bCUBE® 2.0 Quick Start Guide - Hyris Platform guide - Version 1.2.5 Connection LED blinking Missing network red and yellow connection bDATA® LED blinking Missing bDATA® green and yellow connection Thermal LED steady Cartridge not hot orange Network connection Connection LED steady OK. - Page 9 11. When all the desired Wi-Fi networks are saved, go back to the bAPP and unplug the Ethernet cable from the bCUBE®. After some seconds, the Status LEDs should show the Hyris Ready colours . If not, check the troubleshooting section on the Owner’s manual.
-
Page 10: Interacting Bcube® 2.0: Bapp And Bpanel
2.0 Quick Start Guide - Hyris Platform guide - Version 1.2.5 Interacting bCUBE® 2.0: bAPP and bPANEL bCUBE® 2.0 can be controlled and monitored with two Hyris tools: bAPP and bPANEL. o bAPP: it’s a web app software and there’s no need to install it on the PC. Ready-to-use recipes or custom recipes (see dedicated section) can be used to create and run analyses on the available devices according to the account permissions. -
Page 11: Create A New Analysis: General Information
September 2019 bCUBE® 2.0 Quick Start Guide - Hyris Platform guide - Version 1.2.5 o Tab View Area: content is related to the selected Main Menu section 3. After the Main Window is displayed, Login is required. Insert your email and password, which are corresponding to the credentials used to register the user to the Hyris Ltd web site or the bAPP. - Page 12 September 2019 bCUBE® 2.0 Quick Start Guide - Hyris Platform guide - Version 1.2.5 Custom recipe choice In case of disabled “bKITs” option: 1. Select the desired Swarm among the list. In case only one available swarm for the user, it will be automatically selected.
-
Page 13: Create A New Analysis: The Cartridge
September 2019 bCUBE® 2.0 Quick Start Guide - Hyris Platform guide - Version 1.2.5 Note: Each VERSION of the bKIT is associated with a specific Global Recipe. Verify that the selected bKIT and its Version match the part number and version reported on the package. - Page 14 September 2019 bCUBE® 2.0 Quick Start Guide - Hyris Platform guide - Version 1.2.5 2. Wells can be deleted (press the linked to the desired well), modified or added. In this last case: a) Click on the desired well on the cartridge model on the right, according to the loaded...
-
Page 15: Analysis Details
September 2019 bCUBE® 2.0 Quick Start Guide - Hyris Platform guide - Version 1.2.5 You can then add a new well by repeating this procedure or click on If the “Launch now” option is selected, a new window will open. Select the desired bCUBE® among the available devices. - Page 16 September 2019 bCUBE® 2.0 Quick Start Guide - Hyris Platform guide - Version 1.2.5 WARNING Make sure the previews command has been executed by bCUBE® 2.0 before sending a new command. STEPS tab All analysis steps are listed in this tab.
- Page 17 September 2019 bCUBE® 2.0 Quick Start Guide - Hyris Platform guide - Version 1.2.5 RESULTS Tab In this tab a graphic representation of the selected cartridge is shown. After the analysis is completed, each sample is marked with a label indicating the result of the experiment (if specified in the recipe).
-
Page 18: Bpanel 2.0 Interface
Installation Open the bPANEL 2.0 installer located in the provided USB. 1) Insert into an available USB port the Hyris® USB Stick containing bPANEL installer. 2) Launch the file Setup.msi, located inside bPANEL folder. 3) On the welcome screen, click on Next. -
Page 19: Settings: Log In/Sync And Bcube® 2.0 Connection
Go to “Settings” tab: 1. Click on 2. Insert your email and password, which are corresponding to the credentials used to register the user to the Hyris Ltd web site (same as used credential to access the bAPP. See Access the bAPP... -
Page 20: New Analysis Creation
September 2019 bCUBE® 2.0 Quick Start Guide - Hyris Platform guide - Version 1.2.5 3. Click on . After the operation completion, the available bCUBEs® devices will be listed in the dedicated drop-down menu. Select the desired one 4. Click on the button to connect to the selected device. -
Page 21: Run The Analysis
September 2019 bCUBE® 2.0 Quick Start Guide - Hyris Platform guide - Version 1.2.5 7. The new analysis will be created and tabs updated accordingly. The wells information are filled while compiling the selected recipe downloaded from bDATA®. 8. Wells can be deleted, modified or added. In this last case: a. - Page 22 September 2019 bCUBE® 2.0 Quick Start Guide - Hyris Platform guide - Version 1.2.5 Click on the command button and select the desired folder location among “LOCAL”, “bCUBE®” and “bDATA®”. Click on “OK” after the analysis selection. The analysis data will be loaded to...
-
Page 23: Flow Chart
September 2019 bCUBE® 2.0 Quick Start Guide - Hyris Platform guide - Version 1.2.5 Flow Chart... -
Page 24: Appendix-1: Set Bcube® 2.0 Wi-Fi From Bcubes® Menu
September 2019 bCUBE® 2.0 Quick Start Guide - Hyris Platform guide - Version 1.2.5 Appendix-1: Set bCUBE® 2.0 Wi-Fi from bCUBEs® menu If the bDATA® Status LED is showing steady green colour, bCUBE® 2.0 Wi-Fi can also be configured from “bCUBEs®” section of the bAPP. -
Page 25: Appendix-2: Custom Recipe
Appendix-2: Custom Recipe New recipes can be customized on the bAPP according to user’s permissions. If recipe customization is not allowed by user’s permissions, global recipes provided by Hyris Ltd or already existing company recipes can be used for new analyses. -
Page 26: Appendix-3: Cartridge Preparation
September 2019 bCUBE® 2.0 Quick Start Guide - Hyris Platform guide - Version 1.2.5 Appendix-3: Cartridge Preparation Load samples In order to load the samples for the experiment: 1. Place the cartridge face up on a flat and stable surface 2.
Need help?
Do you have a question about the bCUBE 2.0 and is the answer not in the manual?
Questions and answers