Advertisement
Advertisement
Table of Contents

Summary of Contents for Euro Appliances EO8060DX
- Page 1 USAGE AND CARE GUIDE PRODUCT CODE: EO8060DX...
- Page 2 USER INSTRUCTIONS GENERAL WARNINGS Read carefully all the instructions contained in this booklet. It provides you with important information regarding the safe installation, use and maintenance of the appliance as well as useful advice for getting the best out of your oven.
- Page 3 The following items are potentially dangerous, and therefore, appropriate measures must be taken to prevent children and the disabled from coming into contact with them: Controls and the appliance in general; Packaging (bags, polystyrene, nails, etc.); The appliance immediately after use of the oven or grill due to the heat generated; The appliance when no longer in use (potentially dangerous parts must be made safe).
-
Page 4: Indicator Lights
Service Canters authorized by the manufacturer must be contacted in the following cases: If in doubt about the soundness of the appliance after removing it from the packaging; If the power supply cord has been damaged or needs to be replaced; If the appliance breaks down or functions poorly;... -
Page 5: Installing The Appliance
INSTALLING THE APPLIANCE IMPORTANT:Unplug your oven before performing installation or maintenance! Installation should be carried out according to the instructions by a professionally qualified person. The manufacturer declines all responsibility for any damage to persons, animals or things due to a wrong installation. - Page 6 WARNING: THIS APPLIANCE MUST BE EARTHED - Check that the power rating of the mains supply and of the sockets are suitable for the maximum power of the appliance as indicated on the specification plate. - plug should be accessible after installation. Fit the plug into a socket fitted with a third contact which corresponds with the earth connection.
-
Page 7: Control Panel
Control Panel Top oven + main oven: 4 functions + 8 functions (without rotisserie) Top Oven Functions The oven offers a bacis choice between two type of cooking: A) conventional oven cooking B) grill (infrared radiant heat) Selector functions: Pls read functions according to your oven model. Top outside+bottom heating element Both the lower and upper heating elements operate together. - Page 8 Main Oven Functions The oven offers a bacis choice between two type of cooking: A) conventional oven cooking B) grill (infrared radiant heat) Selector functions: Pls read functions according to your oven model. Light in the oven Fan defrost The air at ambient temperature is distributed inside the oven for defrosting food more quickly and without proteins adulteration.
- Page 9 Electronic Timer Setting (Touch Timer) Operating instructions for Electronic Timer (3 keys) Before using for the first time Setting and changing the current time The oven only operates when the time has been set. When the appliance has been connected to the electrical supply or when there has been a power cut, the function indicator Time...
-
Page 10: Clock Functions
Clock Functions Function Indicators Time display Function Indicators S T O P Button Button Selector Button Countdown To set a countdown, a signal sounds after the time has elapsed. This function does not affect the operation of the oven. Cook time To set how long the oven is to be in use. - Page 11 How to use the clock functions When a function has been selected, the corresponding function indicator flashes for approx. 5 seconds. During this time the desired times can be set using the button. When the desired time has been set, the function indicator flashes for approx. another 5 seconds. After that the function indicator is then lit.
- Page 12 Countdown 1. Press Selection button repeatedly, until the function indicator Countdown flashes. S T O P S T O P 2. Using the button, set the required Countdown (m ax. 2 hours 30 minutes). S T O P After approx. 5 seconds, the display shows the remaining time.
- Page 13 Cook time 1. Press Selection button repeatedly, until the function indicator Cook time flashes. S T O P 2. Using the button, set the required cooking time. S T O P After approx. 5 seconds, the display returns to the current time. The function indicator Cook time will light up.
- Page 14 End time S T O P 1. Press Selection button repeatedly, until S T O P the function indicator End time flashes. S T O P 2. Using the button, set the required switch-off time. S T O P After approx. 5 seconds, the display returns to the current time.
- Page 15 Technical Data Dimension height 888mm width 595mm depth 546mm usable volume 42 + 60 litres Model Multifunction oven TOP oven Rated Voltage 220-240V nominal electrical input in W (toll. +5 / -10%) Top outside heating element 750W Top inside heating element 1000W Bottom heating element 1050W...
- Page 16 COOKING TABLE FOR TOP OVEN - CONVENTIONAL COOKING IN HEATING SYSTEM WITH TOP AND BOTTOM HEATERS OPERATING. It is recommended to preheat the oven 10 min. DISHES LEVEL TEMPERATURE COOKING TIME Yorkshire Puddin 200°C 30 - 40 min Fatless Sponge Cake 180°C 25 - 30 min Small Cakes...
-
Page 17: Using The Ovens
USING THE OVENS Set the selector for the type of cooking required. Preheat the oven, setting the thermostat to the required temperature. Once the oven has heated to the selected temperature, the orange warning light will go out. This same light will appear again automatically during operation of the oven to indicate that the heating elements are on. -
Page 18: Roasting Guide
ROASTING GUIDE - Frozen meat should be thoroughly thawed before cooking. For large joints it is advisable to thaw overnight. - Frozen poultry should be thoroughly thawed before cooking, the time required depends on the size of the bird e.g. a large turkey may take up to 48 hours to thaw. - Adjust the shelf position so the meat or poultry will be in the centre of the oven. - Page 19 How to keep Your Oven in Shape This appliance is for household use only, don’t use it outdoors! Important: Unplug your oven before cleaning, or performing maintenance! To extend the life of your oven, it must be cleaned frequently, keeping in mind that: Do not uses steam equipment to clean the appliance.
- Page 20 WARNING: Ensure that the appliance is unplugged before replacing the lamp to avoid the possibility of electric shock. Warning: Do not operate appliance with damaged cord or plug or after the apliance malfunctions, or has been damaged in any manner, return appliance to the nearest Authorized Service Center for exanmination. Repair, or adjustment! USEFUL NOTES FOR COOKING In the following table, some indicative hints for cooking:...
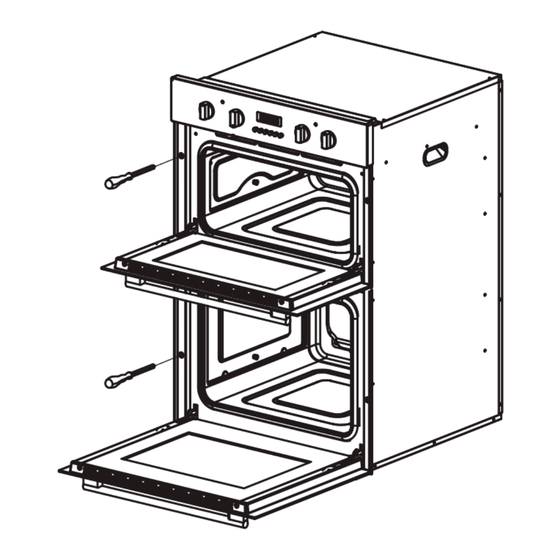
- Page 21 Disassembling/assembling the oven door To make it easier to clean the inside of your oven, the oven door can be removed, by proceeding as follows (fig. 11): Open the door completely and lift the 2 levers “B” (fig.11-1); Now, shutting the door slightly, you can lift it out by pulling out the hooks “A” as shown in figure 2. To reassemble the door: With the door in a vertical position, insert the two hooks “A”...
- Page 22 Step 1 Step 2 Step 3 Step 4 Fitting Oven Shelves 1.Ensure shelf orientation is correct(refer picture below) 2.Slide into oven at an angle until raised back of shelf is past the stop on side runners. 3.Lower front of shelf and push in until stop is reached.
Need help?
Do you have a question about the EO8060DX and is the answer not in the manual?
Questions and answers