
Summary of Contents for Neostar KB111
- Page 1 Knightsbridge 4‐in‐1 Music Centre KB111 Customer Helpline 0845 555 4440 Please keep these instructions in a safe place for future reference. ...
-
Page 2: Table Of Contents
Table of Contents IMPORTANT SAFETY INSTRUCTIONS FOR AUDIO PRODUCTS ............ 3 PRODUCT OVERVIEW ........................ 5 SETUP / BASIC OPERATION ........................ 8 REMOTE CONTROL .......................... 9 REMOTE CONTROL BUTTON FUNCTIONS .................. 1 0 LISTENING TO A VINYL RECORD ...................... 1 1 LISTENING TO THE RADIO ....................... 1 1 LISTENING TO A CD ......................... 1 2 LISTENING TO A TAPE ........................ 1 5 LISTENING TO AN EXTERNAL AUDIO DEVICE (AUX MODE) ............. 1 5 RECORDING TO A CD‐R/CD‐RW ....................... 1 6 FINALIZE A DISC ... - Page 3 The lightning flash with CAUTION: TO PREVENT RISK The exclamation mark within arrowhead symbol, within an OF ELECTRIC SHOCK, DO NOT an equilateral triangle is equilateral triangle, is REMOVE COVER (OR BACK). intended to alert user to the intended to alert user to the NO ...
-
Page 4: Important Safety Instructions For Audio Products
IMPORTANT SAFETY INSTRUCTIONS FOR AUDIO PRODUCTS 1. Read, heed and follow all instructions before operation. 2. Keep this manual in a safe place for future reference. 3. The apparatus should not be exposed to dripping or splashing, and no objects filled with liquids such as vases, shall be placed on the apparatus. 4. Unplug this product from the wall outlet before cleaning. Clean only with a dry cloth. 5. Choose unit installation location carefully. Avoid placing it in direct sunlight or close to a source of heat. Also avoid locations subject to vibrations and excessive dust, cold or moisture. ... - Page 5 Unplug this product from the mains supply, call 0845 555 4440 for advice under the following conditions: If the power‐supply cord or plug is damaged; If liquid has spilled, or objects have fallen into the product; If the product has been exposed to rain or water; If the product does not operate normally by following the operating instructions; If the product has been dropped or damaged in any way, and the product exhibits a distinct change in performance‐this indicates a need for service; If replacement parts are required; Upon completion of any service or repairs to this product, ask the service technician to perform safety checks to determine that the product is in proper operating condition. CAUTION: ...
-
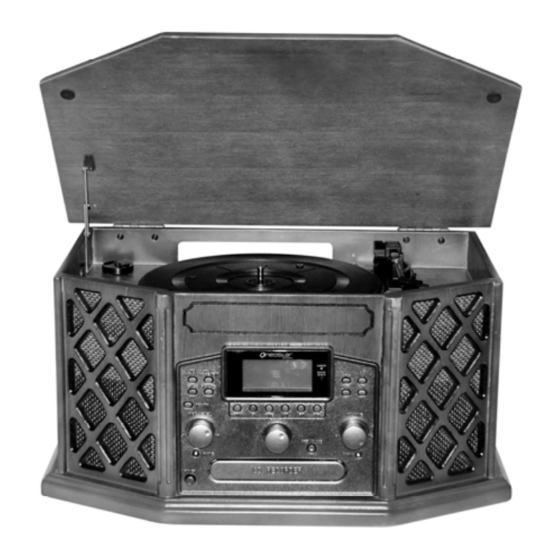
Page 6: Product Overview
PRODUCT OVERVIEW (Front Panel) 1. RECORD BUTTON Press to enter record pause mode or enter copy mode. 2. ERASE BUTTON Press to erase or unfinalize a CD‐RW disc. 3. AUTO/MANUAL BUTTON Press to select mode of track number assignment for recording. 4. FINALIZE BUTTON Press to finalize a CD‐R / CD‐RW disc. 5. TRACK INCREMENT BUTTON During recording, press to separate tracks. 6. LCD DISPLAY 7. TUNING INDICATOR Illuminates to indicate the tuning status. 8. REMOTE SENSOR When using the remote control, point it towards this sensor. 9. STOP BUTTON Press to stop playback or recording. 10. FAST REWIND BUTTON In CD mode, press to skip to the previous track. Press and hold to fast rewind. 11. PLAY/PAUSE BUTTON Press to start playback, recording, finalizing or erasing. During playback, press again to pause. 12. FAST FORWARD BUTTON In CD mode, press to skip to the next track. Press and hold to fast forward. 13. SOURCE BUTTONS (PHONO, CD, TAPE, AM, FM, AUX) Press the corresponding button to select a source. ... - Page 7 21. VOLUME KNOB Turn to adjust volume. 22. AUX‐IN SOCKET Accepts 3.5mm AUX IN (or LINE IN) plug of an external source. (Side Panel) 23. FF/EJECT BUTTON Press halfway to fast forward, press all the way to end to eject the tape. 24. CASSETTE DECK (Rear Panel) 25. LINE IN SOCKETS For audio source with RCA jacks, plug one end of the RCA cable into these sockets and other into the audio source. Be sure to connect the white plug to the white socket (left) and the red plug to the red socket (right). 26. SPEAKER OUT SOCKETS Accepts the RCA plugs of the external speakers. Note: The external speakers should be 8 ohms 2.5 watts. (Additional matching speakers are available separately – please call 0845 555 4440 for more details.) 27. POWER CORD Plugs into a wall outlet. 28. FM ANTENNA While tuned to a station in FM mode, extend the wire and reposition to adjust for best reception. ...
- Page 8 Remove the protective needle cover before use. Keep it in a safe place and put it on when the unit is not in use. A. TURNTABLE PLEASE NOTE: B. TRANSPORT SCREW Before using the unit, turn the screw clockwise using a coin or screwdriver. Important: When you transport the unit, turn the screw counterclockwise to secure the turntable. The silver screw on the back of the turntable is a balancer for both the turntable as well as for the ...
-
Page 9: Setup / Basic Operation
SETUP / BASIC OPERATION Setup 1. Remove any packaging materials from the unit. 2. Connect the optional external speakers to the main unit. 3. Remove the protective needle cover by gently pulling towards front of the unit, loosen transport screw (see page 7), and any other transit protection. 4. Connect the AC plug to the wall outlet. NOTE: To prevent interference, avoid bundling audio signal cables together with the AC power cord. ... -
Page 10: Remote Control
REMOTE CONTROL When using the remote control, point it towards the front panel of the unit. NOTES: Even if the remote control is operated within the effective range, remote control operation may be impossible if there are any obstacles between the unit and the remote control. If the remote control unit is operated near other devices which generate infrared rays, it may not function properly. Conversely, the other devices may not function correctly. Battery Installation 1. Remove the battery compartment cover. 2. Insert 2 “AAA” batteries. NOTE: Make sure that the batteries are inserted correctly so their polarity (“+” and “‐“) match the remote control unit’s markings. 3. Re‐fit the battery compartment cover. ... -
Page 11: Remote Control Button Functions
REMOTE CONTROL BUTTON FUNCTIONS A. OPEN/CLOSE In CD, PHONO or AUX mode, use this button to open and close the disc tray. This button does not work in FM/AM mode. B. CD Press the CD button to play a CD. C. REPEAT In CD mode, use this button to select the repeat mode for a CD. D. PROGRAM In CD mode, use this button to program tracks. E . SHUFFLE In CD mode, use this button for shuffle playback. F . DISPLAY In CD mode, use this button to change the display. G . TRACK INCREMENT During recording, use this button to divide tracks. H. MANUAL/AUTO INCREMENT Use this button to select the mode of track number assignment. I . RECORD Use this button to record CD. J . REC VOL+/REC VOL ‐ Use this button to adjust the record volume. K. ... -
Page 12: Listening To A Vinyl Record
LISTENING TO A VINYL RECORD 1. Press the PHONO button. 2. Gently open the dust cover. NOTE: Be careful not to pinch your finger when opening/closing the top cover. 3. Place a vinyl record on the turntable. When playing a 45 RPM record, use the included adaptor. 4. Select the appropriate speed. 5. Gently push tone arm holder to the right to release the tone arm. 6. Raise the cue lever to lift the tone arm off the tone arm rest. 7. Move the tone arm gently to the edge of the record (or the starting point of a track). The turntable will begin to turn. 8. Gently lower the tone arm by slowly releasing the cue lever. 9. When playback is finished, the tone arm will automatically return to its holder, and the indicator light will light up. Then the turntable will stop. To stop playback manually, slightly lift ... -
Page 13: Listening To A
LISTENING TO A CD 1. Press the CD button. 2. Press the OPEN/CLOSE button to open the tray. Load a disc on the tray with label facing up. 3. Press the OPEN/CLOSE button again to close the tray. ‘‐‐‐BUSY’ appears on the display and no button works till it disappears. NOTE: Never place more than one disc on the tray. The disc must be placed in the centre of the disc tray. Incorrect loaded discs may result in severe damage that the tray won’t open again once it has closed. Do not force the tray by hand during opening and closing operations. ... - Page 14 In Stop mode: Press skip button (FF or FR) to select a track, and press REPEAT button repeatedly to select REPEAT 1, then press the PLAY button to start playback. NOTE: If one of the following buttons is pressed, repeat mode will be cancelled: OPEN/CLOSE, PHONO, AM, FM, AUX, TAPE Repeat playback works with finalized disc only. SHUFFLE PLAYBACK To play the tracks on a CD in a random sequence, press SHUFFLE button during playback. NOTE: If you press the ( ) button during shuffle, playback will randomly select the next track. ...
- Page 15 5. Press the PROGRAM button again to set the current track. 6. “P‐02” is displayed. Repeat steps 4 and 5 to program the additional tracks. 7. When the selection of track numbers has been finished, press the PLAY button ( ) to start program playback. To cancel the program mode Press the STOP ( ) button. To check the programmed order In the stop mode, press the skip button ( or ) repeatedly to show the track numbers that have been programmed. To add a track to the end of the program ...
-
Page 16: Listening To A Tape
LISTENING TO A TAPE 1. Press the TAPE button. 2. Load an audio cassette tape into the unit (located at the side of the unit). Playback will automatically begin if the tape is fully inserted. 3. Press the CASSETTE FF/EJECT button halfway to fast forward the tape. 4. Press the CASSETTE FF/EJECT button lightly and the playback will resume. 5. Press the CASSETTE FF/EJECT button completely down to end the playback and eject the tape. LISTENING TO AN EXTERNAL AUDIO DEVICE (AUX MODE) In AUX (auxiliary) mode, the unit can play audio from an external audio source, such as personal CD player or MP3 player. There are two AUX INs (front and rear). When connecting a device that has a earphone socket, use a cable with 3.5mm plug via the front AUX IN socket. The rear set of AUX IN (/LINE IN) sockets (red and white) can be used with devices that use RCA connections (e.g. reel to reel players etc). ... -
Page 17: Recording To A Cd-R/Cd
RECORDING TO A CD‐R/CD‐RW ABOUT CD‐R AND CD‐RW DISCS 1. Record and Erase Features: Only CD‐RW discs can be recorded and erased many times. A CD‐R disc can be recorded only once. As soon as they have been recorded or finalized, they cannot be erased or re‐recorded. However, if space is available on the disc before finalized, additional material can still be recorded. 2. Compatibility A CD‐R disc can be played on the majority of audio CD players. However, certain CD‐RW discs may not compatible with certain audio CD‐players. BEFORE RECORDING Audio from PHONO, AUX and TAPE sources can be recorded on the CD recorder. PREPARE THE AUDIO SOURCE FOR RECORDING 1. Select the desired audio recording source by pressing the corresponding button (PHONO, AUX or TAPE). 2. Prepare the appropriate audio source for normal play (vinyl record, external audio device or cassette tape). 3. ... -
Page 18: Finalize A Disc
TRACK INCREMENT A new track will be assigned whenever TRACK INCREMENT button is pressed during recording. START RECORDING 1. Follow steps described above on ‘PREPARE THE AUDIO SOURCE FOR RECORDING’. 2. Press RECORD button, then ‘REC’ and symbol ‘II’ will appear on the display. NOTE: If an AUTO TRACK mode is selected, ‘AUTO TRACK’ will appear on the lower middle of the screen. 3. Adjust the recording level using the REC LEVEL knob. You can adjust on your next recording if too loud or too low. NOTE: You may test play the audio source to be recorded and adjust REC LEVEL knob to set the recording volume so that its loudest output does not exceed the ‘OVER’ indicator on the meter on the lower right of the display. 4. Press PLAY/PAUSE button to start recording. Now you are recording. 5. When the song reaches the end, or you need to skip to a next song, or flip the tape, press PLAY/PAUSE button to suspend the recording. NOTE: During recording, you may press TRACK INCREMENT button to end the current track and begin a new track. The current track number will be indicated on the display. 6. When the next song is ready, press PLAY/PAUSE button again to resume recording onto a new assigned track. NOTE: You cannot restart recording while ‘BUSY’ displays on the screen. Also, a new track will always be assigned when applying a pause or stop during recording. ... -
Page 19: Unfinalize A Cd
2. Press the PLAY ( ) button to activate and start finalizing. 3. If you wish to cancel finalizing, press the STOP button ( ). NOTE: The display will show ‘‐‐‐ BUSY’ during finalize, wait until the busy text disappears to complete the finalization. The finalize time is subject to the contents of record, it may take a few minutes in some cases. When finalization has been finished, the ‘NO TOC’ indicator will turn off and the display returns to the track/time display. Then disk will be ejected. During finalizing, no button works. ... -
Page 20: Erase All (Cd-Rw Only)
4. Press the ERASE button, ‘ERASE’ will appear on the display. NOTE: If you wish to cancel erasing at this point, press the STOP button ( ). 5. Press the ( ) button to begin erase the last track. 6. Repeat to press Erase button to continue erasing another track. NOTE: On a non‐finalized CD‐RW disc, ‘ERASE’ and the last track number appear on the display. Each time the ERASE button is pressed, the display changes as follows: ‘ERASE ‘and the last track No. ERASE ALL (CD‐RW ONLY) All erasing processes are permanent – they cannot be undone. 1. When a non‐finalilzed CD‐RW disc is inserted, hold the Erase button until the display shows ‘ERASE ALL’. NOTE: If you wish to cancel the erasing process at this point, press the STOP button ( ). 2. Press the PLAY button ( ) to start erasing. 3. ... -
Page 21: Maintenance/Proper Handling
5. ‘LOAD’ and ‘BLANK CD’ will appear on the screen and the disc tray will be ejected. Remove the original disc and place a Blank recordable CD‐R or CD‐RW disc on the disc tray. Then close the disc tray. 6. ‘‐‐‐BUSY’ will show on the display. 7. Then digits and ‘PCNT’ and ‘WRITING’ will appear in turn. Now the copy process starts automatically. Wait till the digits turn to 100. 8. When it finishes, ‘COMPLETE’ will appear on the display. And the disc will be ejected. The copy is complete. ... - Page 22 Do not use irregular shaped CD's (octagonal, heart‐shape, etc.), as they will damage the unit. Read all precautions supplied with any CD‐R or CD‐RW disc. Never handle a disc with dirty fingers. Never insert a disc that has a crack on the surface. Cassette Tape Storage Do not store tapes on top of heaters, or expose them to direct sunlight or any places where the temperature may rise. Keep tapes away from speakers, TV sets or amplifiers where the device may generate strong magnetic fields. Do not place tapes in places where it is extremely hot, dirty or dusty. Do not subject tapes to vibration or drop tapes. Loading a Cassette Tape: Do not use C‐120 tapes as they are physically weak and could become entangled in the transport mechanism. ...
- Page 23 wall outlet. Be sure to unplug the unit if you will not intend to use it for an extended period of time. How to Replace The Turntable Stylus (Needle) It is recommended that the stylus be replaced as soon as you notice a change in sound quality. Prolonged use of a worn‐out stylus may damage the record. The highest speed of 78 rpm records would wear out the stylus more quickly. Please call 0845 555 4440 to purchase new styli. Removing old stylus 1. Insert a small screwdriver at the tip of the stylus and push down in the direction “A”. 2. Remove the stylus by pulling it forward and down. Installing a new stylus 1. Hold the tip of the stylus and insert the other edge by pressing in the direction “B”. 2. Push up the direction “C” until it locks at the tip. Caution: Do not remove or bend the stylus. Do not touch the needle as it could injure your hand. Don’t let the stylus touch the turning turntable when there is no record. Turn off the unit's power before you replace the stylus. ...
-
Page 24: Troubleshooting Guide
TROUBLESHOOTING GUIDE In case of trouble with the unit, please look through this chart and see if you can solve the problem by yourself before calling the manufacturer on 0845 555 4440. Problem Cause Solution Power does not come on Connect the unit to the AC when the power switch is Unit is unplugged. ... -
Page 25: Specifications
SPECIFICATIONS AMPLIFIER section Output Power (RMS) ……….……………………… 2x5 W (internal 2x2.5W; or internal 2x2.5W + external 2x2.5W) External Speaker Impedance ……….……………………… 8 ohms Frequency Response ……….……………………… 60 TO 20, 000 Hz TUNER section FM Section Frequency Range ……….……………………… 88 to 108 MHz AM Section Frequency Range ……….……………………… 530 to 1600 KHz CASSETTE DECK section Track System ……….……………………… 4 Track, 2 channel stereo Normal Tape Speed ……….……………………… 4.8 cm/sec Wow and Flutter ……….……………………… 0.4% (WRMS) Frequency Response ………………………………... - Page 26 GUARANTEE : This product is guaranteed against manufacturing defects for a period of 12 months from date of purchases on the basis the equipment is operated in accordance with these operating instructions. Any modification to, misuse or abuse of the product will invalidate your guarantee. Your statutory rights remain unaffected. Neostar Electronics is a registered brand of T2 Direct Ltd – London A range of accessories for this equipment is available at www.technologyinthehome.com ...
Need help?
Do you have a question about the KB111 and is the answer not in the manual?
Questions and answers