
Subscribe to Our Youtube Channel
Summary of Contents for Martin-Till SmartClean
- Page 1 Installation Instructions Martin Industries LLC 206 Elk Fork Road Elkton, KY 42220 Telephone: 270-265-5817 E-Mail: martin@martintill.com www.martintill.com VERSION 05-02-19...
-
Page 2: Table Of Contents
Components introduction 1.1. Standard components 1.2. Optional components 2. Air cylinders installation 2.1. SmartClean bracket sets for different bundles 2.2. Top brackets installed on row cleaner mounts 2.3. Bottom brackets installed on row cleaner Frames 3. Plumbing box 3.1 Plumbing box overview 3.2 Plumbing box installation... -
Page 3: Components Introduction
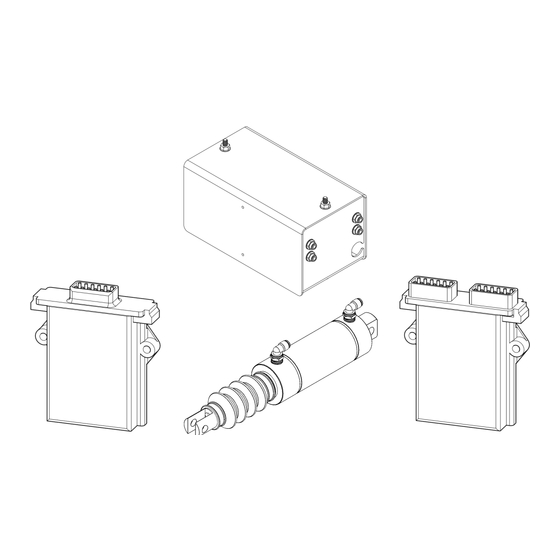
1. COMPONENTS INTRODUCTION 1.1. Standard components The following standard components are included in your Smart Clean purchase: 1. Plumbing box (SC-ASSEMBLY-1) 2. Air preparation filter/regulator (SC-FILTER) 3. Signal converter box (JCA00-015001) 4. ORIOLE controller box (JCA00-009001) 5. Planter harness (JCA86-000012) 6. -
Page 4: Smartclean Bracket Sets For Different Bundles
2.1. Smartclean bracket sets for different bundles: SC-BKW1360 SC-BD1345 SC-BD1360 SC-BKW1345 SC-1345-UMOL SC-1360-UMOL SC-1345-UMOR SC-1360-UMOR SC-BDC1360... - Page 5 , and are installed as shown in the right picture. They come in right and left sets and are used with their opposite side UMO. SmartClean Bracket Set (SC-CUB-2L) Right UMO-100 and Left SmartClean Cylinder top bracket set are shown 2.3. Bottom bracket installation on row cleaner Frame: WA1345 Frame: •...
- Page 6 Use 5/16” x 1 1/4 ” bolt, 5/16” flat washer , 5/8” bushing & 5/16” nut (N516CH) • 5/8” x 1 3/4” FLANGE PATCH BOLT (B5F58NC134) 5/16” x 1 1/4” BOLT AND FLAT WASHER (B5m516NC114 &W516) Smartclean Anchor (SC-1360FR-MT-R) 5/8” BUSHING 5/16” NUT and (SC-FR-SPACER) Washer(N516 &W516) If installing the wheel in rear hole, use 5/16”...
-
Page 7: Plumbing Box
3. PLUMBING BOX 3.1 Plumbing box overview The plumbing box (SC-ASSEMBLY-1) connects wirelessly to your smart phone and allows you to control the row cleaner’s downforce by controlling the cylinder’s air pressure . The control box includes one pressure regulator valve (SC-QB1), one directional valve (SC-DIR-VALVE), signal converter box (JCA00-015001), ORIOLE controller box (JCA00-009001)), and an external air filter/regulator (SC-FILTER). - Page 8 • Use different colored tubing for the up and down circuits. Connect the box’s “Down” air out- let to either the extend or retract end of the cylinder and use the other color for the opposite end. • If your planter is equipped with airbags and you ordered the double valve plumbing box with additional airbag valve(SC-ASSEMBLY-2), connect the box’s “Airbag”...
-
Page 9: Inside The Pluming Box ( Standard Factory Plumbing)
4.2 Inside the pluming box ( Standard factory plumbing) Although you may have received a complete box , the standard factory plumbing of the valves inside the box is described here for future reference. The standard plumbing box (SC-ASSEMBLY-1), includes one pressure regulator valve ( Bank-1) and one Directional Valve, while the Double valve plumbing box (SC -ASSEMBLY-2) includes an extra pressure regulator valve ( Bank-2). - Page 10 Route2 : Tubing from Bank-1 pressure regulator outlet to directional valves main inlet Directional Valve main inlet Bank-1 pressure regulator outlet Route 2 Must inc lude at least 2 loops Route 3: Tubing from Directional valves outlets to Up and Down outlets Directional Valve retraction outlet Directional Valve extraction outlet Plumbing Box’s Up Outlet...
-
Page 11: Plumbing Box Retubing For Bi-Directional Control
Complete plumbed box is shown from left and right views in bellow pictures. Check for any leaks before closing the plumbing box cover. 4.3 Plumbing box retubing for Bi-Directional Control The bi-directional control configuration requires a 2-valve system (Part No: SC-ASSEMBLY-2). The plumbing box valve connection needs to be reconfigured as described bellow for bi- directional control. - Page 12 Step 2 : Connect the Bank-1 pressure regulator outlet to the Up Outlet as shown in the picture. Up Outlet Bank-1 pressure regulator outlet Step 3 : Connect the Bank-2 pressure regulator outlet to the Down Outlet as shown in the pic- ture.
-
Page 13: Wiring
5. WIRING: Identify the two harnesses provided for the control box wiring: Planters harness (JCA86-000012 ) with 9 connectors. • Power harness (JCA86-000011) with one connector and two ring wire-ends • Start with the planters harness. • Locate the connector labeled “CONVERTER BOX” and connect it to the provided Signal con- verter box (JCA00-015001) shown in the picture. - Page 14 • If you ordered the double valve plumbing box with additional airbag valve(SC -ASSEMBLY-2), locate the connector labeled “PRES-REG BANK-2” and connect it to the bank-2 pressure reg- ulator in the box. The bank-2 pressure regulator is the one closer to the air inlets/outlets and doesn’t have a tee connection fitting.
-
Page 15: Smart Clean App
6. SMART CLEAN APP The Martin-Till SmartClean system is controlled via an app that can be installed on iOS and An- droid devices. The app controls the system over a wireless Bluetooth connection. 6.1 Download the App Installing the Martin-Till Smart C lean V2 app on an iOS or Android mobile device is the first step. -
Page 16: Configure Your Martin-Till Smartclean
Connected Devices. 6.3 Configure your Martin-Till SmartClean The Martin-Till SmartClean can have several different configurations. The operator must se- lect the proper configuration within the app by launching the Smart Clean V2 app following the instructions below. -
Page 17: Single Valve Bank (No Air Bag)
6.4 Single Valve Bank (No Air Bag) Select the direction pressure is applied. Actual pressure value. Select the target pressure applied by clicking the up and down buttons, or the actual num- ber to manually enter a value. Connected State Not Connected State (Bluetooth: Not Connected and UP/FLOAT/ DOWN buttons are all blue) -
Page 18: Bi-Directional Control
6.6 Bi-Directional Control The bi-directional control configuration requires a 2 -valve system (Part No: SC-ASSEMBLY-2). The plumbing box valve connection needs to be reconfigured for bi-directional control as was described in section 4.3. Actual pressure value. Select the target pressure applied by clicking the up and down buttons, or the actual num- ber to manually enter a value. -
Page 19: Troubleshooting
7. TROUBLESHOOTING: Please make sure that your phone’s Bluetooth is working. All the buttons in the app get faded or their colors are changed when you touch them. Verify that your phone’s touchscreen works properly, and If you use a case or screen protector for your phone, take them off temporarily be- fore troubleshooting. - Page 20 • This template is full scale. Use it to mark drilling points. • Plumbing box dimensions are 11.5” X 6.25” X 6.25” • Use 3/8” bolts or U-bolts to install the plumbing box. (Bolts are not supplied)
- Page 21 Installation instruction addendum SC-ASSEMBLY-2 SMART CLEAN + AIR BAG CONTROL Cylinder UP connection Cylinder DOWN connection V2 to air bags (if used) Jumper tube(supplied) DC/INLET to V1 Supply air (120 PSI MAX) SC-ASSEMBLY-2 BI-DIRECTIONAL CONTROL Cylinder UP connection Cylinder DOWN connection PLUG (supplied) Supply Air (120 PSI MAX)
- Page 22 The most trusted name in no-till Established 1991 Martin Industries LLC 206 Elk Fork Road Elkton, KY 42220 Telephone: 270-265-5817 E-Mail: martin@martintill.com...
Need help?
Do you have a question about the SmartClean and is the answer not in the manual?
Questions and answers