
Related Manuals for Nexxt Xpy Series


Summary of Contents for Nexxt Xpy Series
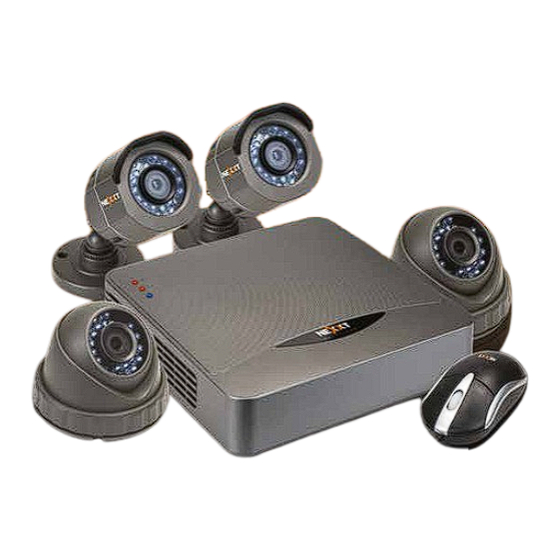
- Page 1 XpySeries XPY-8004-HD / XPY-4004-HD / XPY-4002-HD www.nexxtsolutions.com HIGH DEFINITION MULTI-CHANNEL SURVEILLANCE SYSTEMS...
- Page 2 Number Icon Description Thanks for purchasing the Nexxt Solutions standalone video surveillance system with the The power LED lights solid red when the DVR latest in HD-TVI technology. This multi-channel security DVR is an easy to install, easy to is plugged in setup and easy to use monitoring kit.
-
Page 3: Hard Drive Installation
Nexxt Solutions - Surveillance systems user guide Nexxt Solutions - Surveillance systems user guide III. Hard drive installation Next, insert the SATA interface plug into the corresponding connector on the hard drive. Then, attach the SATA power plug with the terminal on the HDD unit. -
Page 4: Hdd Storage Calculation Chart
Nexxt Solutions - Surveillance systems user guide Nexxt Solutions - Surveillance systems user guide IV. HDD storage calculation chart DVR connections –power, video, audio and network The following chart shows an estimation of storage space used, based on recording at one channel for... -
Page 5: Preliminary Steps
Nexxt Solutions - Surveillance systems user guide Nexxt Solutions - Surveillance systems user guide AC adaptor and splitter Now, you can connect the mouse on any of the two USB ports on the rear panel. The mouse is the default tool for navigating through the menus. - Page 6 Nexxt Solutions - Surveillance systems user guide Nexxt Solutions - Surveillance systems user guide 2. Language: There are three languages available in the system: English, Portuguese and Spanish. English is the language by default. Click Apply to continue. Network configuration: Defines network parameters, including the NIC type, IPv4 address, IPv4 subnet mask, default gateway, server port, etc.
-
Page 7: Live View
Nexxt Solutions - Surveillance systems user guide Nexxt Solutions - Surveillance systems user guide Camera settings: This window allows you to select the camera to be configured, enables the recorder function and the mode you wish to assign to each channel. - Page 8 Nexxt Solutions - Surveillance systems user guide Nexxt Solutions - Surveillance systems user guide 1. Record From the live view interface, the user can configure the recording settings for all channels. Menu bar display Click the Normal record icon on the menu bar to launch manual recording.
-
Page 9: Startup And Shutdown
Nexxt Solutions - Surveillance systems user guide Nexxt Solutions - Surveillance systems user guide Select the recorded files and click Export. Browse to choose the backup device and click the Export button to start the file(s) transfer, as illustrated below. The user can delete or check the saved files by clicking on the corresponding In addition, by moving the cursor to the right side of the screen, the complete list of channels icon on the right hand column. - Page 10 Nexxt Solutions - Surveillance systems user guide Notes At this final stage, you can safely unplug the DVR from the power source.
Need help?
Do you have a question about the Xpy Series and is the answer not in the manual?
Questions and answers