Advertisement
Table of Contents
- 1 Assistance and Spare Parts
- 2 Table of Contents
- 3 Important Notes and Precautions for Use
- 4 Important Notes and Precautions for Use
- 5 Description of the Appliance
- 6 Description of the Appliance
- 7 Instructions for the User
- 8 Troubleshooting
- 9 Instructions for the Installer
- 10 Instructions for the Installer
- 11 Technical Features
- Download this manual
Advertisement
Table of Contents

Summary of Contents for Astivita ASTCOOKE90
- Page 1 INSTRUCTIONS AND ADVICE FOR INSTALLING, USING AND SERVICING OF COOKERS 461307793_03/2015...
-
Page 2: Assistance And Spare Parts
The appliance was designed and made in accordance with the European standards listed below: => EN 30-1-1, EN 30-2-1 and EN 437 plus subsequent amendments (gas) => EN 60 335-1 and EN 60 335-2-6 (electrical) plus relative amendments The appliance complies with the prescriptions of the European Directives as below: =>... -
Page 3: Table Of Contents
SPACE FOR DATA LABEL CONTENTS ASSISTANCE AND SPARE PARTS IMPORTANT NOTES AND PRECAUTIONS FOR USE DESCRIPTION OF THE APPLIANCE 7-11 INSTRUCTIONS FOR THE USER 12-21 TROUBLESHOOTING INSTRUCTIONS FOR THE INSTALLER 23-30 TECHNICAL FEATURES 31-36... -
Page 4: Important Notes And Precautions For Use
IMPORTANT NOTES AND PRECAUTIONS FOR USE removed from the outer surfaces and You have purchased one of our the various inner parts, thoroughly products for which we thank you. We check that the appliance is in perfect are confident that this new appliance, condition. - Page 5 IMPORTANT NOTES AND PRECAUTIONS FOR USE • The oven door glass and the temperature for two hours. This will accessible parts will become hot allow the protective coating on the when in use. To avoid burns and interior of the oven to be burnt off scalds young children should be and dissipate the associated smells.
-
Page 6: Important Notes And Precautions For Use
IMPORTANT NOTES AND PRECAUTIONS FOR USE • The cookers can be equipped with a small compartment under the oven that can be used for storing things Remember that the surfaces become hot, it is strictly forbidden to place inflammable materials inside. •... -
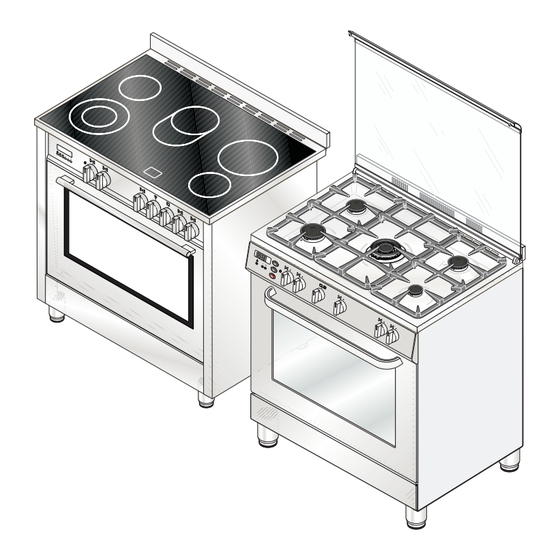
Page 7: Description Of The Appliance
DESCRIPTION OF THE APPLIANCE The oven walls are fitted with various guide bars or PRESENTATION runners (fig. 1) on which the following accessories can GENERAL be placed. Supply and quantities vary from model There are 2 different hobs that can be used on our to model (fig. - Page 8 DESCRIPTION OF THE APPLIANCE CONTROLS HOB GAS BURNER KNOB (A) By rotating the knob in an anticlockwise direction, the following symbols appear: = Closed position = “Full on” position = “Reduced rate or Low” position OVEN THERMOSTAT KNOB (B) By turning the oven knob clockwise we will find the different oven temperature values (from 50°C to Max).
- Page 9 DESCRIPTION OF THE APPLIANCE ENERGY REGULATOR KNOB (E-F) By turning the knob to the right we find the following symbols: = heating elements off = minimum and maximum power for single from 1 to 12 cooking zone from 12 to 0 = maximum power for double cooking zone OVEN FUNCTION SELECTOR KNOB (4) (G) By turning the knob to the right or to the left we will find...
- Page 10 DESCRIPTION OF THE APPLIANCE RED WARNING LIGHT When lit it indicates that the electric grill or one of the oven electric components is on. YELLOW WARNING LIGHT When lit it indicates that either the electric oven or electric grill is working. While the oven is being used the light will switch off when the set temperature is reached.
-
Page 11: Description Of The Appliance
DESCRIPTION OF THE APPLIANCE ELECTRONIC PROGRAMMER The programmer can select the following functions: - Clock (set by keys 2 and 3) - Minute counter (set by key 1) - Cooking time (set by key 2) - End of cooking (set by key 3) - Manual operation mode (set by key 4) 1 2 3 4 5 6... -
Page 12: Instructions For The User
INSTRUCTIONS FOR THE USER HOB: GENERAL NOTES ON SAFETY Burners Ø pan cm • Make sure that pan handles are positioned correctly 22 - 24 and supervise the cooking of foods which use oils Large 20 - 22 and fats, as these are highly inflammable. •... - Page 13 INSTRUCTIONS FOR THE USER GENERAL INFORMATION AND INSTRUCTIONS N.B.: Using the glass scraper, push immediately away FOR USING CERAMIC GLASS HOBS from the cooking zone, any pieces of tin foil or plastic • Ceramic glass is a natural product and, like any other objects that could have melted or stuck;...
- Page 14 INSTRUCTIONS FOR THE USER OVEN: GENERAL SAFETY INSTRUCTIONS WHAT TO DO THE FIRST TIME YOU USE THE OVEN • Remove all protective wrapping materials from the • Always grip the centre of the oven door when opening. appliance and labels from the oven door. Do not practice excessive pressures on the door when •...
- Page 15 INSTRUCTIONS FOR THE USER in the time and temperature chart to some of your AUTOMATIC ELECTRIC IGNITION OF THE OVEN favourite recipes. Add 10 to 15 degrees C when BURNER cooking larger quantities. Shelves are numbered Open the oven door, push lightly the oven knob from the bottom (fig.
- Page 16 INSTRUCTIONS FOR THE USER SWITCHING THE ELECTRIC GRILL C ooking with the aid of the fan Turn the oven knob round to the symbol Some cookers can be equipped with a fan installed The top heating element is turned on and it distributes in the rear part of the oven compartment.
- Page 17 INSTRUCTIONS FOR THE USER HOW TO USE THE FANNED OVEN DEFROSTING AT ROOM TEMPERATURE Turn the selector knob to the symbol and place the food you want to defrost inside the oven. The length of time required depends on the quantity and type of food.
- Page 18 INSTRUCTIONS FOR THE USER HOW TO USE THE MULTIFUNCTION OVEN FAN + REAR HEATING COMBINED COOKING Turn the selector knob to the symbol and adjust the DEFROSTING AT ROOM TEMPERATURE thermostat knob to the desired temperature, then Turn the selector knob to the symbol and place the place your food inside the oven.
- Page 19 INSTRUCTIONS FOR THE USER USEFUL COOKING TIPS Meat: • If, when cooking meat, the time needed is more than 40 minutes, turn the oven off 10 minutes Cakes and bread: before the end of cooking time to exploit the • Heat the oven for at least 15 minutes before you residual heat (energy saving).
- Page 20 INSTRUCTIONS FOR THE USER COOKING / BAKING TIMETABLE Position of the oven shelf COOKING BY COOKING BY Weight from the bottom NATURAL CONVECTION FORCED CONVECTION (WITH FAN) FOODS with 5 with 3 Temperature Cooking Time Temperature Cooking Time runners runners in °C in minutes in °C...
- Page 21 INSTRUCTIONS FOR THE USER CLEANING AND MAINTENANCE CERAMIC GLASS HOB It is very important to clean the top each time it is used and while the glass is still warm, drying it with a soft HOT PLATE cloth. Do not use metal pads, abrasive powders or To keep the surface of the hob and the various corrosive spray products for cleaning.
- Page 22 INSTRUCTIONS FOR THE USER OVEN SEAL REPLACING THE OVEN LAMP The oven seal guarantees the correct functioning of Ensure the appliance is switched off before replacing the oven. We recommend you: the lamp to avoid the possibility of electric shock.. •...
-
Page 23: Troubleshooting
TROUBLESHOOTING Some problems can be caused either as the results of simple maintenance operations or by incorrect selection of settings. Prior to contacting a Service Centre please check the following chart. PROBLEM REMEDY The appliance is not working • Make sure the gas cock is open •... -
Page 24: Instructions For The Installer
INSTRUCTIONS FOR THE INSTALLER TECHNICAL INFORMATION UNPACKING YOUR COOKER • Once the packaging has been removed, thoroughly The installations, conversions and maintenance check that the appliance is in perfect condition. If operations listed in this part must only be carried you have any doubts do not use the appliance and out by authorised personnel. - Page 25 INSTRUCTIONS FOR THE INSTALLER POSITION (fig. Q) LEVELLING THE COOKER • Adjustable feet, to be fitted to the appliance, which The appliance should be positioned in good light and free from draughts. Any adjoining wall surface situated allow the height of the cooker to be aligned with within 200 mm from the edge of any hob burner must be other kitchen furniture This can be done by means a suitable non-combustible material for a height of 150...
- Page 26 INSTRUCTIONS FOR THE INSTALLER SECURING THE COOKER TO WALL (fig. P) SAFETY CHAIN. PLEASE TEST THAT THE COOKER DOES NOT Note:- The installation of the chain provided TILT FORWARD is for safety reasons, it must be installed as Assembly instructions indicated below.
- Page 27 INSTRUCTIONS FOR THE INSTALLER the cooker connection point, pointing downwards. GAS CONNECTION • The hose should be clear of the floor when the This appliance shall be installed only by authorised cooker is in the installed position. The anti-tilting personnel and in accordance with the manufacturer’s chain supplied should be anchored to the lower installation instructions, local gas fitting regulations, hook fixed to the wall so that the chain prevents...
- Page 28 INSTRUCTIONS FOR THE INSTALLER HOT SURFACE Connection Connection point point Isolating tap Isolating tap Hose assembly Hose assembly ADJUSTMENTS OVEN THERMOSTAT (fig. 23) Reduced rate adjustment should be carried out in • All seals must be replaced by the technician the following way: following any adjustment or regulation.
- Page 29 INSTRUCTIONS FOR THE INSTALLER NOTE: Oven Failure • Check thermocouple terminal. • Inspect rear of thermostat (under hob) to check that thermocouple connections are ”tight” and parallel to each other. • Check thermostat knob for sufficient clearance from the control panel to allow electromagnet to fully seat. •...
-
Page 30: Technical Features
INSTRUCTIONS FOR THE INSTALLER GAS CONVERSIONS REPLACING ELECTRICAL COMPONENTS An AGA Approved gas regulator suitable for a supply • The rear protection will have to be removed in order pressure of 2.75 kPa should be part of the gas tank to change the electrical heating elements, terminal supply and the test point pressure should be adjusted board and power cable. - Page 31 INSTRUCTIONS FOR THE INSTALLER • Change seal each time a tap or a thermostat is MAINTENANCE replaced. This will ensure perfect retention between Prior to any maintenance work or changing the tap or a thermostat and part. parts, disconnect the appliance from the gas •...
- Page 32 TECHNICAL FEATURES BURNER AND HEATING ELEMENT DISPOSITION BURNER TECHNICAL DATA TABLE OPERATING DIAMETER BURNER RATING PRESSURE INJECTORS DENOMINATION MJ/h 1/100 mm Large Propane 2.75 10.0 Left front Natural 1.00 10.0 Medium Propane 2.75 Right rear Natural 1.00 Medium Propane 2.75 Left rear Natural 1.00...
- Page 33 TECHNICAL FEATURES TECHNICAL DATA Gas oven and electric grill Electric multifunction oven NATURAL PROPANE NATURAL PROPANE Operating pressure gas kPa 1.00 2.75 1.00 2.75 Total input gas MJ 64.3 63.7 43.4 38.7 ELECTRICAL Voltage / Frequency 240 V~ 50 Hz Total rating electrical 2040 W - 10 A from 3200 to 12120 W -...
- Page 34 TECHNICAL FEATURES Model cooker PL 998XSDC 464252027...
- Page 35 TECHNICAL FEATURES Model cooker DAN 985GE- 464250515...
- Page 36 TECHNICAL FEATURES Model cooker DAN 985CEE- DAN 90CE --- 464250758...
- Page 40 461307793_03/2015...
Need help?
Do you have a question about the ASTCOOKE90 and is the answer not in the manual?
Questions and answers