Table of Contents
Advertisement
Quick Links
Advertisement
Table of Contents

Subscribe to Our Youtube Channel
Summary of Contents for Spectra Geospatial Focus 35
- Page 1 FOCUS 35 Total Station User Guide...
- Page 2 Le présent appareil est conforme aux CNR d' I ndustrie Canada applicables aux appareils radio exempts de Spectra Geospatial is a division of Trimble Inc. Spectra, licence. L' e xploitation est autorisée aux deux conditions the Spectra Geospatial logo, and FOCUS are trademarks of suivantes: Trimble Inc., registered in the United States and in other...
- Page 3 20 cm from all persons and must not be co-located or operating in conjunction with any other antenna or transmitter: Devices marked with Part Numbers 78731035 (78431035),78732035 (78432035), 78733035 (78433035), FOCUS 35 Total Station User Guide | 3...
-
Page 4: Important Information
Safety Information Instruments and original accessories from Spectra Geospatial must only be used for the intended purpose. Operate the instrument only in compliance with the operating conditions specified. Do not point the telescope directly at the sun. -
Page 5: Laser Safety Questions
Fax (937) 233-9661 CLASS 3R Laser Product The FOCUS 35 Total Station is a CLASS 3R LASER PRODUCT and contains different light sources. Distance Measurement and Laser Pointer The Distance Measuring Unit in reflectorless mode and in Laser Pointer mode produces visible Laser light emerging at the centre of the telescope objective. - Page 6 WARNING – The use of Laser Class 3R equipment can be dangerous for the eyes. The risk for eye damage is minimized through the radiation limit of 5 mW (FOCUS 35 at 660 nm). Do not stare directly into the beam.
-
Page 7: Tracklight
40 mrad x 30 mrad 144 µ s Pulse duration Max. pulse frequency 109 Hz Max. Peak Power 2.22 mW Max. Mean Power 0.035 mW Wavelength 850 nm Measuring uncertainty ± 5% For instrument labeling, see Laser Information, page FOCUS 35 Total Station User Guide | 7... -
Page 8: Battery Safety
Do not charge or use the battery if it appears to be damaged or leaking. Charge the lithium-ion battery only in a Spectra Geospatial product that is specified to charge it. Be sure to follow all instructions that are provided with the battery charger. -
Page 9: Environmental Information
That is why Spectra Geospatial is actively pursuing, and will continue to pursue, the expanded use of environment friendly materials in all its products, and why we have established a convenient and environmentally friendly recycling program. -
Page 10: Table Of Contents
Battery Safety and Environment Information Checking the Instrument Battery Power Supply Charging the Instrument Batteries Inserting the Main Battery Inserting the Face 1 Battery (if Available) Suspend Mode Instrument Description Optical Plummet Trigger Key FOCUS 35 Total Station User Guide | 10... - Page 11 Main Menu Face2 - Information and Settings Instrument Adjustment and Calibration Compensator Optical (HA/VA) Collimation and Trunnion Axis Tilt LockNGo Tracker Adjustment Routines in Survey Pro software (if available) The Laser Pointer Optical Plummet Tribrach Circular Level FOCUS 35 Total Station User Guide | 11...
- Page 12 Rod and Prisms Spectra Geospatial Standard Rod Spectra Geospatial 360 Degree Prism Robotic Components External Radio Cables for External Power Supply and Data Transfer Cable for External Power Supply Cable for Data Transfer FOCUS 35 Total Station User Guide | 12...
-
Page 13: Focus 35 Total Station User Guide
Contents Control Unit Screen Protector Transport Case Accessories Carrying Straps FOCUS 35 Total Station User Guide | 13... -
Page 14: Introduction
Technical Assistance Product Registration Welcome to the Spectra Geospatial FOCUS 35 Total Station User Guide. This manual describes how to set up and use the Spectra® Geospatial FOCUS® 35 total station. Even if you have used an optical Total Station before, Spectra Geospatial recommends that you spend some time reading this manual to learn about the special features of this product. -
Page 15: Inspection, Care, And Maintenance
Inspect the shipping container. If the container arrives in poor condition, examine the equipment for visible damage. If damage is found, immediately notify the carrier and your Spectra Geospatial sales representative. Keep the container and the packing material for the carrier to inspect. -
Page 16: Instrument Case
FOCUS 35 instrument Instrument rain cover Warranty Card, WEEE information, Certificate Allen key for optical plummet (1.3 mm), Allen key for EDM/Coarse sight (1.5 mm) and adjustment key for tribrach bubble Data Collector FOCUS 35 Total Station User Guide | 16... - Page 17 If the instrument is equipped with an optional DIN adapter for DIN tribrach, the DIN tribrach must be removed before the instrument is placed in the instrument case. Not all data collectors are designed to fit this space. FOCUS 35 Total Station User Guide | 17...
-
Page 18: Instrument Versions
The FOCUS 35 Total Station is designed and tested to withstand field conditions, but like all precision instruments, it requires care and maintenance. -
Page 19: Cleaning
Clean the screens with a dust-free cloth and gently wipe the screen. Use the provided dust-free cloth in the screen protector package. CAUTION – Do not use abrasive cleaners and do not apply any Cleaning Solution directly on the screen. FOCUS 35 Total Station User Guide | 19... -
Page 20: Applying A Screen Protector For The Face 1 Screen (If Fitted)
There are no user-serviceable parts on the FOCUS 35 Total Station. Spectra Geospatial recommends that you take the instrument to an authorized service center for service and calibration once a year. This is to guarantee that the specified accuracies are maintained. -
Page 21: Getting Started
Control Unit Face1 (if fitted) Control Unit Face2 Telescope Lens rain cover / sun shade Setting Up and Running ActiveSync technology Troubleshooting Windows Mobile Device Center Connection Issues Disconnecting ActiveSync Laser Information FOCUS 35 Total Station User Guide | 21... -
Page 22: Power Supply
Do not charge or use the battery if it appears to be damaged or leaking. Charge the lithium-ion battery only in a Spectra Geospatial product that is specified to charge it. Be sure to follow all instructions that are provided with the battery charger. -
Page 23: Checking The Instrument Battery Power Supply
Information. Checking the Instrument Battery Power Supply To check the power supply in the FOCUS 35 Total Station battery using the built-in battery gauge, press the button on the side of the battery: When you press the button, four LEDs on the battery show the power level. Each LED corresponds to a power level of 25% so that when the power level is at 100%, all four LEDs are lit. -
Page 24: Inserting The Main Battery
Charge the battery before using the total station if the equipment has been stored for longer than six months. Inserting the Main Battery The FOCUS 35 Total Station internal battery fits into the battery compartment on the side of the instrument. This battery can easily be removed and replaced. To insert the battery: 1. -
Page 25: Inserting The Face 1 Battery (If Available)
3 Getting Started Inserting the Face 1 Battery (if Available) On some FOCUS 35 Total Station models a second battery fits into the Face 1 battery compartment. This battery can easily be removed and replaced. To insert the battery: 1. Press gently on the two battery release buttons on either side of the compartment to open the battery compartment door. -
Page 26: Suspend Mode
The internal support module is always charged when the instrument is powered on. If you leave the FOCUS 35 Total Station idle, it goes into suspend mode after 120 minutes by default. If the FOCUS 35 Total Station has not been restarted when the suspend period (default 120 minutes) has elapsed, the instrument powers down and has to reboot when started again. -
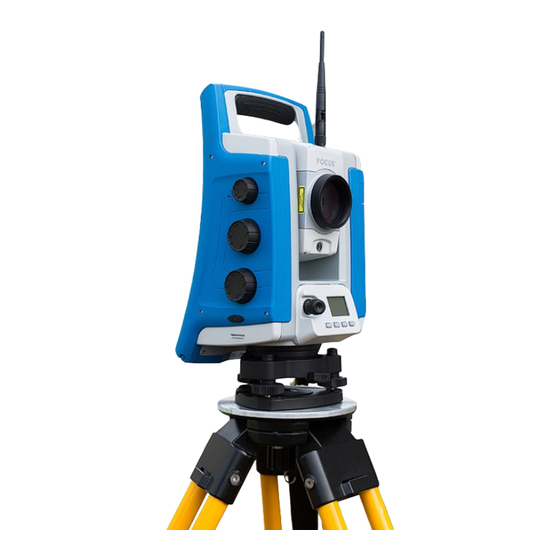
Page 27: Instrument Description
Instrument Description This section describes the instrument controls. Take some time to familiarize yourself with the names and the locations of the controls. The following image shows the Operator’s view of the FOCUS 35 Total Station. Item Description Coarse sight... - Page 28 3 Getting Started Item Description Face1 Control Unit or optional Face 1 Battery Compartment Eyepiece The following is the Front view of the FOCUS 35 Total Station. Item Description Radio antenna Radio antenna is not required in the LockNGo model.
-
Page 29: Optical Plummet
The instrument is equipped with an optical plummet, which has 2x magnification and a focusing range of 0.5 m (1.6 ft) to infinity. The instrument can be positioned to an accuracy of 0.5 mm (0.02 in) at 1.5 m (49 ft) over a ground mark. FOCUS 35 Total Station User Guide | 29... -
Page 30: Trigger Key
123, ABC, and abc. Multiple presses on one key scrolls through the letters on that key depending on which mode is currently selected. The image shows the Control Unit Face1. FOCUS 35 Total Station User Guide | 30... -
Page 31: Control Functions Control Unit Face1
Control Functions Control Unit Face1 In addition to data entry and the standard Microsoft® Windows® operating system functions, the Control Unit has a number of control functions that are Spectra Geospatial specific. These functions are described in the table below. -
Page 32: Entering Information
The Input options are Keyboard or Survey Keyboard: Keyboard — allows you to input data as if you were typing on a physical keyboard Survey Keyboard — has larger keys than the keyboard FOCUS 35 Total Station User Guide | 32... -
Page 33: Touch Screen
Change the date and time as required. To accept the new settings, tap OK. To cancel, tap NOTE – When you attach the instrument to your computer using Microsoft® ActiveSync® technology, the time and date are automatically updated. FOCUS 35 Total Station User Guide | 33... -
Page 34: Control Unit Face2
When the field software is running, the trigger key performs the same function as the Measurement1 key ( ) on the Face1 side and the Enter key ( ) at the Face2 side. FOCUS 35 Total Station User Guide | 34... -
Page 35: Telescope Lens Rain Cover / Sun Shade
Fit the objective rain cover to the Face1 side of the instrument with the shield at the top of the objective. CAUTION – Dust and rain can have an effect on the distance measurements, please keep objective front lens and the targeting prism clean and use the objective rain cover. FOCUS 35 Total Station User Guide | 35... -
Page 36: Connecting The Instrument To An Office Computer
Microsoft ActiveSync technology and Windows Mobile® Device Center (WMDC) provide an easy way to synchronize data on a Windows-based computer with your FOCUS 35 Total Station. WMDC works only on computers that have the Windows Vista® or Windows 7 operating system. Windows 10 version 1703 and later have been found to have issues running Windows Mobile Device Center (WMDC). -
Page 37: Setting Up And Running Activesync Technology
3 Getting Started Setting Up and Running ActiveSync technology Please use the Hirose-USB cable to connect the FOCUS 35 Total Station with a USB port of your computer. The instrument will switch on automatically. NOTE – Microsoft ActiveSync technology or the Windows Mobile Device Center will start automatically, depending on the operating system that is installed on your computer. - Page 38 3 Getting Started 3. If you select Set up your device, Spectra Geospatial recommends that you clear all the check boxes in the next dialog. 4. Click Next to continue. FOCUS 35 Total Station User Guide | 38...
- Page 39 6. To view the files on the Instrument, click the File Management icon, then click Browse the contents of your device. The file structure looks and functions the same as Windows Explorer on your computer: FOCUS 35 Total Station User Guide | 39...
-
Page 40: Troubleshooting Windows Mobile Device Center Connection Issues
1. Download the Registry Editing Tool from Trimble: http://trl.trimble.com/dscgi/ds.py/Get/File-848877/WMDCRegistryUpdate.exe 2. From the File Explorer, right-click the file and choose Run as Administrator. The tool must be run with Administrator privileges because it modifies the computer's registry. FOCUS 35 Total Station User Guide | 40... -
Page 41: Disconnecting Activesync
You have to wait a few seconds until the next screen appears. 2. Tap Disconnect and then remove the cable: For more information about ActiveSync, refer to the help or visit the Microsoft website. Laser Information For more information, see Laser Safety, page FOCUS 35 Total Station User Guide | 41... -
Page 42: Focus 35 Total Station
3 Getting Started FOCUS 35 Total Station The FOCUS 35 distance measuring unit and Laser Pointer has been tested and complies with the regulations for a CLASS 3R LASER PRODUCT. Item Description ❶ Distance measurement LockNGo and Laser pointer aperture ❷... - Page 43 3 Getting Started Location of Laser warning label on a FOCUS 35 Total Station The laser warning label is located on the top of the distance measuring unit. Distance Measurement Unit and Laser Pointer warning label: FOCUS 35 Total Station User Guide | 43...
- Page 44 3 Getting Started Location of Laser aperture label on a FOCUS 35 Total Station The laser aperture label is located on one side of the telescope close to the objective. Laser aperture label: FOCUS 35 Total Station User Guide | 44...
-
Page 45: Setup
Face2 Display while using the Survey Pro Software in different Instrument Versions Instrument Adjustment and Calibration LockNGo Tracker Measuring the Instrument Height Pre Measurement Check List Connecting to an External Data Collector FOCUS 35 Total Station User Guide | 45... -
Page 46: Setup
Setup An instrument setup with good measuring stability will increase the precision in the measurement result and allow you to utilize the measurement precision of the FOCUS 35 Total Station to its full extent. Setup Stability When an instrument is setup it is important to consider the following: 1. -
Page 47: Measurement Stability
Robotic mode. When the Windows CE operating system starts, select your field software from the start menu. Please refer to your Survey field application documentation for supplementary information. FOCUS 35 Total Station User Guide | 47... -
Page 48: Starting And Settings Via Face1 Control Unit (If Fitted)
NOTE – If you are using the Layout Pro™ software, refer to the User Guide for information on using the FOCUS 35 total station. Face1 screen while starting the Survey Pro Instrument loads the Survey Pro software. -
Page 49: First Steps In The Survey Pro Software
4 Setup Screen Actions and Comments First Steps in the Survey Pro software Spectra GeoSpatial recommends spending some time reading the Survey Pro User Guide to learn details of the application program. This section describes a brief overview. Quick Shot Menu After confirming the Level Bubble menu the screen shows the Quick Shot menu. -
Page 50: Lookup And Register The Survey Pro Software
After the initial start of the Survey Pro software, the following menu will appear. Please select Register Modules and enter your registration code(s). How to enter codes Please use the keyboard on the screen to enter registration code. FOCUS 35 Total Station User Guide | 50... - Page 51 If you select Run In Demo Mode, all areas of the software are available, with the limitation a job cannot exceed 25 points. Open or create a Job Screen Actions and Comments Survey Pro Main Menu Select the Filemenu. FOCUS 35 Total Station User Guide | 51...
-
Page 52: Survey Pro Version Number
Select menu File and menu element About and the software version appears on the screen. Survey Pro Version Press the ESC button and the program will return automatically to the Main Menu. FOCUS 35 Total Station User Guide | 52... - Page 53 Select instrument Settings by tapping on this icon. Menu for Settings Navigate to Lights via drop down menu or toggle through the submenus with key left or right. Menu for Lights Settings Make selections and confirm the settings. FOCUS 35 Total Station User Guide | 53...
-
Page 54: Starting And Settings Via Face2 Control Unit
Instrument Status Menu - Suspend After Starting: If the instrument is inactive for longer than 5 minutes it will go into Suspend Mode, see also Suspend Mode Power Management. The display will show Waiting (suspend). FOCUS 35 Total Station User Guide | 54... - Page 55 For more details and information about external power supply select with a short key press in the Power Supply Menu. Power Supply - external source Menu shows the voltage of the source. Leave the menu with press. FOCUS 35 Total Station User Guide | 55...
- Page 56 Face1 started, this field software controls the Face2 display. While using the field software in every menu the Main Menu from the Face2 display can be opened with a long key press! FOCUS 35 Total Station User Guide | 56...
-
Page 57: Security
Using the PIN code to unlock the instrument When the PIN code has been activated, you must enter it when you start up the Instrument. To do this: Switch on the FOCUS 35 instrument. The Face 2 display shows the menu Enter PIN. Press to enter the PIN of your choice digit by digit—press... -
Page 58: Puk Code
PUK code digit by digit—press to accept each digit. Once all valid digits have been entered, press P. The FOCUS 35 instrument is unlocked, the PIN code is reset to 0000 and the security PIN code is deactivated. -
Page 59: Brightness And Contrast
Brightness range: 0 - 20 Contrast Menu Select with a long press of key the setting menu for Contrast. Adjust the contrast by pressing Confirm the selection with Contrast range: 0 - 256 FOCUS 35 Total Station User Guide | 59... -
Page 60: Main Menu Face2 - Information And Settings
Confirm a selection by pressing the key. The Main Menu is structured as follows: Content See ... Exit Radio Parameter page 61 Level bubble page 61 Instrument details page 61 Service menu page 62 FOCUS 35 Total Station User Guide | 60... - Page 61 The Instrument Details menu displays the Instrument Version, Instrument name (your definition), Serial number and Firmware version. Screen Actions and Comments Main Menu To read Instrument Details, press to scroll to Instrument Details and press FOCUS 35 Total Station User Guide | 61...
- Page 62 Drive Mode page 66 Radio configuration page 67 Next Service Date page 67 NOTE – The Service Menu is hidden—please contact your Spectra Geospatial Reseller for instructions on how to access this option. FOCUS 35 Total Station User Guide | 62...
- Page 63 USB Interface Please make sure that the default setting USB Interface for Customer is Always Off. If the FOCUS 35 total station needs a firmware upgrade, the USB interface setting must be set to Always On to complete the firmware upgrade.
- Page 64 At the end the program shows the results and offers the possibility to store it. Service Menu - External EDM Frequency Press to scroll to Ext. EDM Frequency and then press FOCUS 35 Total Station User Guide | 64...
- Page 65 Press to scroll to Ext.EDM Calibration and press Both values for External EDM Calibration influence the measured distance directly! Therefore, they must have been determined by means of an accurate external calibration. FOCUS 35 Total Station User Guide | 65...
- Page 66 Drive Mode settings have an effect while using LockNGo Tracker technology for robotic surveying or while changing face. Press to scroll to Drive Mode and then press Drive Mode Press to select Normal or Fast and then press FOCUS 35 Total Station User Guide | 66...
- Page 67 French radio regulations, the radio must be set to French settings. Press to scroll to France and then press Service Menu - Next Service Date Setting Next Service date Press to scroll to Next Service date and then press FOCUS 35 Total Station User Guide | 67...
-
Page 68: Instrument Adjustment And Calibration
Bumps and knocks during transit Large changes in operating temperature Spectra Geospatial recommends that a collimation and calibration check be carried out routinely as follows: After any long uncontrolled transport of the instrument (e.g., after service or shipment to a new... -
Page 69: Compensator
In this way the FOCUS 35 Total Station will always provide accurate measurements. -
Page 70: Adjustment Routines In Survey Pro Software (If Available)
4 Setup The prism target must be very still during the test (Spectra Geospatial recommends that you use a tripod or bipod mount for the target) and must be in clear line of sight without any obstructing traffic. The instrument is calibrated to accurately point at the center of the target in both horizontal and vertical axes. - Page 71 Make the measurements per the displayed information and confirm and store the values. Optical Collimation / Trunnion Axis Decide per the displayed information for trunnion axis tilt collimation or confirm and store the new values for optical collimation. FOCUS 35 Total Station User Guide | 71...
-
Page 72: The Laser Pointer
The Laser Pointer The FOCUS 35 Total Station uses a red laser beam to measure and as a Laser Pointer. The Laser Pointer is coaxial with the line of sight of the telescope. If the instrument is well adjusted, the red Laser Pointer coincides with the line of sight. - Page 73 Laser adjustment plate, below: Adjusting the Laser Beam Pull out the two plugs from the adjustment ports of the telescope housing: The image shows the Laser beam adjustment ports. FOCUS 35 Total Station User Guide | 73...
- Page 74 4 Setup Item Description ❶ Vertical pointer adjustment port ❷ Horizontal pointer adjustment port FOCUS 35 Total Station User Guide | 74...
- Page 75 4 Setup To correct the vertical position of the laser spot, insert the allen key into the vertical adjustment port and turn it as shown: FOCUS 35 Total Station User Guide | 75...
- Page 76 Refit the plugs in the adjustment holes. Make sure that the plugs are correctly fitted for proper sealing against the cover. CAUTION – To keep out moisture and dust, make sure that the plugs are correctly fitted in the adjustment ports. FOCUS 35 Total Station User Guide | 76...
-
Page 77: Optical Plummet
When one screw is adjusted the opposite screw must be adjusted equally in the reverse direction, in order to keep the correct tension on the optics. Do not overtighten the screws, this might damage the optics. FOCUS 35 Total Station User Guide | 77... - Page 78 4 Setup Optical plummet adjustment: Item Description ❶ Optical plummet reticle 4x adjustment screws ❷ Ground mark FOCUS 35 Total Station User Guide | 78...
-
Page 79: Tribrach Circular Level
When one screw is adjusted the two opposite screw must be adjusted equally in the reverse direction, in order to keep the correct tension on the Circular level. Do not overtighten the screws. Circular Level adjustment: FOCUS 35 Total Station User Guide | 79... -
Page 80: Measuring The Instrument Height
When the Survey Pro software is running, the software has additional functions that reduce the bottom mark measurement to the required vertical instrument height to the trunnion axis, see image below and the following paragraph. FOCUS 35 Total Station User Guide | 80... - Page 81 Alternatively, to obtain an accurate measurement to the top mark (Ih), you can manually measure the slope distance from the ground to the bottom mark (Hm). To calculate the total instrument height (Ih), insert the measured slope distance (Hm) into the formula below: FOCUS 35 Total Station User Guide | 81...
-
Page 82: Pre Measurement Check List
The controller can be connected to the FOCUS 35 Total Station via Bluetooth® wireless technology or radio. Connecting with Cable - LockNGo Instrument Version The controller is connected from the FOCUS 35 Total Station COM port to the USB or the RS-232 connector. Controller... -
Page 83: Connecting With Bluetooth Wireless Technology - Lockngo Instrument Version
Beginning in July 2019, the LockNGo version of the FOCUS 35 total station contains Class 1 Long Rage Bluetooth. When paired with a controller that also has Class 1 Bluetooth this allows for communications over Bluetooth up to 200 m away, without a radio. -
Page 84: Instrument Operational Methods
Instrument Operational Methods Conventional Measurements with StepDrive Motor System LockNGo Measurement GeoLock Technology Robotic Measurement FOCUS 35 Total Station User Guide | 84... -
Page 85: Conventional Measurements With Stepdrive Motor System
The GeoLock technique combines a GNSS position with the FOCUS 35 robotic total station and the robotic roving operator. The remote instrument can then be directed towards the robotic roving operator using the GNSS position and a subsequent search is quickly performed to reacquire the target at the robotic rover. -
Page 86: Instrument Technology
Instrument Technology Angle Measuring Technology Distance Measuring Technology Tracklight StepDrive Motor System and Focus System LockNGo Tracking Technology Power Management Instrument Robotic Configuration Power Supply External Communication Radio Bluetooth wireless technology FOCUS 35 Total Station User Guide | 86... -
Page 87: Angle Measuring Technology
Correction for Trunnion Axis, page Correction for Mislevelment The FOCUS 35 Total Station automatically corrects for mislevelments up to ±5.5’. The instrument warns the operator immediately of any mislevelments in excess of ±5.5’ (±0.1 grads). Corrections for the horizontal angle, vertical angle, and slope distance are calculated in the field application software and applied to all measurements. - Page 88 FOCUS 35 Total Station with LockNGo Tracker A FOCUS 35 Total Station with LockNGo capability can automatically lock and track a prism target as it moves. Pointing errors caused by slight misalignment of the instrument’s tracker have a similar effect to the HA and VA Collimation errors as detailed above.
-
Page 89: Correction For Trunnion Axis
In the FOCUS 35 Total Station, perform a pre-measurement trunnion axis tilt test to determine the trunnion axis tilt error. Angular measurements are observed in both instrument faces, the trunnion axis tilt error is calculated, and the respective correction value is stored in the instrument. -
Page 90: Distance Measuring Technology
6 Instrument Technology Distance Measuring Technology Spectra Geospatial FOCUS 35 Total Stations are equipped with a combined distance unit. This means that the instrument can measure to a prism or to normal surfaces (reflectorless mode). The laser distance unit is based on the phase comparison method. The distance unit is coaxial with the line of sight and transmits an intensity modulated optical measuring beam that is reflected by a prism or scattered by a natural surface on which the beam is directed. -
Page 91: Beam Divergence
When observing measurements to a tight corner, the distance meter beam divergence introduces a range error caused by the size of the sampling area. Measuring to an inner and outer corner: FOCUS 35 Total Station User Guide | 91... - Page 92 2. Aim the instrument at the corner to store the correct horizontal and vertical angle. Offset measurement: With offset measurements, you can accurately measure difficult locations in reflectorless mode and eliminate beam divergence errors. For more information, refer to the field application software documentation. FOCUS 35 Total Station User Guide | 92...
-
Page 93: Tracklight
Do not use the Laser Pointer as an aid when searching for prisms, the reflected light can dazzle your eyes. The reflected light will not damage your eyes, but might be uncomfortable, see also Laser Safety, page FOCUS 35 Total Station User Guide | 93... -
Page 94: Stepdrive Motor System And Focus System
6 Instrument Technology StepDrive Motor System and Focus System The FOCUS 35 Total Station is equipped with a StepDrive motor system to position the instrument and the telescope and a servo drive to focus the telescope. Due to the instrument accuracy it is important to use a high quality tripod and tribrach. It is also important to set up the tripod in a position for best stability, as shown. -
Page 95: Stepdrive
Item Description Vertical motion knob Horizontal motion knob Focus System The instrument is equipped with a motor focus drive. The focus motion knob is on the side of the instrument for easy access. FOCUS 35 Total Station User Guide | 95... - Page 96 6 Instrument Technology The focus knob is connected to a servo motor that is built into the telescope. When you turn the focus motion knob, the servo motor adjusts the focusing lens. FOCUS 35 Total Station User Guide | 96...
-
Page 97: Lockngo Tracking Technology
The FOCUS 35 Total Station LockNGo tracking function: The FOCUS 35 Total Station can lock onto and track a prism. Power Management The power management in the FOCUS 35 Total Station instrument can set the instrument to one of three different modes. Off Mode... -
Page 98: Instrument
To turn the instrument Off, press the Trigger key for 3 seconds. In Suspend Mode the instrument will turn Off automatically at suspend time out (default 120 minutes). FOCUS 35 Total Station User Guide | 98... -
Page 99: Robotic Configuration
External Power Supply The FOCUS 35 Total Station has one external port in the base of the instrument for communication and for external power supply. External power can be provided by a car battery with an appropriate cable. -
Page 100: External Communication
RF environment. The FOCUS 35 Total Station radio baud rate is 115200 bps. This high baud rate reduces the measurement latency, which ensures that a measurement viewed at the pole is received 100 msec after the measurement is sent from the instrument. -
Page 101: Accessories And Options
Accessories and Options Rod and Prisms Robotic Components External Radio Cables for External Power Supply and Data Transfer Control Unit Screen Protector Transport Case Accessories FOCUS 35 Total Station User Guide | 101... -
Page 102: Rod And Prisms
7 Accessories and Options Rod and Prisms Spectra Geospatial Standard Rod The Spectra Geospatial standard rod is available with the FOCUS 35 Total Station. The rod contains the following features: Graduated scale in Meter and Feet Fixed target height position... -
Page 103: Spectra Geospatial 360 Degree Prism
Spectra Geospatial standard rod. NOTE – The FOCUS 35 total station is a passive tracking device that allows users to measure and track a variety of prisms. Necessary prism constants and quality checks are recommended to maintain high-accuracy measurement results. -
Page 104: External Radio
2.4 Ah battery. For technical information, see Radio. External radio 2.4 GHz: For information regarding charging of the battery, see Charging the Instrument Batteries. CAUTION – Always remove the battery from the external radio after use. FOCUS 35 Total Station User Guide | 104... -
Page 105: Cables For External Power Supply And Data Transfer
Cable between the car battery and instrument with crocodile clips and Hirose 6 pin. Cable - 3.0 m (10 ft): Cable for Data Transfer Cable from the instrument to PC with Hirose 6 pin and USB-A plug. Cable - 2.5 m (8 ft): FOCUS 35 Total Station User Guide | 105... - Page 106 Cable from the instrument to BD9 female RS-232. Cable - 2.5 m (8 ft): Cable from the instrument to USB flash card memory with Hirose 6 pin and USB-A socket. Cable - 0.18 m (0.6 ft): FOCUS 35 Total Station User Guide | 106...
- Page 107 7 Accessories and Options Control Unit Screen Protector Screen protector set for the FOCUS 35 Total Station. Control Unit Face1 (if available). Package consists of two pieces with dust-free cloth and installation card. Two versions are available: ULTRA-Clear ANTI-Glare FOCUS 35 Total Station User Guide | 107...
- Page 108 7 Accessories and Options Transport Case Accessories Carrying Straps Carry Strap for Transport Case, two required. FOCUS 35 Total Station User Guide | 108...
Need help?
Do you have a question about the Focus 35 and is the answer not in the manual?
Questions and answers