Advertisement
Available languages
Available languages
Quick Links
Advertisement

Summary of Contents for Hubsan HS001
- Page 1 ® HS001 LCD MONITOR 《HS001 User Manual》 《HS001 Bedienungsanleitung》 Version 1.0...
- Page 2 Aircraft + HS001+ HT015 Transmitter+ HV002 Video glasses H122D HT015 HV002 HS001...
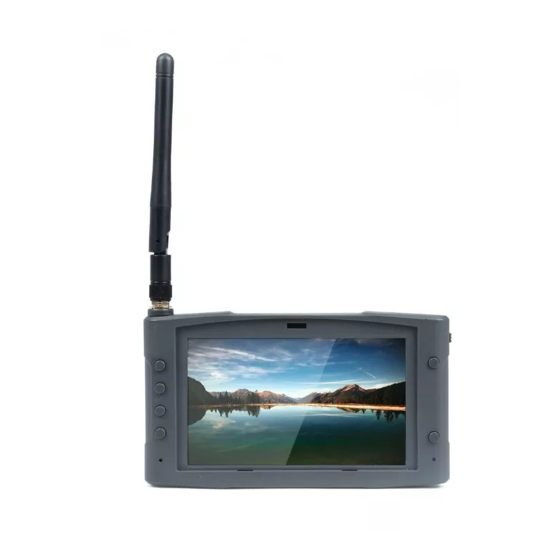
- Page 3 1 HS001 LCD Display 1.1 Main interface Aircraft Aircraft HS001 Photo Video Onscreen Photo/Video HS001 Aircraft Power/Voltage Power/Voltage 0.0 V 4.0 V Roll Pitch Manual Mode 1.2 Display component breakdown Micro-USB charging port Power switch TF card slot 5.8 Antenna...
- Page 4 Micro-SD inwards (it will pop out). 1.5 Charging The HS001 is paired with a rechargeable 7.4V, 2300mAh Li-Po. Be sure to use the provided Hubsan dedicated charger for charging. Fully charge the battery before use.
- Page 5 2 HV002 Video glasses Face panel release 3 Installing the HS001 display Option 1: Secure the HS001 display to the HT015’s mobile device bracket. Option 2 (with the HV002 video goggles): Press the release key on the HV002 goggles to release its face panel. Install the HS001 into the exposed compartment and shut the panel.
- Page 6 All illustrations are shown in Mode 2 (American hand) 2.Power the HS001 on by pushing the power switch up. Long press the display’s binding button (shown below) to allow the HS001 to enter binding mode. The display will beep three times.
- Page 7 Fluggerät + HS001+ HT015 Steuergerät + HV002 Videobrille H122D HT015 HV002 HS001...
- Page 8 1 HS001 LCD-Display 1.1 Hauptoberfläche Fluggerät Fluggerät HS001 Foto Video Foto/Video auf dem Bildschirm HS001 Fluggerät Strom/Spannung Strom/Spannung 0,0 V 4,0 V Überschlag Steigung Manueller Modus 1.2 Bestandteile des Displays Micro-USB- Ladeanschluss Ein-/Ausschalter TF-Kartensteckplatz 5,8-GHz-Antenne Sonnenschutzvertiefung Umschalttaste Foto-/Videomodus Foto-/Videotaste LCD-Bildschirm Hauptmenü...
- Page 9 Drücken Sie die MicroSD zum Herausnehmen nach innen (sie springt dann heraus). 1.5 Aufladen Das HS001 hat einen aufladbaren 7,4 V, 2300m Ah Li-Po-Akku. Stellen Sie sicher, dass Sie nur das von Hubsan zugelassene und mitgelieferte Ladegerät verwenden. Laden Sie den Akku vor dem ersten Flug vollständig auf.
- Page 10 2 HV002 Videobrille Entriegelung der Frontblende 3 Anbringen des HS001-Displays Option 1: Befestigen Sie das HS001-Display an der Mobilgerätehalterung des HT015. Option 2 (mit der HV002-Videobrille): Drücken Sie die Entriegelungstaste auf der HV002-Brille zum Lösen der Frontblende. Bringen Sie das HS001 in dem freigelegten Fach an und schließen Sie die Blende.
- Page 11 Steuergerät in den Anbindemodus. Alle Abbildungen werden in Modus 2 (Amerikanische Handbewegung) gezeigt. 2. Schalten Sie den HS001 durch Drücken des Netzschalters nach oben ein. Drücken Sie die Anbindetaste des Displays (siehe unten) lange, damit das HS001 in den Anbindemodus gehen kann. Das Display gibt drei akustische Signale.
- Page 12 Operating Frequency: FCC: 5735~5840MHz, CE: 5735~5840MHz, SRRC: 5735~5840MHz Transmitter Power(EIRP): FCC:PEAK value<114μv/m AV value<94μv/m, CE<25mW, SRRC<25mW Product Name:HS001 LCD MONITOR Company:Shenzhen Hubsan Technology Co., Ltd. Address:13th Floor, Block 1, Tower C, Software Industry Base, Xuefu Road, Nanshan District, Shenzhen, China.
Need help?
Do you have a question about the HS001 and is the answer not in the manual?
Questions and answers