Advertisement
Table of Contents
Advertisement
Table of Contents

Summary of Contents for Beer Meister BM-1600
- Page 1 Instruction Manual Beer Meister Beer Dispenser BM-1600...
-
Page 2: Table Of Contents
Dear customer, Before placing your new Beer Meister beer dispenser into operation please read these operating instructions carefully. They contain important information for safe use, installation and care of the appliance. Please keep these operating instructions for future reference. Notes, which are important for your safety or for the proper functioning of the appliance, are indicated with a warning triangle and/or with Warning!, Caution!, Important!. -
Page 3: Important Safety Instructions
IMPORTANT SAFETY INSTRUCTIONS 1. NEVER use an abrasive sponge, cloth, or scouring pad on this appliance. 2. Unplug unit from outlet when not in use and during cleaning. 3. DO NOT operate this appliance with a damaged cord or plug, or if the appliance ever malfunctions. - Page 4 Before discarding your old appliance, remove the door from its hinges so that children may not easily become trapped inside. CO2(Carbon Dioxide) Gas 1. CO2 gas can be dangerous! CO2 cylinders contain high-pressure compressed gas, which can be hazardous if not handled properly. Make sure you read and understand all the procedures for the CO2 cylinders before installation.
-
Page 5: Description Of The Appliance
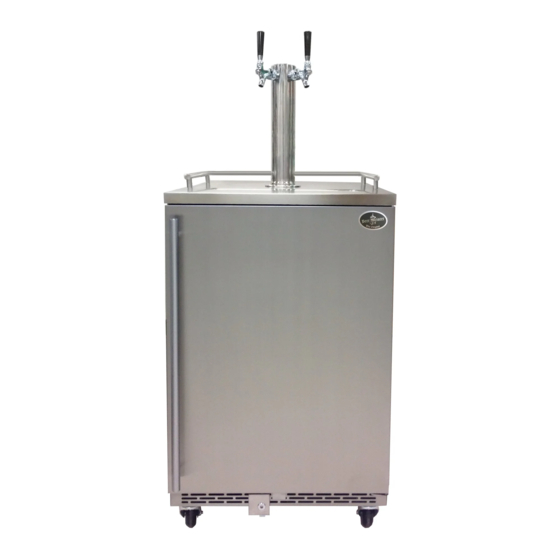
DESCRIPTION OF THE BEER DISPENSER ①Cabinet ②Door ③Stainless steel handle ④Lock ⑤Ventilator ⑥Top cover ⑦Guard rail ⑧Beer tower with faucet and handle ⑨Light switch ⑩Fan ⑾ Return-airway ⑿ Control panel ⒀ Fixing hook for CO2 Tank ⒁ Adjustable legs(4pcs)... -
Page 6: Parts & Assembly
PARTS & ASSEMBLY Read assembly instructions carefully before installing the beer dispenser. Once the unit is laid on its back, the coolant in the refrigeration unit is shifted. The coolant in the refrigeration unit needs to stabilize before the power is turned on. Allow the beer dispenser to stand in an upright position for about 4 hours before turning on the power. - Page 7 Tips for setting up beer tower mounting to counter top When you install the beer dispenser into a kitchen cabinet with a counter-top,the beertower needs to be mounted onto the counter-top.The beer tower must be located just above the hole on the top of the beer dispenser.Using a PVC pipe, measureand cut the length to fit between the beer dispenser top and bottom of the counter top.Using silicone to seal the joints and prevent any leakage of the cold air that will be circulating through the pipe.
- Page 8 Notes: Plug in the unit before moving the beer dispenser into a kitchen cabinet Some of our beer dispenser models come with a stainless steel top.If your beer dispenser hasa stainless steel cover on the top of the beer dispenser,the unit can’t befittedinto a kitchen cabinet with internal height less than35.5 inches.Remove thestainlesssteel top off the beer dispenser before installing the beer dispenser into the kitchen cabinet ifthe internal height of your kitchen cabinet is less than 35.5 inches...
- Page 9 (3) Disassemble the valve support and fixed block of the unit top.
-
Page 10: Freestanding Installation
(4) Install the top door hinge FREESTANDING INSTALLATION: ① Place your appliance on a floor that is strong enough to support the beer dispenser with full load kegs. To level your fridge, adjust the front leveling legs (non caster install). ②... - Page 11 Insert the Casters into the holes on the bottom corners of the cabinet. Tighten each Caster. Once all four Casters have been tightened, stand the cabinet in its upright position.
- Page 12 Installing guard rail&door handle ③ Place the guard rail on top of the beer dispenser and align holes with the holes on the top of beer dispenser. Secure guard rail to the beer dispenser by placing inside corresponding holes, tighten with screwdriver.
- Page 13 Installing the beer tower and drip tray ④ 1) Position large rubber gasket on top of cabinet, aligning all four holes in the gasket with the four holes on the cabinet. 2) Unravel the beer line (hose) from the tower.Feed the beer tubing and hex nut through the gasket and into the cabinet 3) Attach the beertower onto the gasket.Align the holes on tower base with the holes on the gasket/cabinet.Using the screws M5X12 (4 pcs) provided,secure the tower onto the beer...
- Page 14 Installing the co2 line and beer hose to the keg coupler ⑤ 1) Attach the open end of the (red) air line hose the tothe hose barb connection on the keg coupler. 2) Secure the co2 line (red) by using the provided adjustable clamp 3) Screw the beer line nut and washer onto the keg coupler andtighten with adjustable wrench.
- Page 15 (washer is securednext to the regulator nut). Some regulators have the washer built-in. If so, please disregard. • Insert plastic washer into regulator nut and screwregulator nut onto CO2 cylinder valve. • Tighten using an adjustable wrench. INSTALL CO2 AIR LINE HOSE TO REGULATOR •...
- Page 16 the CO2 tank on the right corner of the unit. Lock the metal button from other end of the CO2 tanks bank to the hook. Check if the CO2 tank is secured. KEG TAPPING...
-
Page 17: Keg Capacity
Keg Capacity... -
Page 18: How To Operate
This beer dispenser can hold either of the following types of kegs One half barrel keg; One 1/4 barrel short keg; Two 1/4 barrel slim kegs; Three 1/6 barrel kegs; Three homebrew corny kegs; One Rubber sided 1/2 barrel keg (used by Miller Brewing Company) ;... -
Page 19: Helpful Tips
(3)Auto defrost function The BEER DISPENSER refrigeration system is equipped with an automatic defrost. During the process of defrosting, the compressor will stop working and the interior fan will run continuously. The temperature inside will rise by around 5℉. The beer dispenser is running normally. When setting temperaturelower(e.g. setting temperature at 32 ℉... - Page 20 How to Pour the Perfect Glass of Beer ...
-
Page 21: Cleaning &Maintenance
CLEANING & MAINTAINANCE Beer lines have to periodically be cleaned because of a crystallized build up which forms on the fittings, lines and taps commonly referred to as “beer stone”. If the beer stone is not completely removed in a cleaning process it will leave an unsanitary surface that can harbor microorganisms which will cause an undesirable flavor and/or cause the beer to go flat. -
Page 22: Technical Specifications
TECHNICAL SPECIFICATION Model No. BM-1600 23.85”x24.9”x35.43”( with the stainless steel top) Dimension Product (WxDxH) 23.85”x24.86”x34.375”(without the stainless steel top) Net Volume Total (L/cu ft) 160L/5.7cu ft Product Weight Max(kg/lbs) 53kgs/117 lbs Energy Class /DOE Ambient temperature (℃) 0-38℃/32℉-100℉ Temperature Range -2-10℃/28.4℉-50℉...
Need help?
Do you have a question about the BM-1600 and is the answer not in the manual?
Questions and answers