
Summary of Contents for AQUASCAN INTERNATIONAL KE Series
- Page 1 AquaScan Manual, Rev. 1.6 KE/CSE-series AquaScan User’s Guide: 4.03 Model: KE-series AquaScan General Directions, version: 1.6 Model: CSE-series © ® Copyright AquaScan 2010 Page 1 of 20...
-
Page 2: Table Of Contents
CONTENTS: PAGE: Introduction: ............................3 AquaScan User’s Guide ........................4 Starting the count: ..........................5 Counting pause: ..........................5 More data display ..........................6 Error messages: ..........................7 Get more information about the counting process: ................8 Top level menu: ..........................8 Clock menu .......................... -
Page 3: Introduction
Introduction: Thank you for choosing AquaScan Fishcounters. We are certain that you will be satisfied with our product. If you have any comments or suggestions, be sure to share them with us. This manual consists of two main sections: AquaScan User´s Guide For the everyday use and operation of your AquaScan system. -
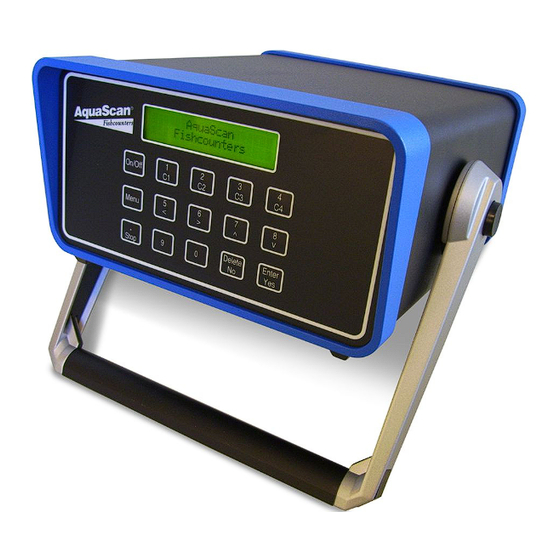
Page 4: Aquascan User's Guide
AquaScan User’s Guide version: 4.00 Model: KE-series The Registration Unit(s) is first connected to the Control Unit. The system is then turned on by pressing the On/Off button. Note! It is important that the connections are carried out in this order. AquaScan Fishcounters After approx. -
Page 5: Starting The Count
Starting the count: When the questions for all channels are answered the display will show: Press N and the counter starts counting, see next section. ALARM Y/N Press Y if you wish the system to give an alarm (siren) when a given number of fish have passed. -
Page 6: More Data Display
More data display While counting the operator may view more data at the same time by pressing > (6/>).. In order to go back to normal view press < (5/<). In order to select from possible data combinations use ^ (7/^) or v (v/8). Three or four data will be displayed at the same time. -
Page 7: Error Messages
Error messages: x may be 1,2,3 or 4. The counting is stopped for this channel. Clean all RUB WINDOW Cx surfaces between the light- source and sensor in the referred Registration Unit. Then press the corresponding Cx key. x may be 1,2,3 or 4. This is a warning, the counting is not stopped. Make SUNLIGHT Cx sure that the view of the lenses are not exposed to sunlight. -
Page 8: Get More Information About The Counting Process
Get more information about the counting process: It is possible to get more information about the counting. The counter will remember the 15 latest counting operations. The Registration Unit(s) does not need to be connected in order to access the information. - Page 9 An example: C1 displays 1778gram, while correct weight is 2,12kg C2 displays 2033gram, while correct weight is 1,49kg If weight factor for both channels was set to 1000, the equation for the new weight factor is: Weight factor = (Correct weight in gram) * 1000 / (displayed weight in gram) For C1: Weight factor = 2120 * 1000 / 1778 = 1192 For C2: Weight factor = 1490 * 1000 / 2033 = 733 If previous weight factor for C1 was set to 1100 and for C2 to 1050 the equation is:...
-
Page 10: Results Menu
Results menu Results menu, menu page 1: 1 selects menu for transfer of counting result to PC. 1:Res>PC 2:Res>DISP 2 selects menu for display of counting result at Control Unit. 05-10-06 09:49:01 < selects previous count result, > selects next count result. The second display line shows the start time for the selected counting result. - Page 11 Display counting result, Calibration Weight screen: Calib. Weight:25g C1 05-10-06 09:49:01 AquaScan weight estimate (average in grams) after calibration for displayed channel. Display counting result, Average weight screen: Avg. Weight:24g C1 05-10-06 09:49:01 AquaScan weight estimate (average in grams) after counting for displayed channel. (This weight estimate is not yet optimized for smolt and different fish species) Display counting result, Total weight screen: Total:4kg 100%...
-
Page 12: Results Menu, Menu
Display counting result, Status screen: Status:OK C1 05-10-06 09:49:01 Status for displayed channel can be one of: Calibration was not performed when the counting was stopped. Calibration was performed when the counting was stopped. Cerr Calibration failed. Display counting result, Stop time screen: Stoptime:09:55:58 05-10-06 09:49:01 Time when counting was stopped. -
Page 13: Aquascan General Directions
AquaScan General directions version: 1.6 Model: CSE-series Electrical connection/disconnection Avoid water at the contact pins of the connectors whenever the Registration Units are connected to the Control Unit, and when powering the system. Connect the Registration Units to the Control Unit before you apply the correct grounded power source. - Page 14 Arrangement: The Registration Unit must be installed ° in a 90 vertical position. ° The whole assembly (Registration Unit and pipes) should be tilted forward to a suitable angle (min. 25 degrees) to assure steady flow (approx. 2,5-3 meter/second) through the counter. (The Control Unit can view the average speed of the fish in the Result Menu when the counting is stopped).
-
Page 15: Maintenance/Checklist
Maintenance/Checklist: To achieve the best counting result, be content with the maintenance of the counter. The units should always be cleaned after use. Follow also this checklist before every use of the counter: Use a moist cloth to clean the transparent pipe in the counter. Open the inspection-hatch and check that everything is clean: window in front of lenses, transparent pipe and the light source. -
Page 16: Memory
Memory: Although the power is removed, the counter will memorize the last calculated number and average size for each channel. This is saved until you perform a new counting operation on the particular channel. (Example: The power accidentally disappears when you are performing a counting operation. When the power is applied again you can continue the counting process from where it left;... -
Page 17: Changing Parameters
Changing parameters: The Control Unit uses several software parameters to control the counting. Depending on your specific installation an operation of the system, some of these parameters may need to be adjusted by the operator. When the Control Unit asks for Weight for the first connected Registration Unit, it will accept special commands. -
Page 18: Standard Parameter Settings
Standard parameter settings: Parameter setting #1: (Delete < > 3) AUT 1 LOG 0 (PC-connection: LOG=9) ALD 10 (CSE1600: ALD=5) VEL 30 DLL 50 DLH 50 CON 0 Constantly changing WLL 30 WLH 30 Parameter setting #2: (Delete < > 4 NMS 125 NOL 70 MAT 512... - Page 19 Page 19 of 20...
- Page 20 Page 20 of 20...
Need help?
Do you have a question about the KE Series and is the answer not in the manual?
Questions and answers