Table of Contents
Advertisement
Quick Links
Advertisement
Table of Contents

Summary of Contents for Electronic & Electrical Solutions Magic Breed Plus
- Page 1 User Manual...
- Page 2 Revision date: 1/8/2019 Electronic & Electrical Solutions Pty Ltd 3/9 Rawlins Circuit Kunda Park QLD 4556 Australia Phone: +61 07 5453 4355 email: admin@eesolutions.net.au www.eesolutions.net.au © Copyright 2019 Electronic & Electrical Solutions...
-
Page 3: Table Of Contents
Magic Breed Plus User Manual 1. Contents Contents ................... 1 Introduction ................2 Legal Information ..............3 Principle of Operation ............5 Getting Started ................ 6 Setting Up ................. 8 Fitting to the Mare ..............12 User Interface ................ 16 Transmitter Pairing ............... -
Page 4: Introduction
Magic Breed Plus now incorporates many electronic advancements from during that time. To ensure that you have the best possible experience with your Magic Breed Plus system, please ensure that you read through this manual and understand the operation before use. -
Page 5: Legal Information
Magic Breed Plus User Manual 3. Legal Information 3.1. Liability Statement Magic Breed Plus is intended to aid in the foaling process but there are limitations to the technology which mean that it cannot be 100% accurate. While we have every expectation that the Magic Breed Plus will work well and be very helpful in the majority of situations, Electronic &... - Page 6 An LIPD device can be operated by any person without requiring a radiocommunications licence, which is important for equipment like the Magic Breed Plus which is intended for operation by unlicensed people. If you require more information regarding EMC and...
-
Page 7: Principle Of Operation
4. Principle of Operation Typically, in the late term of pregnancy, a mare will avoid lying flat on its side until it enters labour. The Magic Breed Plus system uses this well documented behaviour. A transmitter containing a special sensor called an accelerometer is attached to the mare’s halter. -
Page 8: Getting Started
Magic Breed Plus User Manual 5. Getting Started The Magic Breed Plus system is comprised of two main components: the receiver (base station) and transmitter. The transmitter is attached to the mare and sends wireless signals to the base station for reporting when it has detected that the mare is foaling. - Page 9 Magic Breed Plus User Manual 5.2. Transmitter Magic Breed Plus transmitters are battery powered and contain an accelerometer which enables it to sense the orientation of the mare’s head. Detecting when the mare is laying on its side with its head on the ground is how the...
-
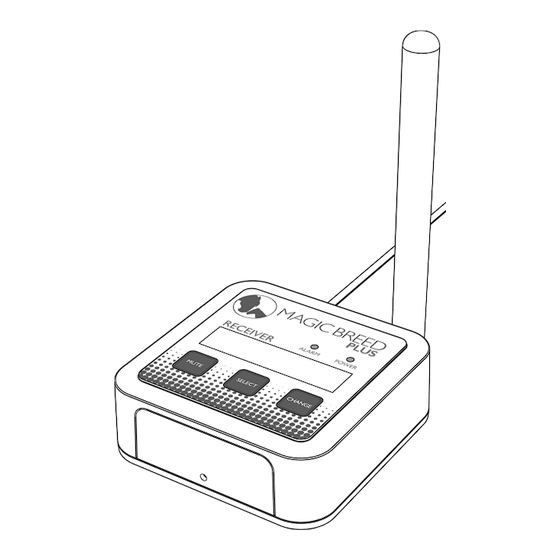
Page 10: Setting Up
Magic Breed Plus User Manual 6. Setting Up 6.1. Receiver Connections The receiver is powered by USB, either using the supplied USB plug pack or an alternative USB power source. The receiver also needs to have the supplied antenna connected to the screw in connector on the rear. - Page 11 Magic Breed Plus User Manual The antenna screw connection should only be tightened to finger tight (do not use a tool to tighten it further). The antenna and power connections can be damaged if treated roughly or dropped. Please take care with them and place the receiver in a safe location.
- Page 12 Magic Breed Plus User Manual 6.2. Transmitter Batteries Transmitters are powered by a pair or AAA 1.5V alkaline batteries. Depending on the mare’s level of activity the batteries in a transmitter can easily last an entire season. To insert or remove the batteries, the transmitter battery door must be opened by first removing the battery door screw using a PH1 philips head screwdriver.
- Page 13 Magic Breed Plus User Manual 1. Remove battery door 2. Remove battery door screw 4. Once batteries are 3. Insert batteries installed replace battery door and screw...
-
Page 14: Fitting To The Mare
Magic Breed Plus User Manual 7. Fitting to the Mare The transmitter is secured in place under the mare’s chin using a halter fitted with a transmitter pouch. - Page 15 Magic Breed Plus User Manual The pouch is fitted to the halter using the four Velcro straps: If concerned about the Velcro fasteners coming loose an optional alternative would be to use cable ties to fasten the pouch to the halter.
- Page 16 Magic Breed Plus User Manual Insert the transmitter into the pouch in the orientation indicated in the following diagram: Note that the transmitter must be inserted into the pouch in the correct orientation or it WILL NOT WORK. Refer to the instructions on the transmitter front label for guidance in the field.
- Page 17 Magic Breed Plus User Manual Then pull the flap over and down, sealing the Velcro so that the transmitter is held tightly. It’s important that the transmitter is not able to move around inside the pouch.
-
Page 18: User Interface
Magic Breed Plus User Manual 8. User Interface The Magic Breed Plus receiver features an LCD screen and three buttons to aid in configuration and user information. Operation is simple: Switch between the various menu and status screens. Change a setting on the current screen. -
Page 19: Transmitter Pairing
Magic Breed Plus User Manual 9. Transmitter Pairing Before a transmitter can be used it first must be paired with the receiver. Each transmitter has a unique code that it uses to identify itself and the pairing process is used to teach the receiver this code without the user having to enter it. - Page 20 Magic Breed Plus User Manual 4. The receiver should then beep to indicate that it has paired the new transmitter, and will display the number that has been assigned to that transmitter: It is recommended that this number is marked on the...
- Page 21 Magic Breed Plus User Manual 1. Press SELECT until the corresponding transmitter information page is displayed: 2. Press and hold the CHANGE button for 5 seconds. The following will be displayed: 3. When the unpairing is complete, the buzzer will beep...
-
Page 22: Operation
Magic Breed Plus User Manual 10. Operation 10.1. Transmitter Communication While a transmitter has batteries inserted it sends periodic messages to the receiver every 10 minutes. These “status” messages inform the receiver that the transmitter is operational and provide information such as signal strength and battery power level. - Page 23 Magic Breed Plus User Manual 10.3. Transmitter Information For each paired transmitter a screen is available showing its current status. Pressing the SELECT button will cycle through these. The content of the screen is shown as follows: The two icons on the right hand side of the screen indicate the...
- Page 24 Magic Breed Plus User Manual If more than one transmitter is detecting an alarm then the additional transmitters will be listed: If the mare returns to an upright position for 20 seconds then the alarm will automatically cancel. 10.5. Mute Any time an alarm is sounding the MUTE button on the receiver can be pressed.
- Page 25 Magic Breed Plus User Manual As with the foaling alarm, this screen will provide a list of the transmitters that are currently offline. 10.7. Empty Battery Alarm The transmitter is able to measure its battery level and sends this information to the receiver. If the battery level is being measured as critically low and the transmitter goes offline then a “Battery Empty”...
- Page 26 Magic Breed Plus User Manual Instead of requiring battery removal, it’s possible to put the transmitter into power saving mode by placing it on its back so that the label is facing up. This must be on a flat and level...
-
Page 27: Range And Testing
Magic Breed Plus User Manual 11. Range and Testing The range of RF devices such as the Magic Breed Plus system is highly dependent on many factors but most specifically on the path between the transmitter and receiver. Magic Breed... -
Page 28: Settings
Magic Breed Plus User Manual 12. Settings The menu has two option settings available, which can be selected by pressing SELECT until the desired setting is displayed. 12.1. Mute Period The mute period specifies how long the receiver will ignore an alarm for a specific receiver for after the mute button is pressed. -
Page 29: After Use
Magic Breed Plus User Manual 13. After Use New Magic Breed Plus systems should be stored in a clean, dry environment between seasons or when not in use. IMPORTANT: make sure the batteries are removed from all receiver units prior to storage. -
Page 30: Specifications
Magic Breed Plus User Manual 14. Specifications Operating frequency: 917MHz Signal modulation: Chirp spread-spectrum Transmitter Size: 110 x 58 x 19mm Weight (excluding batteries): Power: 2x AAA 1.5V Alkaline batteries IP rating: IP54 EIRP output power: 50mW Receiver Size: 110 x 110 x 37mm... -
Page 31: Warranty
2. The warranty period for Magic Breed Plus components is 24 months from the date of purchase. 3. The warranty does not apply where damage is caused... - Page 32 Magic Breed Plus User Manual 4. Any repair work carried out will receive a further 12 month warranty. A fresh warranty does not apply to any parts not repaired. 15.2. Warranty Claim Procedure 1. You must inform Electronic & Electrical Solutions as soon as the failure becomes apparent.
Need help?
Do you have a question about the Magic Breed Plus and is the answer not in the manual?
Questions and answers