Advertisement
Quick Links
Intellian MIM Serial Number
This serial number will be required for
all troubleshooting or service calls
made regarding this product.
Notice
All Right Reserved
®
®
Intellian MIM
and Intellian
are the registered trademarks of Intellian
Technologies, Inc., and should not be appropriated without permission by
Intellian Technologies, Inc., and the information contained in this manual is the
property of Intellian Technologies, Inc. Any and all parts of this manual shall not
be reproduced and distributed in any form without prior written consent by
Intellian Technologies, Inc. The information contained in this manual shall be
subject to change at any time without notice due to the functional upgrades of the
product.
Copyright© Intellian Technologies, Inc
.
Doc. No. DISH MIM V.1.21
Advertisement

Summary of Contents for Intellian MIM Series
- Page 1 Technologies, Inc., and should not be appropriated without permission by Intellian Technologies, Inc., and the information contained in this manual is the property of Intellian Technologies, Inc. Any and all parts of this manual shall not be reproduced and distributed in any form without prior written consent by Intellian Technologies, Inc.
-
Page 2: Table Of Contents
CONTENTS INTRODUCTION ................1 INSTALL THE MIM ................. 2 CONNECT THE CABLES TO THE MIM ........4 SET THE DIP SWITCHES FOR CONNECTED MIMS ....9 SELECT THE MASTER CONTROL FUNCTION......10 SETUP THE ANTENNA CONTROL UNIT ........11 SETUP THE RECEIVER AND RUN “CHECK SWITCH”... -
Page 3: Introduction
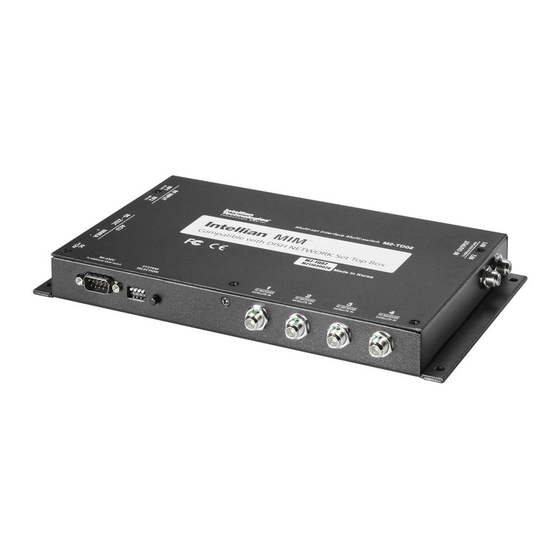
Intellian recommends using a Dish Network model ViP211 HDTV receiver for automatic satellite switching. The MIM module has four receiver connector ports. Intellian’s MIM allows you to select which receiver connected to the MIM will be the “Master” receiver. The “Master” receiver will control which satellite the antenna is focused on. -
Page 4: Install The Mim
Install the MIM You will need to wire the Intellian i-series system differently than specified in i-Series manual. These instructions require additional installation steps. The following instructions and configuration diagram will explain how to modify your system for MIM use. - Page 5 Power Requirements 350cm(137.8”) AC-DC Adaptor For your own safety, make sure to disconnect power from all wired components (i.e., antenna, antennal control unit and satellite receiver) before performing this procedure.
-
Page 6: Connect The Cables To The Mim
(3) Connect the RF cable from the RF2 connector on the antenna to the “RF2 INPUT” connector on the MIM. (4) For Intellian i2, connect a pair of wires from the NMEA connector on the rear panel of ACU to the “NMEA” connector on the MIM. The pair of wires for communication are connected straight through, + to +, - to -, as indicated in the drawing. - Page 7 Antenna Unit Antenna Unit Antenna Baseplate Antenna Control Unit RS232 Cable RS232 DishNetwork Receiver #1 DIP Switch setting for i3/i4/i6 ACU Antenna Unit Antenna Unit NMEA Cable Antenna Baseplate NMEA Cable RS232 Antenna Control Unit for i2 DishNetwork Receiver #1 DIP Switch setting for i2 ACU...
- Page 8 (3) Connect the RF cable from the RF2 connector on the antenna to the “RF2 INPUT” connector on the MIM. (4) For Intellian i2, connect a pair of wires from the NMEA connector on the rear panel of ACU to the “NMEA” connector on the MIM.
- Page 9 Dual Tuner Receiver Installation Instructions (1) Connect the RF cable from any “TO RECEIVER SATELLITE IN” on the rear of MIM to the ‘Satellite 1 on the rear panel of the receiver. Connect the RF cable from any “TO RECEIVER SATELLITE IN” on the rear of MIM to the ‘Satellite 2 on the rear panel of the receiver.
- Page 10 (4) Connect the RF cable from the RF2 connector on the antenna to the “RF2 INPUT” connector on the first MIM. (5) For Intellian i2, connect a pair of wires from the NMEA connector on the rear panel of ACU to the “NMEA” connector on the first MIM.
-
Page 11: Set The Dip Switches For Connected Mims
DOWN position. All additional MIMs must have the DIP switches set to the UP position, for multi-connection. All other Intellian i-series connect with the RS-232C cable from the PC interface connector on the rear panel of ACU to the “RS-232C” connector on... -
Page 12: Select The Master Control Function
Select the Master Control Function for Connected Receivers Intellian’s MIM allows you to select which receiver connected to the MIM will be the “Master” receiver by pressing the “Select” button on the front panel of the MIM. (1) When you have a receiver connected to “TO RECEIVER SATELLITE IN”... -
Page 13: Setup The Antenna Control Unit
Setup the Antenna Control Unit In order to configure the correct set of satellites for MIM use, follow the instructions below on the ACU. ACU setup should be Triple Sat as follows: Set as Satellite Sat A DISH110 Sat B DISH119 Sat C DISH129 /DISH 61.5... - Page 14 Press SELECT to set chosen satellite to SAT A. Press NEXT to show next satellite name. 5. Set satellite B SAT B : DISH 119 Press PREV to show previous satellite name. PREV SELECT NEXT Press SELECT to set chosen satellite to SAT B. Press NEXT to show next satellite name.
-
Page 15: Setup The Receiver And Run "Check Switch
ACU indicates “Tracking” from the target satellite, turn on the satellite receiver. You will initially see this message on the TV screen as below. In order to load the information from the Intellian MIM into the receiver, you will need to complete the “Check switch” Test following the steps below. - Page 16 (2) Select “Check Switch” button and select “Test”. Be sure that “SuperDISH” and “Alternate” are NOT checked. (3) Wait until the message “Currently doing test #3 of 3” appears. This indicates the test is completely done. If the message is different, check your connections again.
- Page 17 (4) After the test is finished, you will see the message with “OK” for all three satellites Dish 110, 119 and 129 (or 61). With dual tuner receivers, you will see the same results for “Satellite Input 2”. Select the “Done” button to go to the Point Dish/Signal screen.
- Page 18 When AC power has been removed from the Dish Network receiver, there is a 5 to 10 minute initialization period when power is restored. This is an unavoidable requirement of the Dish Network receiver, not a function of the Intellian antenna system.
- Page 19 Phone: +82-31-436-1488 Fax: +82-31-436-1489 R&D Center SK Ventium 104-601, 522 Dangjeong-Dong, Gunpo-Si, Kyunggi-Do 435-776, Korea Phone: +82-31-436-2280 Fax: +82-31-436-2284 Intellian Technologies USA, Inc. 9261 Irvine Blvd. Irvine, CA 92618 USA Phone: +1-949-916-4411 Fax: +1-949-271-4183 E-Mail : customersupport@Intelliantech.com Homepage : http://www.Intelliantech.com...
Need help?
Do you have a question about the MIM Series and is the answer not in the manual?
Questions and answers