Table of Contents
Advertisement
Advertisement
Table of Contents

Subscribe to Our Youtube Channel
Summary of Contents for bibox Firepen 3D
- Page 1 USER MANUAL Evobi Automations Pvt Ltd www.firepen3d.bibox.in...
-
Page 2: Table Of Contents
TABLE OF CONTENTS A. SETTING UP YOUR Firepen 3D PRINTER 1. Attaching Power Supply and Powering On B.Firepen 3D printer AT A GLANCE 1. 3D printer Diagram 2. Specifications 3. Touch Screen panel C.FIRST USE 1. Installing Spool Holder and Mounting the Filament Spool 2. -
Page 3: Setting Up Your Firepen 3D Printer
1.Attaching Power Supply and Powering On Its very important to see to that, the Power socket that the Firepen 3D printer connects to, can source atleast upto 15A current and 220V AC supply. Also, see to that, this power socket isn’t sharing with other electrical appliances. -
Page 4: B.firepen 3D Printer At A Glance
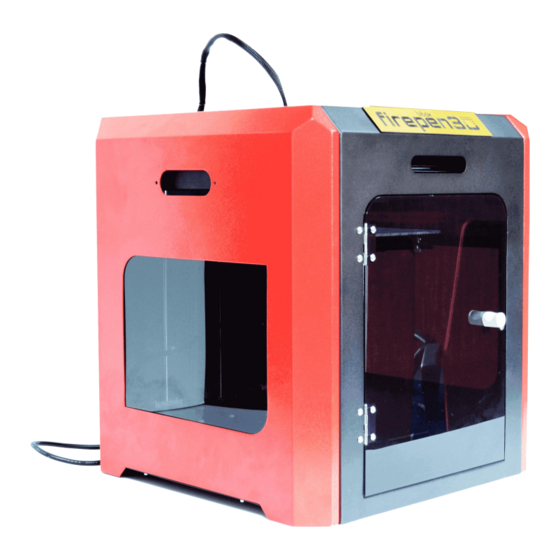
B.Firepen 3D printer AT A GLANCE 1. 3D printer Diagram Build plate screws Gantry rod Build plate Build platform Touch Screen Threaded rod Drive bearing Y axis motor X axis motor Extruder Evobi Automations Pvt Ltd www.firepen3d.bibox.in... - Page 5 Feed tube Filament Out Detector Spool holder Power input SD card slot USB port Power switch Evobi Automations Pvt Ltd www.firepen3d.bibox.in...
-
Page 6: Specifications
2. Specifications Machine model Firepen 3D P220 printer Machine Color Black & Red Display Full color Touch screen Language English Print Technology Fused Filament Fabrication (FDM/FFF) Layer resolution 0.05-0.4mm Nozzle diameter 0.4mm Nozzle quantity Positioning Precision Z: 2.5 microns X Y: 11 microns... -
Page 7: Touch Screen Panel
Tips: Go to Appendix for Display and Controller C.FIRST USE 1. Installing Spool Holder and Mounting the Filament Spool:- Take out the spool holder from the accessory box, Attach the spool holder at the back side of the machine. Evobi Automations Pvt Ltd www.firepen3d.bibox.in... -
Page 8: Preheating The Extruder
You will see plastic start to emerge from the extruder nozzle. Release the extruder arm. Feeding pipe Filament out device knob Feed port Feed port 4. Leveling the Build Platform Extruder button /arm Evobi Automations Pvt Ltd www.firepen3d.bibox.in... - Page 9 0.1-0.2mm) ○ click<Home>——<Home> ○ click<Set>——<Motor off> Evobi Automations Pvt Ltd www.firepen3d.bibox.in...
-
Page 10: D.making An Object With 3D Printer
D.MAKING AN OBJECT WITH 3D printer 1.Making a Test Object from the SD Card The Firepen 3D printer package includes an SD card pre-loaded with a file for making a test object. The SD Card is located in the accessory box. Insert the SD card into the SD card slot. -
Page 11: Appendix
Insert the SD card reader with SD card on your computer, copy the Cura installer to your computer. Open the installer and run the installation wizard to complete the installation. Select Next and tick all the options. Evobi Automations Pvt Ltd www.firepen3d.bibox.in... - Page 12 Install > Next > Finish Select your language > English > Next Select your machine > Other > Next Evobi Automations Pvt Ltd www.firepen3d.bibox.in...
- Page 13 Other machine information > Custom > Next ET-K1 Finish the blank with the specs of your 3D printer in Custom RepRap information > Finish Evobi Automations Pvt Ltd www.firepen3d.bibox.in...
-
Page 14: Software Settings
2. Software Settings Evobi Automations Pvt Ltd www.firepen3d.bibox.in... -
Page 15: Tutorial Of Parameter Setting
,and the specific difference reference software is introduced. 11.filament diameter defaults to 1.75mm 12. flow default 100%, if diameter less than 1.75mm and lead to print model surface filling unevenly, can increase this value appropriately, but seldom happened. Evobi Automations Pvt Ltd www.firepen3d.bibox.in... -
Page 16: Software Operation
Choose your desired settings and wait for Cura to save the file slice the model. When Cura has converted the file you can save the print file (G code) via the “Save” button. Save the file to the SD card. Evobi Automations Pvt Ltd www.firepen3d.bibox.in... -
Page 17: Display And Controller(二
2. 1mm Choose the length of click<Page Up>,<Page Down>to 4. <Z> Z axis moves up extruded search the file you need filament 1/5/10mm 3. Slow Choose the speed of load or unload filament. File Sys Evobi Automations Pvt Ltd www.firepen3d.bibox.in... - Page 18 Any further Questions / support related queries Contact:- Email:- support@bibox.in sales@bibox.in Mobile:- +917760676606 / +919008333233 Tel:- +91-80-25743579 Evobi Automations Pvt Ltd Floor, Pixel Park ‘A’, PESIT South Campus, Electronics City, Hosur Road, Bangalore - 560100 www.firepen3d.bibox.in www.bibox.in Evobi Automations Pvt Ltd...
Need help?
Do you have a question about the Firepen 3D and is the answer not in the manual?
Questions and answers