Table of Contents
Advertisement
WARNING
Improper installation, adjustment, alteration, service or
maintenance can cause property damage, personal injury
or loss of life. Installation and service must be performed
by a licensed professional installer (or equivalent), service
agency or the gas supplier.
CAUTION
As with any mechanical equipment, personal injury can
result from contact with sharp sheet metal edges. Be
careful when you handle this equipment.
Table Of Contents
UH(RS,CM)-030/105 Compact Unit Dimensions............ .. 2
Compact Unit Parts Arrangement................................... 3
UH(RS,CM)-125/200 Standard Unit Dimensions ........... . . 4
UH(RS,CM)-250/400 Standard Unit Dimensions ........... 5
Standard Unit Parts Arrangement.................................... 6
Shipping...........................................................................7
Optional Accessory.........................................................7
Requirements in USA ......................................................7
Requirements in Canada................................................ 7
Additional Requirements ................................................ 8
Unit Heater Installation ................................................... 8
Combustion and Ventilation Air....................................... 8
Rotation of Combustion Air Inducer - 125/150.................9
Venting.............................................................................9
Electrical Connections ................................................... 14
Be sure to read and understand the
structions in this manual.
ation, service or maintenance can cause
serious injury, death or property damage.
Do not store or use gasoline or other
cinity of this or any other appliance.
formed by a qualified installer, service
agency or the gas supplier.
RETAIN THESE INSTRUCTIONS
FOR FUTURE REFERENCE
WARNING
FIRE OR EXPLOSION HAZARD.
Failure to
ly could result in serious injury, death,
or property damage.
WHAT TO DO IF YOU SMELL GAS:
Do not try to light any appliance.
Do not touch any electrical switch; do not use
any phone in your building.
Leave the building immediately.
Immediately call your gas supplier from a
neighbor's
structions.
If you cannot reach your gas supplier, call the
fire department.
Page 1
INSTALLATION
INSTRUCTIONS
UH(RS,CM)
30,000 to 400,000 Btuh Series
UNIT HEATERS
507938-01
6/2019
Gas Connection ................................................... 18
Leak Check ......................................................... 18
Unit Start-Up ........................................................ 18
To Turn Off Gas to Unit .......................................... 19
Heating Sequence of Operations ............................ 19
Ignition Control LED .............................................. 20
High Altitude Adjustments ...................................... 20
Gas Flow ............................................................. 20
Gas Pressure Adjustments..................................... 20
Limit Control Switch .............................................. 21
Louver Vane Adjustment ........................................ 21
Combustion Air Pressure Switch ............................. 21
Flame Rollout Switch ............................................ 21
Service ................................................................ 21
Start-Up and Performance Checklist........................ 22
Advertisement
Table of Contents

Subscribe to Our Youtube Channel
Related Manuals for Adp UHRS Series


Summary of Contents for Adp UHRS Series
-
Page 1: Table Of Contents
INSTALLATION WARNING INSTRUCTIONS Improper installation, adjustment, alteration, service or maintenance can cause property damage, personal injury or loss of life. Installation and service must be performed UH(RS,CM) by a licensed professional installer (or equivalent), service agency or the gas supplier. 30,000 to 400,000 Btuh Series UNIT HEATERS CAUTION... -
Page 2: Uh(Rs,Cm)-030/105 Compact Unit Dimensions
UHRS-030 / 105 DIMENSIONS - Inches (mm) HANGING MOUNTING SLOTS (Typical) BRACKETS (2) 5/16 x 3 Inches (8 x 76 mm) 8-3/4 10-1/2 (222) (267) 2-3/4 4-1/4 (70) [13] (108) (25) FLOW (533) HEAT EXCHANGER (25) ELECTRICAL TOP VIEW INLET HANGING (533) (737) -
Page 3: Compact Unit Parts Arrangement
UHRS COMPACT UNIT HEAT ER PARTS ARRANG EM ENT 030 / 105K BTUH T RANSFORMER Page 3... -
Page 4: Uh(Rs,Cm)-125/200 Standard Unit Dimensions
UHCM-125 / 200 DIMENSIONS - Inches (mm) 10-1/2 5-3/8 16 (406) (267) (137) 1/2 (13) FLUE OUTLET 3-1/8 (79) 1/2 (13) (4) 3/8-16 MOUNTING NUTS 2-1/2 (64) FOR UNIT SUSPENSION TOP VIEW ELECTRICAL INLETS 10-5/8 31-7/8 (810) (270) COMBUSTION AIR ADJUSTABLE INDUCER LOUVERS... -
Page 5: Uh(Rs,Cm)-250/400 Standard Unit Dimensions
UHCM- 250 / 400 DIMENSIONS - Inches (mm) 10-1/2 16 (406) (76) (267) 5-3/8 (137) 1/2 (13) FLUE OUTLET 3-1/8 (79) 1/2 (13) (4) 3/8-16 MOUNTING NUTS FOR UNIT SUSPENSION 2-5/8 (67) ELECTRICAL INLETS TOP VIEW 10-5/8 31-7/8 (810) COMBUSTION AIR (270) ADJUSTABLE INDUCER... -
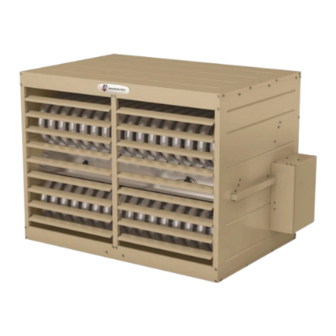
Page 6: Standard Unit Parts Arrangement
UHCM STANDARD UNIT HEATER PARTS ARRANGEMENT 125 / 400K BTUH Page 6... -
Page 7: Shipping
Shipping Requirements in Canada Shipping contents includes heater, installation instruc- These instructions are intended only as a general guide tions, warranty certificate, two mounting brackets (shipped and do not supersede local codes in any way. Authorities loose in UH(RS,CM)-30/105 units), and a flue transition having jurisdiction should be consulted before installation. -
Page 8: Additional Requirements
UHRS 30/105 TABLE 1 Unit may be installed as shown in figure 1 or rotated UNIT CLEARANCES TO COMBUSTIBLE MATERIALS 180°. Side** Bottom Back Flue 1 - Push each louver to the right to depress spring and Unit release locking tab on the other end (locking tab 030/105 keeps the louver in place for shipping). -
Page 9: Rotation Of Combustion Air Inducer - 125/150
or another appliance will operate in an inefficient manner, FLUE BOX AND COMBUSTION AIR resulting in incomplete combustion which can result in the INDUCER ASSEMBLY production of excessive carbon monoxide. 125/150 WARNING VEST PANEL Insufficient combustion air can cause headaches, nausea, dizziness or asphyxiation. - Page 10 A single-wall vent pipe used as a vent connector in resi- NOTE - If needed, loosen the upper right two or three dential or commercial applications, or as a vertical vent in screws securing the combustion air blower. Slide the tran- commercial applications, must have all seams and joints sition into place and secure loosened screws.
- Page 11 6 - The unit may be vented vertically as a single appliance level and maximum snow height. or in a common vent with other gas-fired appliances. 7 - Do not install a horizontal vent termination directly In common venting situations, vent connectors for below roof eaves or above a public walkway, or other appliances must maintain a 4”...
- Page 12 Page 12...
- Page 13 CONDENSATE DRAIN THROUGH VENT TERMINATION DOWNWARD SLOPE ON HORIZONTAL VENT−RESIDENTIAL OR COMMERCIAL APPLICATION NOTE − Minimum horizontal v ent length is 5 f t. This does not include termination tee. Ref er to table 3 f or LISTED THIMBLE MALE maximum length and THROUGH ELBOW...
-
Page 14: Electrical Connections
8 - If B-1 vent or an insulated flexible vent pipe cannot Electrical Connections be used as liners, the chimney must be rebuilt NOTE - Local codes may supersede any of the provisions to accommodate one of these methods or some outlined in this instruction. - Page 15 537992-01 I G N CTRL HIGH VOLT AGE POWER CONNECT IONS C OM GN D GRN- YEL FIELD PROVIDED FACTORY INSTALLED POWER POWER WIRING. WIRING MAKE FIELD POWER P368 11 6 CONNECTIONS IN POWER ENTRY BOX. J368 XFMR - L 1 6 12 XFMR - N GR N - YEL...
- Page 16 538025-01 I G N CTRL HI G H VO LTAG E PO WER CO NNECTI O NS C OM GN D GR N - YEL FIELD PROVIDED POWER WIRING. CONNECT TO P366 AND GREEN GROUND SCREW LOCATED INSIDE UNIT. 11 6 P368 J368 8 6 12...
- Page 17 5 3 8 0 2 4 -01 I GN CT RL HIGH VOLT AGE POWER CONNECT IONS WH T C OM GR N - YEL GN D FIELD PROVIDED POWER WIRING. CONNECT TO P366 AND GREEN GROUND SCREW LOCATED INSIDE UNIT. 11 6 P368 J368 8...
-
Page 18: Gas Connection
NOTE - In case emergency shutdown is required, shut Gas Connection down main gas valve and disconnect main power to unit. When connecting gas supply, the length of the run from These devices should be properly labeled by the installer. the meter must be considered in determining the pipe size to avoid excessive pressure drop. -
Page 19: To Turn Off Gas To Unit
OPERATION OF WHITE RODGERS 36H SERIES VALVE WHITE RODGERS 36 GAS VALVE (FIGURE 9) AND WHITE RODGERS 36G SERIES GAS Single-Stage VALVE (FIGURE 10) MANIFOLD INLET PRESSURE PRESSURE NOTE - STOP! Read the safety information at the begin- ADJUSTMENT PORT ning of this section. -
Page 20: Ignition Control Led
High Altitude Adjustments In Canada, certification for installation at altitudes over 4500 feet (1372m) above sea level is the jurisdiction of local authorities. ADP recommends derating 4%/1000 feet above 4,500 feet. Refer to table 6 for natural gas manifold pressures and the Engineering Handbook for high altitude kit part numbers. -
Page 21: Limit Control Switch
d. Reinstall burner cluster assembly, burner box 2 - After line pressure has been checked and adjusted, top, gas manifold, high tension and sensor leads. check regulator pressure. Correct manifold pressure is shown on the unit rating plate. See figures 9 and Reconnect gas supply piping. -
Page 22: Start-Up And Performance Checklist
5 - After 10 seconds, the gas valve closes and steps 4 SAFETY SHUT-OFF VALVE TEST and 5 will repeat two additional times before locking The safety shut-off valve test procedure is as follows: out the gas valve, which will be indicated by two 1 - Turn off the manual gas valve. - Page 23 ADP, at its option, will furnish a replacement heat exchanger or allow a credit (in the amount of the heat exchanger original selling price) toward the purchase of a new ADP unit heater. No extended coverage granted for UHCM series heat exchangers.
Need help?
Do you have a question about the UHRS Series and is the answer not in the manual?
Questions and answers