Advertisement
Available languages
Available languages
Advertisement
Table of Contents

Subscribe to Our Youtube Channel
Summary of Contents for grumbach ProCon Compact S 84
- Page 1 Bedienungsanleitung für Brutgeräte Manual for incubators...
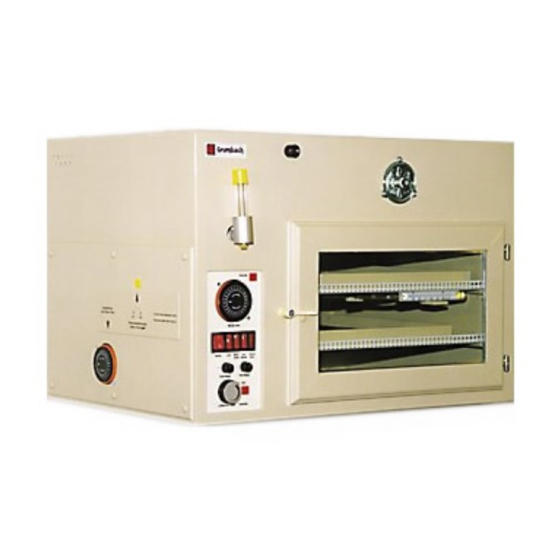
- Page 2 Steuerungselement Compact S 84 Control unit Compact S 84 Kontrolle Control Wende-Timer Reversing-Timer Betrieb Licht Motor- Luft- Thermo- Power Light Motor Humi- Thermo- wende feuchte Kontr. Revers dity Control Grob-Regler Fein-Regler Coarse Fine Temperature Luftfeuchte-Regler Kontrolle Humidity-Regulator Control Wichtig! Vor dem Reinigen des Brutgerätes unbedingt den Netzstecker ziehen. Bei Compact SA beachten Sie bitte, die Filter regelmäßig alle acht Tage zu überprüfen.
- Page 3 Aufstellung Ihres Brutgerätes Sehr geehrter Kunde! Sie haben ein GRUMBACH-Brutgerät erworben und wir wünschen Ihnen damit viel Erfolg. Bevor Sie mit der Brut beginnen, sollten Sie einige wichtige Grundbedingungen voraussetzen: Der Brutraum Die Betriebsbedingungen können an jedem Aufstellort verschieden sein. Komponenten wie Außentemperatur, äußere Luftfeuchtigkeit, Stromstärke im Netz können dazu bei-...
- Page 4 Überprüfung des Hygrometers Das Hygrometer wurde vor der Auslieferung überprüft. Es ist jedoch zu berücksichtigen, dass Erschütterungen beim Transport sowie längeres Lagern in trockenen Räumen zu geringen Abweichungen der Anzeigegenauigkeit führen können. Um das Gerät wieder instandzusetzen bzw. die Genauigkeit zu gewährleisten, legen Sie ein feuchtwarmes Wolltuch 30 Minuten lang auf die Rückseite.
- Page 5 Das Abschalten der Temperatur wird durch ein leises Klicken, sowie Erlöschen der Thermo- und Feuchtigkeitskontrolle bestätigt. Es ist erforderlich, dass nach dem Probelauf der Begrenzer auf seine Abschalttem- peratur fixiert wird. Bitte ganz behutsam drehen, denn schon eine minimale Drehung verändert die Abschalttemperatur.
- Page 6 Sollte das Gerät länger als zwei Wochen außer Betrieb sein, muss das Tankwasser erneuert werden. Der Wasserablasshahn befindet sich unter dem Einfüllstutzen. Um das Wasser restlos zu entleeren, kippen Sie das Gerät solange nach vorne, bis kein Wasser mehr aus dem Tank herausfließt. Tankklappe Die Tankklappe ist nur dann zu bedienen, wenn Sie bei gefülltem Tank die Feuchtigkeit reduzieren wollen.
- Page 7 schiebt der Rahmen nur die halbe Strecke. Die Motorwende schiebt und zieht nun die Horden wechselseitig nach rechts und links. Der Wendevorgang vollzieht sich sehr langsam, damit die Eier vor Erschütterungen gesichert sind. Den Timer können Sie nur durch Rechtsdrehung mit Ihrer Uhrzeit abgleichen und danach einstellen.
-
Page 8: Reinigung Und Desinfektion
Brutwärme Als günstigste Temperatur wird hier von Fachleuten eine Anfangswärme von 37,5 °C angegeben. Erwiesenermaßen gilt als anstrebenswerte Temperatur: Richtwert 37,8 °C bzw. 100 ° Fahrenheit. Für die drei Tage vor dem Schlupf kann die Temperatur um ca. 0,5 bis 1 °C tiefer eingestellt werden. Schlupf Hat die Brut ihren normalen Verlauf genommen, können Sie in Ruhe dem Schlupftag entgegensehen. - Page 9 Kontrollpunkte vor Einlage der Eier • Temperaturbereich, Temperaturkontrolle • Luftfeuchtigkeit, Lärmbelästigung Brutgerät • waagerechter Stand des Gerätes • Messgeräte (Thermometer und Hygrometer • Bedienungselemente (Schalter, Kontrollen, Regler) • Probelauf • Sicherheitsthermostat einreguliert • abgekochtes Wasser • störungsfreies Arbeiten Störungsbeseitigung Problem Grund Lösung Thermokontrolle blinkt...
- Page 10 Problem Grund Lösung Thermokontrolle blinkt Lüftermotor steht oder Neuen Motor einbauen nicht und Feuchtigkeits- läuft zu langsam kontrolle leuchtet nicht auf, wenn Sie das Thermo- Filter verschmutzt Filter auswechseln stat nach rechts drehen Temperatur schwankt Raumtemperatur zu hoch Brutraum ca. 20 °C Temperatur schwankt Elektronik oder Fühler Neue Platine oder...
- Page 11 Brutempfehlung Hühnerbrut Brutdauer 21 Tage Temperatur: 1. – 17. Tag 37,8 °C 18. – 21. Tag 37,0 °C (Schlupf) Feuchtigkeit: 1. – 19. Tag 55 – 60 % rel. Luftfeuchte 20. – 21. Tag 70 % rel. Luftfeuchte Wenden: 3. – 17. Tag 5-mal täglich Schieren: 4.
-
Page 12: Bedienung
Feuchte-Regler: Mikroprozessor Feucht-Regler für Sicherheitsbrüter mit LED-Anzeige im Einbaugehäuse und Feuchte-Sensor Impuls-Regelung (Wasserbehälter) Spannung: 230 Volt Frequenz: 50 … 60 Hz Schaltleistung: 500 W Bedienung: Anzeigemodus: Nach dem Einschalten des Gerätes wird die aktuelle Luftfeuchte (Istwert) 2-stellig angezeigt. Durch kurzzeitiges Drücken des Tasters (kleiner 3 Sekunden) auf der Vorderseite wechselt die Anzeige und zeigt die zu erreichende Luftfeuchte (Sollwert) an. -
Page 13: Installing Your Grumbach Incubator
Installing your Grumbach Incubator Dear Customer! For your GRUMBACH-incubator we would like to wish you every success. Before you start incubating you should read the manual. The incubating room The operating conditions can be different according to the place of setting. Compo- nents like the outside temperature, outer humidity, strength of the electric current can be relevant. - Page 14 this time the hygrometer should show a humidity of 90 to 95 %. It should now function properly. It is important to repeat this step every 6 months to ensure the accuracy of this gadget. Starting Make sure you are familiar with the incubator and its controls. After putting the plug into a 230 voltage safety socket which is according to the regulations, your incubator is operational.
- Page 15 Humidity The room where the incubator is set up has an important effect on the humidity. In areas that are humid, like basements, less water will be needed to keep proper humidity in the machine. After the hygrometer has been checked it can be hung up directly behind the pane of glass or put on the floor so it is readable.
-
Page 16: Turning Of Eggs
Turning of eggs There are trays situated in every incubator to hold the eggs. The ground of these trays is made of covered punch metal. The eggs have to be laid on the rollers so that the pointed sides are opposite the blunt sides; this prevents a rolling away of the eggs into one direction. - Page 17 fall. There is no need to worry- because the incubator was open a lot of warmth has escaped and the temperature of the eggs is much lower. It would be wrong to turn up the heating as the eggs first have to adopt the breeding temperature. After a few hours the thermometer will show the correct temperature.
-
Page 18: Troubleshooting
Cleansing and disinfection After the completed hatch, the incubator should be cleaned with a damp cloth. The drawers can be scoured with soapy water and the trays of Compact and closet incu- bators you can just clean with water. After that, the incubator should be heated and disinfected. - Page 19 Problem Cause Resolve Thermostat blinking Security thermostat Security thermostat has not turns off been turned far enough right-hand Temperature drops Dirty filter Clean or change filter Temperature drops Heating stops Check security thermo- meter and cool down timer Thermo control is not Fan motor stopped Replace fan motor blinking and humidity...
- Page 20 Recommendations Fowls breeding Duration of breeding: 21 days Temperature: 1. – 17. day 37,8 °C 18. – 21. day 37,0 °C (hatch) Humidity: 1. – 19. day 55 – 60 % relative humidity 20. – 21. day 70 % relative humidity Turning: 3.
-
Page 21: Operation
Moisture control unit: Microprocessor moisture control unit for safety breeder with LED display in rack enclosure casing and humidity sensor Impulse control (water tank) Voltage: 230 Volt Frequency: 50 … 60 Hz Rupturing capacity: 500 W Operation: Display mode: After the device has been switched on, the current air humidity (actual level) is displayed in 2 digits. When the button on the front panel is pushed briefly (<... - Page 22 – 22 –...
- Page 23 BSS Brutgerät · BSS Incubator 1 Filter für Kükenstaub Filter 2 Isolierglastür, aushängbar Isolation door, removable 3 Eihorde mit Rollenwender Egg trays with rollers 4 Steuerungselement Control panel 5 Auskühltimer Cool down timer 6 Sicherheitsthermostat Security thermostat 7 Wassereinfüll-/Ablass-Stutzen Water fill in/Water drain plug 8 Tankklappe Tank flap 9 Frischluftregulierung Fresh air –...
- Page 24 ProCon automatic systems GmbH & Co. KG Bettwiesenweg 18 · D-35325 Mücke Telefon +49 (0) 64 00/9 56 91-15 · Telefax +49 +49 (0) 64 00/9 56 91-16 E-Mail: info@grumbach-brutgeraete.de Internet: www.grumbach-brutgeraete.de...
Need help?
Do you have a question about the ProCon Compact S 84 and is the answer not in the manual?
Questions and answers
Can you kindly advise what in line UPS is compatible with the S84 incubator load characteristics. Many thanks