Table of Contents
Advertisement
Quick Links
QA-860 Digital Music Transport User's Guide
Overview ··············································································································· 3
1.1.
Storage Medium ····································································································· 3
1.2.
Audio Format ·········································································································· 3
1.3.
Functional Interface ······························································································· 4
1.4.
1.4.1. Front Panel ········································································································· 4
1.4.2. Rear Panel ··········································································································· 5
1.4.3. Right Panel ········································································································· 6
1.4.4. Display Screen ···································································································· 6
1.4.5. Remote Control ··································································································· 7
Starting Up ·············································································································· 8
2.1.
Mute ························································································································ 8
2.2.
Back ························································································································ 8
2.3.
Play/Pause/Enter ······································································································ 8
2.4.
FB/FF ······················································································································ 8
2.5.
Replay ····················································································································· 8
2.6.
Rewind ···················································································································· 8
2.7.
2.8.
Page Up/Down········································································································· 8
Previous/Next Folder ······························································································· 8
2.9.
2.10. Choose Track ········································································································· 9
2.11. Seek Track ··············································································································· 9
2.12. Seek Folder ·············································································································· 9
2.13. Delete Track ············································································································ 9
2.14. Positioning Time ······································································································ 9
2.15. A-B Replay ·············································································································· 9
2.16. CUE Play Operation ································································································ 10
2.17. Favorites Play Operation ·························································································· 10
2.18. Full-screen ··············································································································· 10
Approaches Of Function Settings ············································································· 10
3.1.
Play Mode ··············································································································· 11
3.2.
Play Range ·············································································································· 11
3.3.
Memory Play/Auto Play ··························································································· 11
3.4.
Language ················································································································· 11
3.5.
Process Indicator ······································································································ 11
3.6.
Cursor Color ············································································································ 12
3.7.
Main Color ·············································································································· 12
3.8.
Font Size ················································································································· 12
3.9.
Table of contents
1
QLS -HiFi
Advertisement
Table of Contents

Related Manuals for Qls QA-860

Summary of Contents for Qls QA-860
-
Page 1: Table Of Contents
QA-860 Digital Music Transport User’s Guide QLS -HiFi Table of contents 1. Product Introduction Overview ··············································································································· 3 1.1. Storage Medium ····································································································· 3 1.2. Audio Format ·········································································································· 3 1.3. Functional Interface ······························································································· 4 1.4. 1.4.1. Front Panel ········································································································· 4 1.4.2. Rear Panel ··········································································································· 5 1.4.3. - Page 2 QA-860 Digital Music Transport User’s Guide QLS -HiFi 3.10. Display Screen Brightness························································································ 12 3.11. Key Speed Setting ···································································································· 12 3.12. Gap Between Tracks ································································································ 12 3.13. Track Name Scroll ··································································································· 12 3.14. Full Screen Layout ··································································································· 12 3.15. Signal selection ········································································································ 12 3.16.
-
Page 3: Product Introduction
The QA860 HiFi lossless digital music player (hereinafter referred to as QA860) is a set of digital player, DAC, headphone amplifier in one cost-effective HiFi equipment . QLS-HiFi in its hot-selling products based on QA660 once again raise the level of the digital output, and spend... -
Page 4: Functional Interface
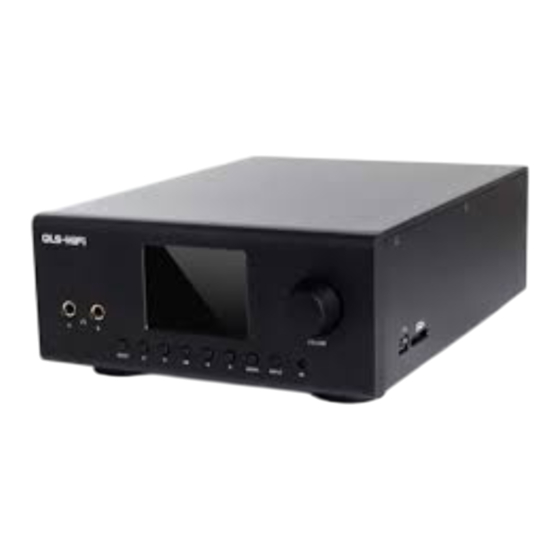
QA-860 Digital Music Transport User’s Guide QLS -HiFi 1.4. Functional Interface 1.4.1. Front Panel Interface Functional Description 6.35 output headphone jack (Direct output, for big headphones) 6.35 output headphone jack (Increased resistance output, for small headphones) Back key-switch to main/folder list/song list/CUE list/favorites list/play interface... -
Page 5: Rear Panel
QA-860 Digital Music Transport User’s Guide QLS -HiFi 1.4.2. Rear Panel Interface Functional Description Digital signal optical input port Digital signal coaxial input port Digital signal coaxial output port Digital signal optical output port Right channel balanced (XLR) output port... -
Page 6: Right Panel
QA-860 Digital Music Transport User’s Guide QLS -HiFi 1.4.3. Right panel Interface Functional Description USB device input interface (reserved function) SD card interface 1.4.4. Display Screen Note: When the MP3 playback, the sample bit is displayed as the current bit rate of the MP3 file. -
Page 7: Remote Control
QA-860 Digital Music Transport User’s Guide QLS -HiFi 1.4.5. Remote Control... -
Page 8: Play Operation
QA-860 Digital Music Transport User’s Guide QLS -HiFi 2. Play Operation 2.1. Starting Up Plug in the power cord, turn on the power supply, then you can start up. 2.2. Mute When you press the remote control to the upper left corner of the MUTE button, the player will enter silent mode and mute icon appears on the display, press it again to exit. -
Page 9: Choose Track
QA-860 Digital Music Transport User’s Guide QLS -HiFi 2.10. Choose Track You can choose what you want play track with the following methods: By pressing the "▍◀◀" or "▶▶▍" keys to choose previous or next track. Press the BACK key to return to song list, press up/down navigation keys to choose other tracks in the current folder (album);... -
Page 10: Cue Play Operation
QA-860 Digital Music Transport User’s Guide QLS -HiFi vertical bar, shown as the following picture. Note: Point A and B do not really exit on display screen, here are for explanation. 2.16. CUE Play Operation Select the cue file to enter the cue list, and choose the cue index to play.It support loop, random, play once and one cycle playing mode, but the play range is limited to the current cue list and displayed as "ALBUM"... -
Page 11: Play Mode
QA-860 Digital Music Transport User’s Guide QLS -HiFi Press the LEFT/RIGHT keys on the front panel or remote control to set the function parameter you want. After setting, Press the MENU key on front panel or remote control to save and exit the SETTING Menu interface. -
Page 12: Cursor Color
QA-860 Digital Music Transport User’s Guide QLS -HiFi 3.7. Cursor Color The cursor colors available are as follows: RED, PINK, GREEN, BLUE, YELLOW, WHITE. 3.8. Main Color The main colors available are as follows: RED, PINK, GREEN, BLUE, YELLOW, WHITE. -
Page 13: Preamp Volume
QA-860 Digital Music Transport User’s Guide QLS -HiFi 3.17. Preamp Volume Set the preamp volume, adjustable from 0 to 100. If you set 0 is mute, set 100 is the maximum volume. Note: Only open preamp function, you can adjust the preamp volume. -
Page 14: Upgrade Firmware
QA-860 Digital Music Transport User’s Guide QLS -HiFi 5. Upgrade Firmware Upgrade operation includes the upgrade of master control program, word stock, etc. Copy the upgrade documents into SD card root directory through card reader. Plug in the SD card which has upgrade documents, keep pressing the PLAY/PAUSE/ENTER key and turn on the power supply or reset the host machine, then you can enter the operation of upgrade mode. - Page 15 QA-860 Digital Music Transport User’s Guide QLS -HiFi Note:...
-
Page 16: Appendix : Product Warranty Card
QA-860 Digital Music Transport User’s Guide QLS -HiFi Appendix:Product Warranty Card When the product has problems, please fill this form, tear it down and deliver it to us along with the product. Product QA860 Digital Player Serial Number Name Purchase...
Need help?
Do you have a question about the QA-860 and is the answer not in the manual?
Questions and answers
How will I know if the remote is working or not
You can check if the QLS QA-860 remote is working by pointing it at the unit and pressing buttons while observing the LED function indicator or the remote control transmitter signal receiver window on the front panel. If the unit responds to commands, such as changing tracks or navigating menus, the remote is functioning properly.
This answer is automatically generated
How to operate
To operate the Qls QA-860:
1. Starting Up: Plug in the power cord, turn on the power supply.
2. Mute: Press the MUTE button on the remote to mute/unmute.
3. Navigation: Use the BACK key to switch between different interfaces (main, folder list, song list, cue list, favorites list, and play interface).
4. Play/Pause: Press the PLAY/PAUSE/ENTER key on the front panel or remote to start or pause playback. Select a track from the song list and press PLAY/PAUSE/ENTER to play.
5. Fast Backward/Forward: Long press the LEFT/RIGHT keys on the front panel or "◀◀/▶▶" keys on the remote.
6. Replay: Press the REPLAY key on the remote to replay the current track.
7. Favorites:
- To add a track to favorites, enter the track list or play interface in SD card playback mode, press F1 on the remote or long press PLAY/PAUSE for 1-2 seconds, then select "Yes."
- To remove a track from favorites, enter the favorites list or play interface in Favorites mode, press F1 on the remote or long press PLAY/PAUSE for 1-2 seconds, then select "Yes."
8. Signal Input Selection: Choose between internal digital music transport, external coaxial digital signal, or external optical digital signal via the SETTING menu, remote control button, or front panel INPUT button.
9. Preamp Volume Adjustment: Adjust volume through the SETTING menu or remote control keys F3/F4. (Note: Volume control does not work in DSD mode.)
10. Firmware Upgrade: Copy upgrade files to the SD card, insert the SD card, press and hold the PLAY/PAUSE/ENTER key, and turn on or reset the device.
These steps allow basic operation of the Qls QA-860.
This answer is automatically generated